Lexmark B3340 Quick Reference - Page 2
Maintain the printer
 |
View all Lexmark B3340 manuals
Add to My Manuals
Save this manual to your list of manuals |
Page 2 highlights
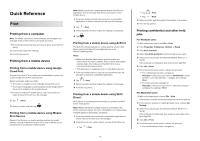
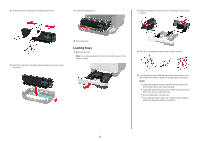
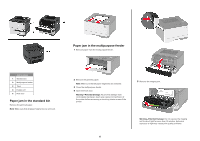
Held jobs > select your user name > Confidential > enter the PIN > select the print job > configure the settings > Print • For other print jobs, navigate to: Held jobs > select your user name > select the print job > configure the settings > Print Maintain the printer Replacing the toner cartridge 1 Open the front door. Warning-Potential Damage: To prevent damage from electrostatic discharge, touch any exposed metal frame of the printer before accessing or touching interior areas of the printer. 2 Remove the imaging unit. 3 Twist the blue latch, and then remove the used toner cartridge from the imaging unit. Warning-Potential Damage: Do not expose the imaging unit to direct light for more than 10 minutes. Extended exposure to light may cause print quality problems. Warning-Potential Damage: Do not touch the photoconductor drum. Doing so may affect the quality of future print jobs. 4 Unpack the new toner cartridge. 2
-
 1
1 -
 2
2 -
 3
3 -
 4
4 -
 5
5 -
 6
6 -
 7
7 -
 8
8 -
9
-
10
-
11
 |
 |
