Konica Minolta bizhub 4422 bizhub 4422 Quick Reference Guide - Page 4
Replacing the imaging unit
 |
View all Konica Minolta bizhub 4422 manuals
Add to My Manuals
Save this manual to your list of manuals |
Page 4 highlights
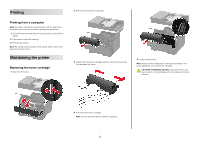
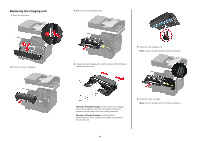
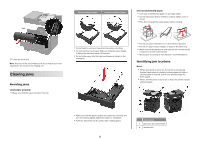
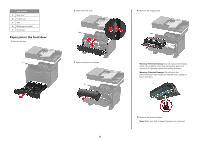
Replacing the imaging unit 1 Open the front door. 3 Remove the used imaging unit. 2 Remove the toner cartridge. 5 Insert the new imaging unit. Note: Use the arrows inside the printer as guides. 4 Unpack the new imaging unit, and then shake it three times to redistribute the toner. Warning-Potential Damage: Do not expose the imaging unit to direct light for more than 10 minutes. Extended exposure to light may cause print quality problems. Warning-Potential Damage: Do not touch the photoconductor drum. Doing so may affect the quality of future print jobs. 6 Insert the toner cartridge. Note: Use the arrows inside the printer as guides. 4
-
 1
1 -
 2
2 -
 3
3 -
 4
4 -
 5
5 -
 6
6 -
 7
7 -
 8
8 -
 9
9
 |
 |

Replacing the imaging unit
1
Open the front door.
2
Remove the toner cartridge.
3
Remove the used imaging unit.
4
Unpack the new imaging unit, and then shake it three times to
redistribute the toner.
Warning—Potential Damage:
Do not expose the imaging
unit to direct light for more than 10 minutes. Extended
exposure to light may cause print quality problems.
Warning—Potential Damage:
Do not touch the
photoconductor drum. Doing so may affect the quality of
future print jobs.
5
Insert the new imaging unit.
Note:
Use the arrows inside the printer as guides.
6
Insert the toner cartridge.
Note:
Use the arrows inside the printer as guides.
4