Kenwood XD-6551 User Manual - Page 7
Speaker Unit, Caution regarding placement, Main unit, Connection of parallel cord, Preparation
 |
View all Kenwood XD-6551 manuals
Add to My Manuals
Save this manual to your list of manuals |
Page 7 highlights
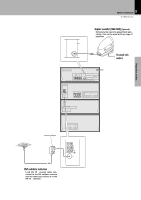
Connection of parallel cord 7 System connection XD SERIES (En/E2) Preparation section Basic section ÷ When connecting the parallel cord, insert plug straight into the connector until it clicks to look them securely. ÷ When connecting the parallel cord, the wire while line should come to the left side end. ÷ When disconnecting the parallel cord, push in the two sides of the plug and pull it straight out. 4 −+ Speaker (left) Main unit 1 2 Twist Speaker Unit 1 2 Twist Caution regarding placement (Front View) The external view is variable depending on the model and marketing destination type. Please install as shown below, as otherwise fire may be caused by overheating. From the top to the bottom Amplifier :A-H5 Tuner/Equalizer :C-H6 or C-H5 CD player :DP-H5 or DP-MH5 Cassette deck :X-H5 3 4 3 4 To maintain proper ventilation, be sure to leave a space around the unit (from the largest outer dimensions including projections) equal to, or greater than, shown below. top panel: 50 cm rear panel: 10 cm left and right panels: 10 cm Notes 1. Be sure to insert all connection cords securely. If their connections are imperfect, the sound may not be produced or noise may interfere. 2. Before plugging or unplugging a connection cord, be sure to unplug the power cord from the wall AC outlet. If connection cords are plugged or unplugged with the power cord left plugged in, malfunction or damage may result. 3. When arranging the system units in a vertical, stacked configuration, observe the stacking order indicated in the system connection diagram. 4. In case an associated system component is connected, also read the instruction manual of the component. 5. Align the front panels of all sets flush. 6. Never short-circuit the + and - speaker cords. 7. If the left and right speaker connections or the + and - polarity are inverted, the sound will be unnatural with unclear positioning of musical instruments, etc. Be sure to connect them without mistake. Application section Knowledge sections
-
 1
1 -
 2
2 -
 3
3 -
 4
4 -
 5
5 -
 6
6 -
 7
7 -
 8
8 -
 9
9 -
 10
10 -
 11
11 -
 12
12 -
13
-
14
-
15
-
16
-
17
-
18
-
19
-
20
-
21
-
22
-
23
-
24
-
25
-
26
-
27
-
28
-
29
-
30
-
31
-
32
-
33
-
34
-
35
-
36
-
37
-
38
-
39
-
40
-
41
-
42
-
43
-
44
-
45
-
46
-
47
-
48
-
49
-
50
-
51
-
52
-
53
-
54
-
55
-
56
-
57
-
58
-
59
-
60
-
61
-
62
-
63
-
64
-
65
-
66
-
67
-
68
-
69
-
70
-
71
-
72
-
73
-
74
-
75
-
76
 |
 |
