Invacare TER Owners Manual - Page 51
Adjusting Front Seat Height, Adjusting Rear Seat Height
 |
View all Invacare TER manuals
Add to My Manuals
Save this manual to your list of manuals |
Page 51 highlights
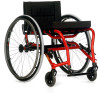
SECTION 6-SEAT Adjusting Transformer Seat Height NOTE: For this procedure, refer to FIGURE 6.2 on page 51 Adjusting Front Seat Height 1. Note the order of the mounting screw, coved washers, spacer, half clamps and mounting screw/threaded sleeve and their position on the wheelchair frame and footrest tubing (Detail ʺAʺ, FIGURE 6.2). 2. Remove the mounting screw, coved washers, spacer, half clamps and mounting screw/threaded sleeve on both sides of the wheelchair. NOTE: The footrest tubing will slide once the hardware is removed. 3. Raise/lower the front of the seat to the desired position. 4. Adjust the footrest height if desired. Refer to Adjusting the Transformer Footrests on page 55. 5. Align the footrest tubing adjustment holes with the desired wheelchair frame adjustment holes. 6. Install the hardware removed in STEP 2 through the adjustment holes aligned in STEP 5. 7. Securely tighten all hardware. Adjusting Rear Seat Height 1. Loosen the two mounting screws on both sides of the front of the wheelchair (Detail ʺAʺ). 2. Loosen the four adjustment screws on both sides of the rear of the wheelchair (Detail ʺBʺ). 3. Adjust seat higher or lower to desired position. Use a tape measure or ruler to ensure that both sides are the same height. 4. Securely tighten the four adjustment screws at the rear of the wheelchair and the two mounting screws at the front of the wheelchair. Wheelchair Frame Coved Washer Footrest Tubing DETAIL "A" FRONT VIEW Adjustment Holes See Detail "A" Mounted Screw/ Threaded Sleeve Half Clamp Mounting Screw Half Clamp Coved Washer DETAIL "B" Adjustment Screw FIGURE 6.2 Adjusting Transformer Seat Height Part No 1122172 51 Everyday Series Wheelchairs/Sport Series Wheelchairs
-
 1
1 -
2
-
3
-
4
-
5
-
6
-
7
-
8
-
9
-
10
-
11
-
12
-
13
-
14
-
15
-
16
-
17
-
18
-
19
-
20
-
21
-
22
-
23
-
24
-
25
-
26
-
27
-
28
-
29
-
30
-
31
-
32
-
33
-
34
-
35
-
36
-
37
-
38
-
39
-
40
-
41
-
42
-
43
-
44
-
45
-
 46
46 -
 47
47 -
 48
48 -
 49
49 -
 50
50 -
 51
51 -
 52
52 -
 53
53 -
 54
54 -
 55
55 -
 56
56 -
57
-
58
-
59
-
60
-
61
-
62
-
63
-
64
 |
 |
