Invacare TER Owners Manual
Invacare TER Manual
 |
View all Invacare TER manuals
Add to My Manuals
Save this manual to your list of manuals |
Invacare TER manual content summary:
- Invacare TER | Owners Manual - Page 1
Maintenance Manual ® Everyday Series Wheelchairs Top End® Terminator™ Everyday Top End® Terminator™Everyday w/ Heavy Duty Package Top End®Terminator™Titanium Top End® Terminator Titanium w/ Heavy Duty Package Sport Series Wheelchairs Top End®Transformer™All Sport Top End®Rugby QR.2G Top End® Paul - Invacare TER | Owners Manual - Page 2
with Invacare accessories. Accessories designed by other manufacturers have not been tested by Invacare and are not recommended for use with Invacare products. NOTE: Updated versions of this manual are available on www.invacare.com. Everyday Series Wheelchairs/Sport Series Wheelchairs 2 Part No - Invacare TER | Owners Manual - Page 3
Other Seats ...20 SECTION 3-SAFETY INSPECTION 21 Safety Inspection Checklist ...21 Troubleshooting ...23 Maintenance...23 SECTION 4-BACK 25 Unfolding/Folding the Back ...25 Closing Camber Clamps...34 Adjusting Rear Wheel Camber...35 Part No 1122172 3 Everyday Series Wheelchairs/Sport Series - Invacare TER | Owners Manual - Page 4
Length (Adjusting Center of Gravity 39 Adjusting Center of Gravity - Top End Pro Tennis/ Top End Pro BB 40 Adjusting Center of Gravity (T-5/Paul Schulte Signature BB 42 /Removing the Wing/Bumper ...61 LIMITED WARRANTY 63 Everyday Series Wheelchairs/Sport Series Wheelchairs 4 Part No 1122172 - Invacare TER | Owners Manual - Page 5
safety belts. If signs of wear appear, belt MUST be replaced immediately. Because TOP END wheelchairs are made to the specifications of the original owners it is unlikely that refurbished product would be suitable to other user's needs. Part No 1122172 5 Everyday Series Wheelchairs/Sport Series - Invacare TER | Owners Manual - Page 6
TERMINATOR EVERYDAY (ED) TERMINATOR TITANIUM FRAME: Rigid - 6061-T6 Aluminum Rigid - 3-2.5 Titanium 90° FOOT WIDTH: Tapered Front End = Seat Width minus 6 inches "V" Front End = Seat Width minus 5 inches Free (Optional) Everyday Series Wheelchairs/Sport Series Wheelchairs 6 Part No 1122172 - Invacare TER | Owners Manual - Page 7
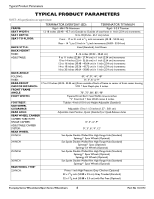
: CASTOR SIZE: BACK UPHOLSTERY: WEIGHT: SHIPPING WEIGHT: WEIGHT LIMITATION: TERMINATOR EVERYDAY (ED) TERMINATOR TITANIUM Primo (25-540): 1inch High Pressure Grey Clincher (Standard) Kenda: 13. NOTE: All specifications are approximate. Part No 1122172 7 Everyday Series Wheelchairs/Sport Series - Invacare TER | Owners Manual - Page 8
(Optional) Primo 25-559 (Standard) Kenda (Optional) Primo 25-590 (Standard) Kenda (Optional) Cheng Shin CST Super HP (Standard) Kenda (Optional) Aluminum Welded Tab (Standard) N/A Everyday Series Wheelchairs/Sport Series Wheelchairs 8 Part No 1122172 - Invacare TER | Owners Manual - Page 9
kg) NOTE: 15 x 15‐inch seat, rear wheels and minimal options are included in the weight. *NOTE: Refer to Tyre Pressure Conversion on page 13. Part No 1122172 9 Everyday Series Wheelchairs/Sport Series - Invacare TER | Owners Manual - Page 10
seat, rear wheels and minimal options are included in the weight. *NOTE: Refer to Tyre Pressure Conversion on page 13. NOTE: All specifications are approximate. Everyday Series Wheelchairs/Sport Series Wheelchairs 10 Part No 1122172 - Invacare TER | Owners Manual - Page 11
Solid (Standard) U240 Black - Adjustable Tension 24 lbs (10.89 kg) (Aluminium), 20 lbs (9.07 kg) (Titanium) 30 lbs (13.6 kg) 250 lbs (113.4 kg), HD optional available NOTE: 15 x 15‐inch seat 13. NOTE: All specifications are approximate. Part No 1122172 11 Everyday Series Wheelchairs/Sport Series - Invacare TER | Owners Manual - Page 12
Typical Product Parameters TOP END PRO TENNIS AND TOP END PRO BB FRAME: SEAT WIDTH: SEAT DEPTH: SEAT-TO-FLOOR: BACK STYLE: ADJUSTABLE BACK : Refer to Tyre Pressure Conversion on page 13. All specifications are approximate. Everyday Series Wheelchairs/Sport Series Wheelchairs 12 Part No 1122172 - Invacare TER | Owners Manual - Page 13
75 517 80 552 85 586 Typical Product Parameters PSI KILOPASCALS 90 621 95 655 100 690 105 724 110 758 115 793 120 827 Part No 1122172 13 Everyday Series Wheelchairs/Sport Series - Invacare TER | Owners Manual - Page 14
from behind as this may cause the wheelchair to tip over. DO NOT shift your weight or sitting position toward the direction you are reaching as the wheelchair may tip over. DO NOT tip the wheelchair without assistance. Everyday Series Wheelchairs/Sport Series Wheelchairs 14 Part No 1122172 - Invacare TER | Owners Manual - Page 15
noted, all service and adjustments should be performed while the wheelchair is unoccupied. ALWAYS wear your seat positioning strap. Inasmuch as the SEAT POSITIONING STRAP is an option on this wheelchair (You may order with or without the seat positioning strap), Invacare Top End strongly recommends - Invacare TER | Owners Manual - Page 16
not be liable for bodily injury and the warranty is void. Weight Limitation Invacareʹs Top End Everyday and Sport Series wheelchairs (Terminator Titanium, Terminator Everyday, Paul Schulte Signature BB, T‐5 Tennis Elite, Top End Pro Tennis, Top End Pro BB, Rugby QR.2G and Transformer All Sport) have - Invacare TER | Owners Manual - Page 17
only as a "basic" guide. The techniques that are discussed on the following pages have been used successfully by many. Individual wheelchair users often develop skills to deal with daily living activities that may differ from those described in this manual. Invacare recognizes and encourages each - Invacare TER | Owners Manual - Page 18
pick them up from the floor by reaching down between your knees. Reaching, Leaning - Backwards ƽ WARNING DO NOT lean over the top of the back upholstery. This will change your center of gravity and may cause you to tip over. Everyday Series Wheelchairs/Sport Series Wheelchairs 18 Part No 1122172 - Invacare TER | Owners Manual - Page 19
in one continuous movement. Tipping - Curbs ƽ WARNING Invacare does not recommend that sport wheelchairs be used where traversing curbs present an obstacle. Possible injury to occupant and/or assistant(s) can occur. Transfer to an everyday use wheelchair is recommended if any such obstacles may be - Invacare TER | Owners Manual - Page 20
Stairways ƽ WARNING Concerning stairway access: Invacare does not recommend that wheelchairs be transported up or down stairways with occupant in the wheelchair. Possible injury to occupant and/or assistant(s) can occur. Transfer to an everyday use wheelchair is recommended. DO NOT attempt to - Invacare TER | Owners Manual - Page 21
wheelchair to a qualified technician for a thorough inspection and servicing. Regular cleaning will reveal loose or worn parts and enhance the smooth operation of your wheelchair. To operate properly and safely, your wheelchair necessary. Part No 1122172 21 Everyday Series Wheelchairs/Sport Series - Invacare TER | Owners Manual - Page 22
and free of moisture. ❑ Ensure castors are free of debris. Inspect/Adjust Periodically ❑ Ensure wheelchair rolls straight (no excessive drag/pull to one side). ❑ Ensure wheel locks are easy to should be replaced if damaged. Everyday Series Wheelchairs/Sport Series Wheelchairs 22 Part No 1122172 - Invacare TER | Owners Manual - Page 23
legible. Replace if necessary. Troubleshooting CHAIR VEERS CHAIR SLUGGISH CASTOR ANY adjustments, repair or service and BEFORE use, make wheelchair may occur. 3. Clean quick‐release axles and camber inserts once a week with a Teflon® lubricant. Part No 1122172 23 Everyday Series Wheelchairs - Invacare TER | Owners Manual - Page 24
Contact a qualified technician or Invacare customer support at the telephone numbers on the back of this manual. 7. Periodically check handrims to service be cleaned and sanitized. Please consult your dealer prior to returning product. Everyday Series Wheelchairs/Sport Series Wheelchairs 24 Part - Invacare TER | Owners Manual - Page 25
Terminator Wheelchairs NOTE: For this procedure, refer to FIGURE 4.2 on page 26. NOTE: Perform this procedure on both sides of the wheelchair adjustment. 5. Secure cam in desired position. Torque all hex screws and locknuts to 960‐1020 Part No 1122172 25 Everyday Series Wheelchairs/Sport Series - Invacare TER | Owners Manual - Page 26
Bracket TOP Hex Screw and Locknut Cam Back Angle Bracket Seat Rail Seat Rail Seat Rail FIGURE 4.2 Back Angle Adjustment - All Models Except Terminator Wheelchairs Terminator Wheelchairs NOTE: For this procedure, refer to FIGURE 4.3 on page 27 and FIGURE 4.4 on page 28. NOTE: The numbers on - Invacare TER | Owners Manual - Page 27
NOTE: Back angle plate, mounting screw and adjustment square are removed for clarity. Back Cane Jam Nut Mounting Screw Seat Rail FIGURE 4.3 Back Angle Adjustment - Terminator Wheelchairs Part No 1122172 27 Everyday Series Wheelchairs/Sport Series - Invacare TER | Owners Manual - Page 28
to be positioned at +4° Back Cane Back Angle Plate 91° +8° Adjustment square to be positioned at +8° Seat Rail FIGURE 4.4 Back Angle Adjustment - Adjustment Square Position Everyday Series Wheelchairs/Sport Series Wheelchairs 28 Part No 1122172 - Invacare TER | Owners Manual - Page 29
cause the wheelchair to decrease in stability. EXTREME care MUST be taken when changing the stability of the wheelchair. Refer to the chart in General Guidelines on page 14 of this manual. NOTE: For this procedure, refer to FIGURE 4.6. Part No 1122172 29 Everyday Series Wheelchairs/Sport Series - Invacare TER | Owners Manual - Page 30
adjusted at various levels of tension to accommodate individual end‐users. The bottom two straps can be adjusted tightly to support and/or assist the extensor muscles. Back Posts The back upholstery cover on the seat pan. Everyday Series Wheelchairs/Sport Series Wheelchairs 30 Part No 1122172 - Invacare TER | Owners Manual - Page 31
secure the top of the wheelchair. 4. Adjust the new back upholstery to the desired tautness. Refer to Adjustable Tension Back Upholstery on page 29. Insert Back Post Hole Number 5 4 3 2 1 Part No 1122172 FIGURE 4.7 Back Height Adjustment (Adjustable Backs Only) 31 Everyday Series Wheelchairs - Invacare TER | Owners Manual - Page 32
the wheelchair. Contact Invacare at the telephone numbers on the back of this manual before End of Quick Release axle is shown for reference only. It is not visible when inserted into camber bar. FIGURE 5.2 Adjusting Quick-Release Axles Everyday Series Wheelchairs/Sport Series Wheelchairs 32 Part - Invacare TER | Owners Manual - Page 33
axle from the wheelchair. Refer to axle onto the wheelchair. Refer to Removing rear wheel. NOTE: End of Quick Release axle the quad‐release axle from the wheelchair. Refer to Removing/Installing Rear axle onto the wheelchair. Refer to Removing/ still mounted onto the wheelchair, make the following - Invacare TER | Owners Manual - Page 34
MUST be performed by a qualified technician. CAUTION Changing the size of the rear wheels can affect the performance of the wheelchair. Contact Invacare at the numbers on the back cover before performing this procedure. NOTE: If replacing rear wheels with a different size than what was originally - Invacare TER | Owners Manual - Page 35
insert 180°. 5. Reinstall the rear wheel into the camber insert. Rear View of Wheelchair Camber Insert - Rotate 180° Axle Tube Indexing Ring Indexing Marks Camber Clamp FIGURE 5.7 Adjusting Rear Wheel Camber Adjustable Camber System Part No 1122172 35 Everyday Series Wheelchairs/Sport Series - Invacare TER | Owners Manual - Page 36
Front of Wheelchair Toe-out Toe-in Top View of Wheelchair Rear of Wheelchair Smaller than Front Centerlines of Rear Wheels Larger than Front FIGURE 5.8 Determining Toe In/Toe Out - Measuring Centerlines of Rear Wheels Everyday Series Wheelchairs/Sport Series Wheelchairs 36 Part No 1122172 - Invacare TER | Owners Manual - Page 37
the right or left adjustment ring until the stop on the ring is at the top of the slot in the camber clamp as shown in FIGURE 5.11 and securely tighten clarity. There is no need to remove rear wheels from the wheelchair during adjustment. NOTE: FIGURE 5.11 shows two examples of how the - Invacare TER | Owners Manual - Page 38
until the stop on the opposite adjustment ring is positioned at the opposite end of the camber clamp. 3. Close the camber clamp. Refer to Opening/ for clarity, there is no need to remove rear wheels from the wheelchair during adjustment. NOTE: FIGURE 5.13 shows one example of how the adjustment - Invacare TER | Owners Manual - Page 39
that secure one of the top clamps to the wheelchair frame. NOTE: Securely tightening one hex screw at a time ensures that the camber clamps will sit flush on the wheelchair frame. 4. Repeat STEP 3 for opposite side of the wheelchair. Part No 1122172 39 Everyday Series Wheelchairs/Sport Series - Invacare TER | Owners Manual - Page 40
Suspension - Side View Wheelchair Frame Hex Screws Top Clamp Top Clamp Axle Tube Shortening Hex Screw - Loosen But DO NOT Remove FIGURE 5.14 Adjusting Wheelbase Length (Adjusting Center of Gravity) Axle Tube Adjusting Center of Gravity - Top End Pro Tennis/ Top End Pro BB NOTE: For - Invacare TER | Owners Manual - Page 41
L-Bracket L-Bracket Washers Mounting Screw Coved Spacer Base Frame Base Frame Mounting Screw, Two Washers, Coved Spacer and Locknut FIGURE 5.15 Adjusting Center of Gravity - Top End Pro Tennis/ Top End Pro BB Part No 1122172 41 Everyday Series Wheelchairs/Sport Series - Invacare TER | Owners Manual - Page 42
Rear Wheels on page 32. 2. Torque the axle nut to increase/decrease the wheelbase width. 3. Count the number of threads showing on the axle bolt. NOTE: The number of threads showing on the axle bolt should be equal on both sides of the wheelchair. Otherwise, wheelchair performance may be affected - Invacare TER | Owners Manual - Page 43
not be securely tightened in the axle tube. Possible injury to the user or damage to the wheelchair may occur. 2. Position camber insert to the desired position. Make sure there are no more than the toe adjustment rings to the axle tube. Part No 1122172 43 Everyday Series Wheelchairs/Sport Series - Invacare TER | Owners Manual - Page 44
Camber Clamp Set Screw Axle Tube Axle Tube Front of Wheelchair Front of Wheelchair NOTE: Suspension option not shown for clarity. Axle tube installs in the same manner as pictured above. FIGURE 5.19 Replacing Axle Tube Everyday Series Wheelchairs/Sport Series Wheelchairs 44 Part No 1122172 - Invacare TER | Owners Manual - Page 45
to Refer to Opening/Closing Camber Clamps on page 34. 4. Determine the toe in/toe out of the wheelchair. Refer to Determining Toe In/Toe Out on page 36. Flat Edge of Camber Tube Place "L" Square Camber on page 35. 11. Repeat STEP 3. Part No 1122172 45 Everyday Series Wheelchairs/Sport Series - Invacare TER | Owners Manual - Page 46
of the wheelchair. Contact Invacare at the telephone numbers on the back of this manual before performing this procedure. NOTE: For this procedure, refer to FIGURE 5.22 on page 47. NOTE: Non‐suspension castors cannot be adjusted as they mount in one position only. Everyday Series Wheelchairs/Sport - Invacare TER | Owners Manual - Page 47
Suspension Castor Fork Bolt Locknut Mounting Positions Fork Mounting Screw Spacer Spacer Castor Mounting Screw/ Threaded Sleeve FIGURE 5.22 Replacing/Adjusting Castors Spacer Front Castor Part No 1122172 47 Everyday Series Wheelchairs/Sport Series - Invacare TER | Owners Manual - Page 48
- Transformer Only CAUTION Changing the height of the front/castors can affect the performance of the wheelchair. Contact Invacare at the telephone numbers on the back of this manual before performing this procedure. Locknut Castor Housing Dust Cover NOTE: For this procedure, refer to FIGURE - Invacare TER | Owners Manual - Page 49
Shoe Hex Screws Wheelchair Frame Wheel Lock Shoe 5/32 to 5/16-inch Gap (.4 to .8 cm) Rear Wheel NOTE: High mount wheel lock shown for clarity NOTE: Rear wheel not shown for clarity. FIGURE 5.24 Wheel Lock Adjustment/Replacement Part No 1122172 49 Everyday Series Wheelchairs/Sport Series - Invacare TER | Owners Manual - Page 50
service 2. Place the wheelchair onto its two rear top crossbar for proper installation. NOTE: Make sure the rear retaining flap is between the wheelchair frame and the back post support Top Crossbar Seat Upholstery Anchor Loop Wheelchair Frame (Top Everyday Series Wheelchairs/Sport Series Wheelchairs - Invacare TER | Owners Manual - Page 51
VIEW Adjustment Holes See Detail "A" Mounted Screw/ Threaded Sleeve Half Clamp Mounting Screw Half Clamp Coved Washer DETAIL "B" Adjustment Screw FIGURE 6.2 Adjusting Transformer Seat Height Part No 1122172 51 Everyday Series Wheelchairs/Sport Series - Invacare TER | Owners Manual - Page 52
Mounting Screw Height Adjustment Bracket Mounting Screw Washer Mounting Screw Mounting Screw Washer Locknuts FIGURE 6.3 Adjusting Seat Height for Top End Pro Tennis and Top End Pro BB - Adjusting Front/Rear Seat Height Everyday Series Wheelchairs/Sport Series Wheelchairs 52 Part No 1122172 - Invacare TER | Owners Manual - Page 53
ANY adjustments, repair or service and before use, make wheelchair frame. Installing/Adjusting Optional Clamp on Raised Footrest NOTE: For this procedure, refer to FIGURE 7.2. NOTE: This procedure is for Terminator Everyday (ED) wheelchairs ONLY. Part No 1122172 53 Everyday Series Wheelchairs - Invacare TER | Owners Manual - Page 54
7.3 on page 54. NOTE: This procedure is for Terminator Everyday (ED) wheelchairs Only. Replacing the Footrest 1. Loosen, but DO NOT remove each end user. NOTE: The locknuts should lie in the channel of the footplate half clamp. Everyday Series Wheelchairs/Sport Series Wheelchairs 54 Part No - Invacare TER | Owners Manual - Page 55
on both sides of the wheelchair. Tighten securely. Mounting Screw/ Threaded Sleeve Coved Washer Footrest Tubing Adjustment Holes Half Clamp Mounting Screw Half Clamp Coved Washer Part No 1122172 FIGURE 7.5 Adjusting the Transformer Footrests Height 55 Everyday Series Wheelchairs/Sport Series - Invacare TER | Owners Manual - Page 56
wheelchair (you may order it with or without the anti-tippers), Invacare strongly recommends ordering the anti-tippers as an additional safeguard for the wheelchair and are taken using the top adjustment hole on the anti‐tipper Everyday Series Wheelchairs/Sport Series Wheelchairs 56 Part No 1122172 - Invacare TER | Owners Manual - Page 57
TIPPER PART NUMBER MEASUREMENT 1112178 21 - 1/8-inches (53.66 cm) DETAIL"A" - ANTI-TIPPER ADJUSTMENT HOLES Top 7.7 on page 58. NOTE: This applies to any Terminator ordered with swivel anti‐tip. Installing/Depth Adjustment 1. Loosen Part No 1122172 57 Everyday Series Wheelchairs/Sport Series - Invacare TER | Owners Manual - Page 58
tighten mounting screw and locknut. Mounting Screw Bullet Locknut Caster Fork Assembly FIGURE 7.8 Adjusting Height - Paul Schulte Signature BB, T-5 Tennis Elite Models, Top End Pro Tennis, and Top End Pro BB ONLY Everyday Series Wheelchairs/Sport Series Wheelchairs 58 Part No 1122172 - Invacare TER | Owners Manual - Page 59
. Tighten securely. Outside of Wheelchair Frame Suspension Base Outer Allen Screw Recess Elstaomer Part No 1122172 Pivot Pin Inner Allen Screw Axle Bracket Mounting Holes Recess Inside of Wheelchair Frame FIGURE 8.1 Replacing Rear Elastomers 59 Everyday Series Wheelchairs/Sport Series - Invacare TER | Owners Manual - Page 60
and tighten securely. Upper Portion of Fork Lower Portion of Fork Mounting Screw Threaded Sleeve Mounting Screw (Use Loctite 242) Elstaomer FIGURE 8.2 Replacing Front Elastomers Everyday Series Wheelchairs/Sport Series Wheelchairs 60 Part No 1122172 - Invacare TER | Owners Manual - Page 61
WING/BUMPER SECTION 9-WING/BUMPER ƽ WARNING After any adjustments, repair or service and before use, make sure all attaching hardware is tightened securely - Wing/Bumper Castor Housing FIGURE 9.1 Installing/Removing the Wing/Bumper Part No 1122172 61 Everyday Series Wheelchairs/Sport Series - Invacare TER | Owners Manual - Page 62
NOTES NOTES Everyday Series Wheelchairs/Sport Series Wheelchairs 62 Part No 1122172 - Invacare TER | Owners Manual - Page 63
state. Invacare warrants the frame to be free from defects in materials and workmanship for the original purchaser for the following periods of time from the date of purchase: Terminator Everyday (ED) and Terminator Titanium Everyday (ED) are lifetime All other models are 3 years All component parts - Invacare TER | Owners Manual - Page 64
01656 647327 Fax: 01656 649016 email: [email protected] www.invacare.co.uk ©2009 Invacare Corporation. All rights reserved. Republication, duplication or modification in whole or in part is prohibited without prior written permission from Invacare. Trademarks are identified by ™ and ®. All trademarks
-
 1
1 -
 2
2 -
 3
3 -
 4
4 -
 5
5 -
 6
6 -
 7
7 -
8
-
9
-
10
-
11
-
12
-
13
-
14
-
15
-
16
-
17
-
18
-
19
-
20
-
21
-
22
-
23
-
24
-
25
-
26
-
27
-
28
-
29
-
30
-
31
-
32
-
33
-
34
-
35
-
36
-
37
-
38
-
39
-
40
-
41
-
42
-
43
-
44
-
45
-
46
-
47
-
48
-
49
-
50
-
51
-
52
-
53
-
54
-
55
-
56
-
57
-
58
-
59
-
60
-
61
-
62
-
63
-
64
 |
 |

Owner’s Operator and Maintenance Manual
DEALER:
This manual MUST be given to
the user of the wheelchair.
USER:
BEFORE using this wheelchair, read
this manual and save for future reference.
For more information regarding
Invacare products,
parts, and services,
please visit www.invacare.com
Everyday Series Wheelchairs
Top End® Terminator™ Everyday
Top End® Terminator™Everyday w/ Heavy Duty Package
Top End®Terminator™Titanium
Top End® Terminator Titanium w/ Heavy Duty Package
Sport Series Wheelchairs
Top End®Transformer™All Sport
Top End®Rugby QR.2G
Top End® Paul Schulte Signature BB
Top End® T-5™Tennis Elite
Top End® Pro™Tennis
Top End® Pro™BB
®