Invacare DDV0041 Owners Manual - Page 32
Luggage carrier, WARNING, Riskoftipping
 |
View all Invacare DDV0041 manuals
Add to My Manuals
Save this manual to your list of manuals |
Page 32 highlights
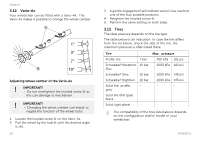
Advance 3. Pull the tube further downwards until the pin engages into the slot. 4. Move the wheelchair to a stable object (door frame, heavy table), which you can use for support and hold onto it firmly with one hand. 5. Tilt the wheelchair until the rear wheel on the opposite side rises off the floor. Prior to removing the rear wheels, the distance between the lowered transit wheels and the floor should not be more than 25/32". 6. Remove the rear wheel, ® 7.3 Removing and installing the rear wheels, page 45. 7. Repeat the process on the other side. Switching from transit wheels to rear wheels 1. Move the wheelchair to a stable object, which you can use for support and hold onto it firmly with one hand. 2. Tilt the wheelchair until the transit wheel on the opposite side rises slightly off the floor. 3. Install the rear wheel onto the removable axle, ® 7.3 Removing and installing the rear wheels, page 45. 4. Bring the transit wheels back into the inactive position. 5. Repeat the process on the other side. 4.3 Luggage carrier Your wheelchair can be fitted with a luggage carrier. When not in use, the luggage carrier can be folded up. WARNING! Risk of tipping Weight on the carrier changes the tipping behaviour of the wheelchair. The wheelchair can tip forwards more easily when the luggage carrier is loaded. - Use the luggage carrier only for transporting small and lightweight luggage. - Avoid driving the wheelchair to fast when carrying luggage. - Avoid driving ramps and slopes when carrying luggage. - Do not stand on the luggage carrier. 32 1605620-B
-
 1
1 -
2
-
3
-
4
-
5
-
6
-
7
-
8
-
9
-
10
-
11
-
12
-
13
-
14
-
15
-
16
-
17
-
18
-
19
-
20
-
21
-
22
-
23
-
24
-
25
-
26
-
 27
27 -
 28
28 -
 29
29 -
 30
30 -
 31
31 -
 32
32 -
 33
33 -
 34
34 -
 35
35 -
 36
36 -
 37
37 -
38
-
39
-
40
-
41
-
42
-
43
-
44
-
45
-
46
-
47
-
48
-
49
-
50
-
51
-
52
-
53
-
54
-
55
-
56
-
57
-
58
-
59
-
60
 |
 |
