Hitachi CPX5 Network Guide - Page 27
Starting the LiveViewer
 |
UPC - 050585151185
View all Hitachi CPX5 manuals
Add to My Manuals
Save this manual to your list of manuals |
Page 27 highlights
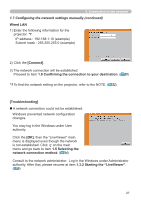
1. Connection to the network 1.7 Configuring the network settings manually (continued) Wired LAN 1) Enter the following information for the projector. *1 IP address : 192.168.1.10 (example) Subnet mask : 255.255.255.0 (example) 2) Click the [Connect]. 3) The network connection will be established. Proceed to item 1.8 Confirming the connection to your destination. ( 30) *1 To find the network setting on the projector, refer to the NOTE. ( 22) [Troubleshooting] A network connection could not be established. Windows prevented network configuration changes. You may log in the Windows under User authority. Click the [OK], then the "LiveViewer" main menu is displayed even though the network is not established. Click on the main menu and go back to item 1.5 Selecting the network connection method. ( 14) Consult to the network administrator. Log in the Windows under Administrator authority. After that, please resume at item 1.3.2 Starting the "LiveViewer". ( 9) 27
-
 1
1 -
2
-
3
-
4
-
5
-
6
-
7
-
8
-
9
-
10
-
11
-
12
-
13
-
14
-
15
-
16
-
17
-
18
-
19
-
20
-
21
-
 22
22 -
 23
23 -
 24
24 -
 25
25 -
 26
26 -
 27
27 -
 28
28 -
 29
29 -
 30
30 -
 31
31 -
 32
32 -
33
-
34
-
35
-
36
-
37
-
38
-
39
-
40
-
41
-
42
-
43
-
44
-
45
-
46
-
47
-
48
-
49
-
50
-
51
-
52
-
53
-
54
-
55
-
56
-
57
-
58
-
59
-
60
-
61
-
62
-
63
-
64
-
65
-
66
-
67
-
68
-
69
-
70
-
71
-
72
-
73
-
74
-
75
-
76
-
77
-
78
-
79
-
80
-
81
-
82
-
83
-
84
-
85
-
86
-
87
-
88
-
89
-
90
-
91
-
92
 |
 |
