HP R7000 HP UPS Network Module User Guide - Page 34
Time Settings screen, Accept automatic update from HP Power Protector
 |
View all HP R7000 manuals
Add to My Manuals
Save this manual to your list of manuals |
Page 34 highlights
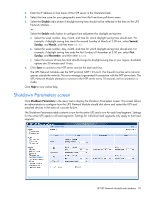
Time Settings screen Click Date and Time in the menu tree to display the Time Settings screen. This screen allows an administrator to set the UPS Network Module date and time. The current date and time appears at the top of the screen. To manually enter the date and time: 1. Select the Set manually radio button. 2. Enter the date (yyyy/mm/dd) in the Date field. 3. Enter the time (hh:mm:ss) in the Time field. 4. Click Save. After the system reboots, it needs to sync with the UPS date and time on UPSs with real time clock. Otherwise the default date is set to 1970/01/01 and the default time is set to 00:00:00. To avoid this, select either the Accept Automatic Update from HPPP radio button (default setting) or the Synchronize with NTP Server radio button. To synchronize the date and time with the HPPP Client: NOTE: Verify that the HPPP Client is configured with the correct date and time, because the UPS Network Module uses the time from the first Client that responds. 1. Select the Accept automatic update from HP Power Protector radio button. 2. Click Save. To synchronize the date time with an NTP server: 1. Select the Synchronize with NTP server radio button. If no NTP server is discovered, the date is set to 1970/01/01 and the time is set to 00:00:00. HP UPS Network Module web interface 34
-
 1
1 -
2
-
3
-
4
-
5
-
6
-
7
-
8
-
9
-
10
-
11
-
12
-
13
-
14
-
15
-
16
-
17
-
18
-
19
-
20
-
21
-
22
-
23
-
24
-
25
-
26
-
27
-
28
-
 29
29 -
 30
30 -
 31
31 -
 32
32 -
 33
33 -
 34
34 -
 35
35 -
 36
36 -
 37
37 -
 38
38 -
 39
39 -
40
-
41
-
42
-
43
-
44
-
45
-
46
-
47
-
48
-
49
-
50
-
51
-
52
-
53
-
54
-
55
-
56
-
57
-
58
-
59
-
60
-
61
-
62
-
63
-
64
-
65
-
66
-
67
-
68
-
69
-
70
-
71
-
72
-
73
-
74
-
75
-
76
-
77
-
78
-
79
-
80
-
81
-
82
-
83
-
84
-
85
-
86
-
87
 |
 |
