HP EliteOne 870 Maintenance and Service Guide - Page 48
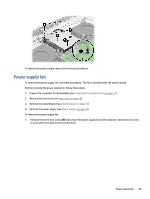
Remove the nine Torx screws, that secure the system board to the computer.
 |
View all HP EliteOne 870 manuals
Add to My Manuals
Save this manual to your list of manuals |
Page 48 highlights
● Audio board cable (6) ● Speaker cable (7) ● Card reader board cable (8) ● Fingerprint reader cable (ZIF) (9) ● USB/power/OSD board cable (10) 2. Remove the nine Torx screws (1) that secure the system board to the computer. 3. Remove the system board from the computer (2). System board 41
-
 1
1 -
2
-
3
-
4
-
5
-
6
-
7
-
8
-
9
-
10
-
11
-
12
-
13
-
14
-
15
-
16
-
17
-
18
-
19
-
20
-
21
-
22
-
23
-
24
-
25
-
26
-
27
-
28
-
29
-
30
-
31
-
32
-
33
-
34
-
35
-
36
-
37
-
38
-
39
-
40
-
41
-
42
-
 43
43 -
 44
44 -
 45
45 -
 46
46 -
 47
47 -
 48
48 -
 49
49 -
 50
50 -
 51
51 -
 52
52 -
 53
53 -
54
-
55
-
56
-
57
-
58
-
59
-
60
-
61
-
62
-
63
-
64
-
65
-
66
-
67
-
68
-
69
-
70
-
71
-
72
-
73
-
74
-
75
-
76
-
77
-
78
-
79
-
80
-
81
-
82
-
83
-
84
-
85
-
86
-
87
-
88
-
89
-
90
-
91
-
92
-
93
-
94
-
95
-
96
-
97
-
98
-
99
-
100
-
101
-
102
-
103
-
104
-
105
-
106
-
107
-
108
-
109
-
110
-
111
-
112
-
113
-
114
-
115
-
116
-
117
-
118
-
119
-
120
-
121
-
122
-
123
 |
 |

●
Audio board cable
(6)
●
Speaker cable
(7)
●
Card reader board cable
(8)
●
Fingerprint reader cable (ZIF)
(9)
●
USB/power/OSD board cable
(10)
2.
Remove the nine Torx screws
(1)
that secure the system board to the computer.
3.
Remove the system board from the computer
(2)
.
System board
41