HP EliteDesk 705 65W G4 Hardware Reference Guide - Page 28
that secure the hard drive cage to the chassis, and then connect the hard drive cable 3 to
 |
View all HP EliteDesk 705 65W G4 manuals
Add to My Manuals
Save this manual to your list of manuals |
Page 28 highlights
10. Slide the connector end of the SSD into the socket (1) on the system board, and then secure the SSD with the screw (2). 11. Replace the hard drive cage or the graphics processor, depending on your model. For models with a hard drive: a. Place the hard drive cage down into the chassis, and then slide it forward (1). Install the two screws (2) that secure the hard drive cage to the chassis, and then connect the hard drive cable (3) to the system board. Secure the cable by attaching the hard drive cable clamp (4) to the system board connector. 22 Chapter 3 Hardware upgrades
-
 1
1 -
2
-
3
-
4
-
5
-
6
-
7
-
8
-
9
-
10
-
11
-
12
-
13
-
14
-
15
-
16
-
17
-
18
-
19
-
20
-
21
-
22
-
 23
23 -
 24
24 -
 25
25 -
 26
26 -
 27
27 -
 28
28 -
 29
29 -
 30
30 -
 31
31 -
 32
32 -
 33
33 -
34
-
35
-
36
-
37
-
38
-
39
-
40
-
41
-
42
-
43
-
44
-
45
-
46
-
47
-
48
-
49
-
50
-
51
-
52
-
53
-
54
-
55
-
56
-
57
 |
 |

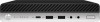
10.
Slide the connector end of the SSD into the socket (1) on the system board, and then secure the SSD with
the screw (2).
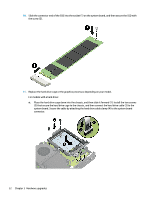
11.
Replace the hard drive cage or the graphics processor, depending on your model.
For models with a hard drive:
a.
Place the hard drive cage down into the chassis, and then slide it forward (1). Install the two screws
(2) that secure the hard drive cage to the chassis, and then connect the hard drive cable (3) to the
system board. Secure the cable by attaching the hard drive cable clamp (4) to the system board
connector.
22
Chapter 3
Hardware upgrades