GE JVW5301SJSS Installation Instructions - Page 7
Installation Instructions, INSTALLATION INSTRUCTIONS - filter
 |
View all GE JVW5301SJSS manuals
Add to My Manuals
Save this manual to your list of manuals |
Page 7 highlights
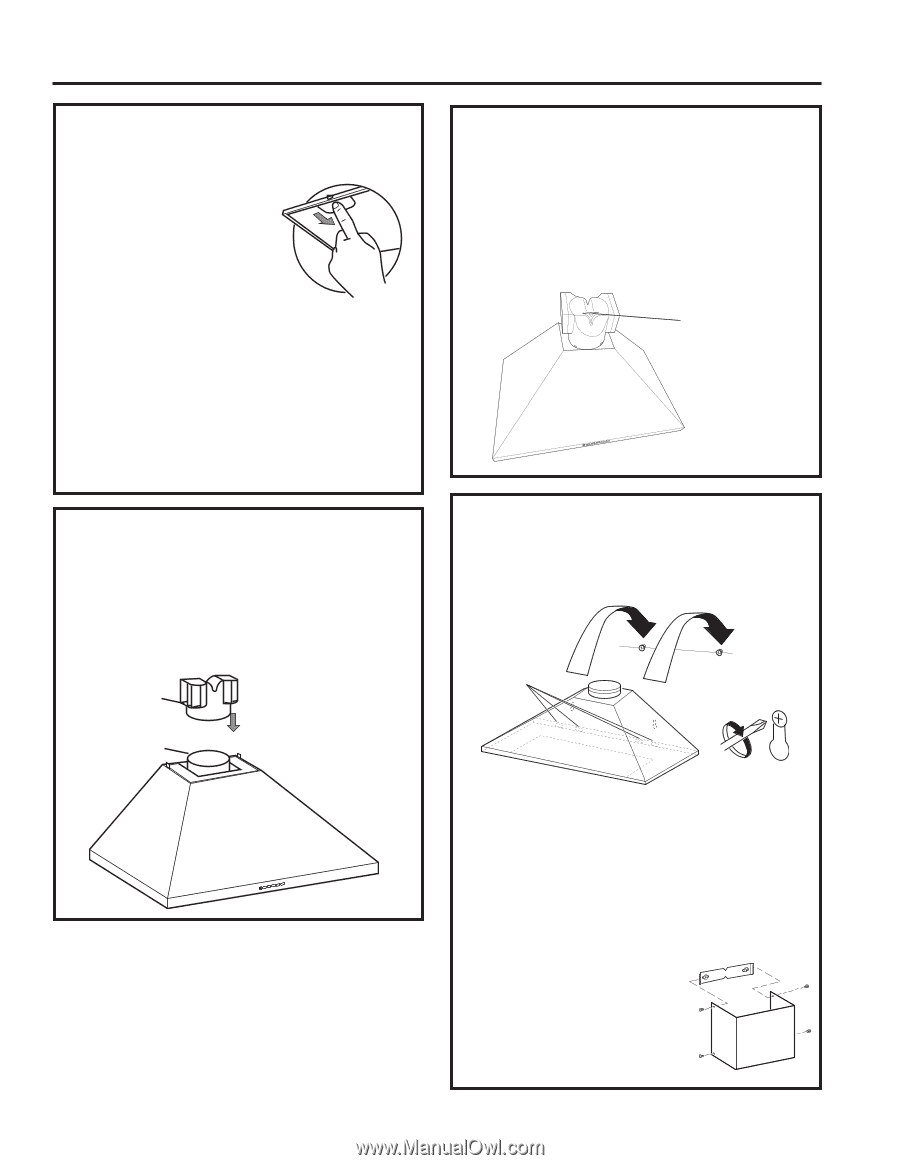
INSTALLATION INSTRUCTIONS Installation Instructions PREPARE HOOD FOR INSTALLATION 1. Remove the grease filters from the unit and set aside. The grease filters are removed by pressing the handle in front of the filter. When replacing, make sure that the filters are properly positioned with the handles in front and visible. 2. Remove and properly discard the protective plastic wrapping from the hood and grease filters. 3. Remove junction box cover. Vented Installations 1. Securely press damper on top of the exhaust opening. Check that the damper opens freely. 2. Go to Mount the Range Hood in this section. Non-vented (recirculation) Installations NOTE: Recirculation duct (included) and charcoal filters JXCF72 (not included) are required. The damper is not installed on the unit with recirculation installations. 1. Install the non-vented (ductless) recirculation duct (A) supplied with the vent hood. A B Non-vented (recirculation) Installations (Continued) 2. Check that the recirculation duct is in the correct orientation with the hole towards the front of the hood. Fit the recirculation duct over the vent exhaust outlet (B) and push down to seat on the outlet. 3. Go to Mount the Range Hood in this section. NOTE: Hole must be facing toward front of hood. MOUNT THE PYRAMID RANGE HOOD 1. Install the range hood body by placing the hood key holes over the mounting screws. Feed the power supply cable through the electrical knockout. Tighten the mounting screws. A Mounting Screw Slots 2. Insert 2 mounting screws into the 2 duct cover anchors (installed on line D in Preparing the Wall section) located in the slots on the back surface of the hood. Secure tightly. 3. Connect the house ducting to the damper on the hood body if ducted install. Seal all connections with duct tape. NOTE: If recirculation installation, skip to Step 4 and proceed. 4. Install the upper duct cover. Slightly spread the sides of the cover apart and hook them behind the duct cover mounting brackets. Attach the cover to the brackets with 4 duct cover screws. 31-10983 7
-
 1
1 -
 2
2 -
 3
3 -
 4
4 -
 5
5 -
 6
6 -
 7
7 -
 8
8 -
 9
9 -
 10
10 -
 11
11 -
 12
12 -
13
-
14
-
15
-
16
 |
 |