GE JVW5301SJSS Installation Instructions - Page 6
Installation Preparation, INSTALLATION PREPARATION
 |
View all GE JVW5301SJSS manuals
Add to My Manuals
Save this manual to your list of manuals |
Page 6 highlights
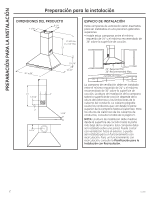
INSTALLATION PREPARATION Installation Preparation PREPARE THE WALL Hood Body and Power Supply 1. Put a protective covering over the surface below the location of the hood to protect from dirt and/or damage. 2. Determine and mark the centerline on the wall (draw line up to the ceiling) where the range hood will be installed. Based on the ceiling height, determine the distance 24" required min, 36" recommended max (X) needed between the cooking surface (B) and the bottom of the hood. To this distance, add 7" and draw a horizontal line (A) about 24" long centered on the vertical centerline (C). 3. Mark 2 points on each side of the horizontal line (A), 5-1/2" from the vertical centerline (C). Drill the canopy mounting anchors into the wall at the markings. Install the 2 mounting screws into the anchors, leaving a 1/4" gap between the wall and the back of the screw head. (You will place the hood body onto these screw heads.) 4. Draw a second horizontal line (D) that is 1-1/4" added from the X distance. Draw a third horizontal line (E) that is 4-5/16" added from the X distance. 5. Mark 2 points on each side of the horizontal line (D), 7-7/8" from the vertical centerline (C). Drill the 2 holes for installation with a 9/32" drill bit, and insert the duct cover anchors. 6. Determine and mark where the hole will be drilled for the power supply cable to be run through the wall. Mark a point on the left side of the horizontal line (E), 6-1/4" from the vertical centerline (C). Drill a 1-1/4" hole at this mark. Duct Covers 1. Place one of the duct cover brackets against the wall so that its top edge is 1/16" from the ceiling and level. Align the center notches of the bracket and the centerline (C) and mark the centers of the bracket holes. Remove the bracket to drill the 2 holes for installation with a 9/32" drill bit, and insert the duct cover anchors. Place the bracket back on the wall and install the 2 mounting screws into the anchors. Tighten screws. 2. Place the other duct cover bracket on the wall so that its top edge is 10-1/2" from the ceiling and level. Align the center notches of the bracket and the centerline (C) and mark the centers of the bracket holes. Remove the bracket to drill the 2 holes for installation with a 9/32" drill bit, and insert the duct cover anchors. Place the bracket back on the wall and install the 2 mounting screws into the anchors. Tighten screws. Ceiling 1/16" 10-1/2" C 5-1/2" 5-1/2" A E 6-1/4" D 7-7/8" 7-7/8" 7" 4-5/16" C X B 1-1/4" 6 31-10983
-
 1
1 -
 2
2 -
 3
3 -
 4
4 -
 5
5 -
 6
6 -
 7
7 -
 8
8 -
 9
9 -
 10
10 -
 11
11 -
 12
12 -
13
-
14
-
15
-
16
 |
 |
