Garmin GPSMAP 943 Owners Manual - Page 50
Adding the Trolling Motor Controls to, Screens, Trolling Motor Settings
 |
View all Garmin GPSMAP 943 manuals
Add to My Manuals
Save this manual to your list of manuals |
Page 50 highlights
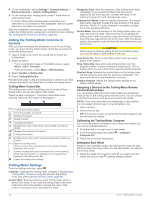
4 On the chartplotter, select Settings > Communications > Wireless Devices > Garmin Trolling Motor. 5 On the trolling motor display panel, press three times to enter pairing mode. on the trolling motor display panel is solid blue as it searches for a connection to the chartplotter, and turns green when the connection is successful. After the chartplotter and trolling motor connect successfully, enable the trolling motor overlay bar to control the motor (Adding the Trolling Motor Controls to Screens, page 42). Adding the Trolling Motor Controls to Screens After you have connected the chartplotter to the Force trolling motor, you must add the trolling motor control bar to screens to control the trolling motor. 1 Open a screen from which you would like to control the trolling motor. 2 Select an option: • From a combination page or SmartMode layout, select Menu > Edit > Overlays. • From a full screen, select Menu > Edit Overlays. 3 Select Top Bar or Bottom Bar. 4 Select Trolling Motor Bar. Repeat these steps to add the trolling motor controls to all of the screens from which you would like to control the trolling motor. Trolling Motor Control Bar The trolling motor control bar allows you to control a Force trolling motor and see the status of the motor. Select an item to engage it. The button illuminates when selected. Select the item again to disengage it. Trolling motor battery status. Turns the propeller on and off. Reduces the speed. Speed indicator. Increases the speed. Enables the cruise control at the current speed over ground (SOG). Engages the propellor at full speed. Trolling motor status. Enables anchor lock, which uses the trolling motor to hold your position. Steers the trolling motor. When in anchor lock, jogs the anchor lock position forward, backward, left, or right. Enables heading hold (set and maintain the current heading). When the trolling motor is in heading hold, an autopilot bar appears in the trolling motor bar. Opens the trolling motor settings. Navigation Gain: Sets the response of the trolling motor when navigating. If you need the trolling motor to be more responsive and move quicker, increase the value. If the motor is moving too much, decrease the value. Heading Hold Mode: Sets the heading hold mode. The Vessel Align option attempts to keep the boat pointing in the same direction. The Go To option attempts to navigate a straight line in the requested direction. Arrival Mode: Sets the behavior of the trolling motor when you reach the end of a route. With the Anchor Lock setting, the trolling motor holds the position using the anchor lock feature when the boat reaches the end of the route. With the Manual setting, the propeller turns off when the boat reaches the end of the route. CAUTION When using the Manual setting for the Arrival Mode option, you must be ready to take control of the boat. Auto Power On: Turns on the trolling motor when you apply power to the system. Prop. Stow Side: Sets which side of the trolling motor the propellor rotates to when stowing the trolling motor. This is helpful when you store other items near the stowed propellor. Shortcut Keys: Enables the shortcut keys on the trolling motor remote control to work with this particular chartplotter. The keys work with only one chartplotter at a time. Restore Defaults: Resets the trolling motor settings to the factory default values. Assigning a Shortcut to the Trolling Motor Remote Control Shortcut Keys You can quickly open commonly used screens by assigning a shortcut key on the trolling motor remote control. You can create a shortcut to screens, such as sonar screens and charts. NOTE: If you have more than one chartplotter on the network, you can assign shortcut keys to one chartplotter only. 1 Open a screen. 2 Hold a shortcut key. TIP: The shortcut is also saved to the Favorites category with the shortcut key number. Calibrating the Trolling Motor Compass You must calibrate the compass in the trolling motor before you can use the autopilot features. 1 Drive the boat to an open area of calm water. 2 From the trolling motor bar, select > Calibrate > Compass Cal.. 3 Follow the on-screen instructions. Setting the Bow Offset Based on the installation angle, the trolling motor may not align with the center line of your boat. For the best results, you should set the bow offset. 1 Adjust the angle of the trolling motor so it aligns with the center line of your boat , pointing straight forward. Trolling Motor Settings From the trolling motor bar, select . Calibrate: Calibrates the trolling motor compass (Calibrating the Trolling Motor Compass, page 42) and sets the trolling motor bow offset (Setting the Bow Offset, page 42). Anchor Gain: Sets the response of the trolling motor when in anchor lock mode. If you need the trolling motor to be more responsive and move quicker, increase the value. If the motor is moving too much, decrease the value. 42 Force® Trolling Motor Control
-
 1
1 -
2
-
3
-
4
-
5
-
6
-
7
-
8
-
9
-
10
-
11
-
12
-
13
-
14
-
15
-
16
-
17
-
18
-
19
-
20
-
21
-
22
-
23
-
24
-
25
-
26
-
27
-
28
-
29
-
30
-
31
-
32
-
33
-
34
-
35
-
36
-
37
-
38
-
39
-
40
-
41
-
42
-
43
-
44
-
 45
45 -
 46
46 -
 47
47 -
 48
48 -
 49
49 -
 50
50 -
 51
51 -
 52
52 -
 53
53 -
 54
54 -
 55
55 -
56
-
57
-
58
-
59
-
60
-
61
-
62
-
63
-
64
-
65
-
66
-
67
-
68
-
69
-
70
-
71
-
72
-
73
-
74
-
75
-
76
-
77
-
78
-
79
-
80
 |
 |
