Fagor 24 Inch Bmf-300x BMF-300X Installation Manual - Page 4
Leveling the Appliance, Installing the Door Handles, Reversing the Door Hinge
 |
View all Fagor 24 Inch Bmf-300x manuals
Add to My Manuals
Save this manual to your list of manuals |
Page 4 highlights
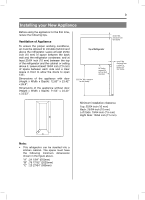
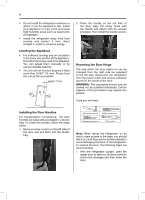
4 • Do not install the refrigerator outdoors or where it can be exposed to rain. Install your appliance in a dry room and avoid high humidity areas such as basements and garages. • Install the refrigerator away from heat sources and protect it from direct sunlight in order to conserve energy. Leveling the Appliance • For sufficient leveling and air circulation in the lower rear section of the appliance, the bottom feet may need to be adjusted. You can adjust them manually or by using a suitable spanner. • The unit will not function properly if tilted more than 25/64" (10 mm). Please level the unit as flat as possible. ≤25/64" (10mm) 2. Place the handle on the left side of the door, align the screw holes with the handle and attach with the screws provided. Then install the handle covers. Reversing the Door Hinge The side which the door opens on can be changed from the right side (as supplied) to the left side. Disconnect the refrigerator from the power outlet and remove products stored on the inside of the door. WARNING: This procedure should only be carried out by qualified individuals. Certain aspects of this procedure may require two people. Tools you will need: Installing the Door Handles For transportation convenience, the door handles are separately packaged in a plastic bag. To install the handles, follow the steps below. 1. Remove screw covers on the left side of the door and put them into the plastic bag. 8mm socket wrench Phillips screwdriver Flathead screwdriver 8mm wrench Note: When laying the refrigerator on its back to gain access to the base, you should rest it on a soft foam pad or similar material to avoid damaging the back of the refrigerator. To reverse the door, the following steps are recommended. 1. With the refrigerator upright, open the upper door to take out all door racks (to avoid rack damage) and then close the door.
-
 1
1 -
 2
2 -
 3
3 -
 4
4 -
 5
5 -
 6
6 -
 7
7 -
 8
8 -
 9
9 -
 10
10 -
11
-
12
-
13
-
14
-
15
-
16
-
17
-
18
-
19
-
20
 |
 |
