Epson WorkForce Pro WF-7310 Users Guide - Page 77
Job Arranger Lite, Sided Printing
 |
View all Epson WorkForce Pro WF-7310 manuals
Add to My Manuals
Save this manual to your list of manuals |
Page 77 highlights
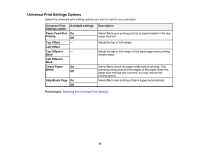
4. For the Paper Source setting, select where you loaded the paper you want to print on. 5. Select the size of the paper you loaded as the Document Size setting. Note: You can also select the User-Defined setting to create a custom paper size, but you cannot use the Borderless setting. 6. If you are printing a borderless photo, select Borderless. You can click Settings to access additional options for borderless printing. Note: You must select a compatible borderless paper type and size to print without borders. Check the borderless paper compatibility list for details. 7. Select the orientation of your document. Note: If you are printing an envelope, select Landscape. 8. Select the type of paper you loaded as the Paper Type setting. Note: The setting may not exactly match the name of your paper. Check the paper type settings list for details. 9. Select the Quality setting that matches the print quality you want to use. 10. Select a Color option: • To print a color document or photo, select the Color setting. • To print text and graphics in black or shades of gray, select the Black/Grayscale setting. 11. To print on both sides of the paper, select a 2-Sided Printing option. 12. To print multiple pages on one sheet of paper, or print one image on multiple sheets of paper, select one of the settings in the Multi-Page menu and select the printing options you want. 13. To print multiple copies and arrange their print order, select the Copies options. 14. To reduce noise during printing, turn on Quiet Mode (printing will be slower). 15. To preview your job before printing, select Print Preview. 16. To save your print job as a project that can be modified and combined with other print jobs, select Job Arranger Lite. Paper Source Options - Windows 77
-
 1
1 -
2
-
3
-
4
-
5
-
6
-
7
-
8
-
9
-
10
-
11
-
12
-
13
-
14
-
15
-
16
-
17
-
18
-
19
-
20
-
21
-
22
-
23
-
24
-
25
-
26
-
27
-
28
-
29
-
30
-
31
-
32
-
33
-
34
-
35
-
36
-
37
-
38
-
39
-
40
-
41
-
42
-
43
-
44
-
45
-
46
-
47
-
48
-
49
-
50
-
51
-
52
-
53
-
54
-
55
-
56
-
57
-
58
-
59
-
60
-
61
-
62
-
63
-
64
-
65
-
66
-
67
-
68
-
69
-
70
-
71
-
 72
72 -
 73
73 -
 74
74 -
 75
75 -
 76
76 -
 77
77 -
 78
78 -
 79
79 -
 80
80 -
 81
81 -
 82
82 -
83
-
84
-
85
-
86
-
87
-
88
-
89
-
90
-
91
-
92
-
93
-
94
-
95
-
96
-
97
-
98
-
99
-
100
-
101
-
102
-
103
-
104
-
105
-
106
-
107
-
108
-
109
-
110
-
111
-
112
-
113
-
114
-
115
-
116
-
117
-
118
-
119
-
120
-
121
-
122
-
123
-
124
-
125
-
126
-
127
-
128
-
129
-
130
-
131
-
132
-
133
-
134
-
135
-
136
-
137
-
138
-
139
-
140
-
141
-
142
-
143
-
144
-
145
-
146
-
147
-
148
-
149
-
150
-
151
-
152
-
153
-
154
-
155
-
156
-
157
-
158
-
159
-
160
-
161
-
162
-
163
-
164
-
165
-
166
-
167
-
168
-
169
-
170
-
171
-
172
-
173
-
174
-
175
-
176
-
177
-
178
-
179
-
180
-
181
-
182
-
183
-
184
-
185
-
186
-
187
-
188
-
189
-
190
-
191
-
192
-
193
-
194
-
195
-
196
-
197
-
198
-
199
-
200
-
201
-
202
-
203
-
204
-
205
-
206
-
207
-
208
-
209
-
210
 |
 |
