Epson LightScene EV-100 Quick Setup
Epson LightScene EV-100 Manual
 |
View all Epson LightScene EV-100 manuals
Add to My Manuals
Save this manual to your list of manuals |
Epson LightScene EV-100 manual content summary:
- Epson LightScene EV-100 | Quick Setup - Page 1
LightScene EV-100/LightScene EV-105 Quick Setup Before using the projector, make sure you read the safety instructions in the online User's Guide. External speakers Connect one end of a 3.5 mm stereo mini-jack audio cable to the projector's Audio Out port and the other end to your powered external - Epson LightScene EV-100 | Quick Setup - Page 2
problems, see the troubleshooting projector for a wireless network connection. Note: For more information about using the projector on a network, see the online User's Guide projector, and projecting from multiple computers. You can download the optional software and its manuals from the Epson - Epson LightScene EV-100 | Quick Setup - Page 3
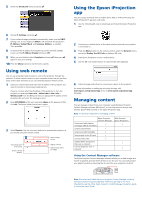
by inserting the SD card into your projector's card slot. Note: Download and install the Epson Projector Content Manager software from your product's support page (see "Where to get help"). For more information, see the online Epson Projector Content Manager Operation Guide or the online User - Epson LightScene EV-100 | Quick Setup - Page 4
projector and support services Visit www.epson.com/support (U.S.) or www.epson.ca/support (Canada) and search for your product to download software and utilities, view manuals, get FAQs and troubleshooting advice, or contact Epson. Telephone support To use the Epson PrivateLine® Support service
-
 1
1 -
 2
2 -
 3
3 -
 4
4
 |
 |

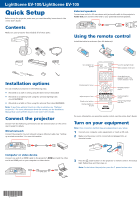
Quick Setup
Before using the projector, make sure you read the safety instructions in the
online
User’s Guide
.
Contents
Make sure your projector box included all of these parts:
Installation options
You can install your projector in the following ways:
•
Mounted on a wall or ceiling using the direct mount (included)
•
Mounted on a lighting track using the optional lighting track
mount (ELPMB54)
•
Mounted on a table or floor using the optional floor stand (ELPMB55)
Note:
To purchase optional mounts or other accessories, see “Optional
accessories.” For more information about the mounts, see the
Installation
Manual
that came with the mount or the online
User’s Guide
.
Connect the projector
Choose from the following connections. See the sections below or the online
User’s Guide
for details.
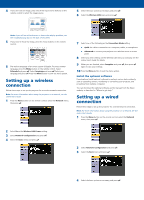
Wired network
Connect the projector to your network using an Ethernet cable. See “Setting
up a wired connection” for more information.
Computer or video device
Connect one end of an HDMI cable to the projector’s
HDMI
port and the other
end to an HDMI port on your computer or video device.
HDMI cable
External speakers
Connect one end of a 3.5 mm stereo mini-jack audio cable to the projector’s
Audio Out
port and the other end to your powered external speakers.
Using the remote control
Install the batteries as shown (two AA batteries).
Turn projector on
and off
Access projector menus
Display a test pattern
Display playlists on
SD card
Change image shape
and color
Navigate projector
menus
Access playlists you
assigned to each of the
numeric buttons (1 to 9)
Adjust projector focus
Control projector
volume
Switch to spotlight mode
Select a playlist on SD card
For more information on using the remote control, see the online
User’s Guide
.
Turn on your equipment
Note:
Your connection method may vary depending on your setup.
1
Connect your computer, video equipment, or insert an SD card.
2
Make sure the power cord is connected and plugged into an
electrical outlet.
3
Press the
power button on the projector or remote control. The Status
light flashes blue and then stays on.
Note:
To shut down the projector, press the
power button twice.
LightScene EV-100/LightScene EV-105