Epson LightScene EV-100 Installation Manual - Page 20
Adjusting the Orientation of the Projector, b
 |
View all Epson LightScene EV-100 manuals
Add to My Manuals
Save this manual to your list of manuals |
Page 20 highlights
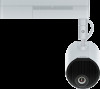
Installation Procedure Adjusting the Orientation of the Projector Use the ball joint to adjust the orientation and the angle of the projector. a Loosen the screw for the ball joint with a hexagonal wrench. b Adjust the orientation of the projector. c When you have finished making adjustments, securely tighten the screw for the ball joint section with a hexagonal wrench. c After adjusting the orientation of the projector, turn on the power and adjust the size and focus of the projected image. For more details, see the User's Guide supplied with the projector. 19
-
 1
1 -
2
-
3
-
4
-
5
-
6
-
7
-
8
-
9
-
10
-
11
-
12
-
13
-
14
-
 15
15 -
 16
16 -
 17
17 -
 18
18 -
 19
19 -
 20
20 -
 21
21 -
 22
22 -
 23
23
 |
 |

Installation Procedure
19
Adjusting the Orientation of the Projector
Use the ball joint to adjust the orientation and the angle of the projector.
a
Loosen the screw for the ball joint with a hexagonal wrench.
b
Adjust the orientation of the projector.
c
When you have finished making adjustments, securely tighten the screw for the ball joint
section with a hexagonal wrench.
c
After adjusting the orientation of the projector, turn on the power and adjust the size and focus of
the projected image. For more details, see the User's Guide supplied with the projector.