Denon DP 300F Owners Manual - English - Page 6
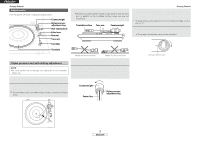
Counterweight, Lifter lever, Armrest, Tone arm, Cartridge, Turntable, Stylus pressure, adjustment
 |
UPC - 081757506915
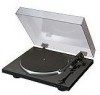
View all Denon DP 300F manuals
Add to My Manuals
Save this manual to your list of manuals |
Page 6 highlights
ENGLISH Getting Started Adjustments Turn the power off when making the adjustments. Counterweight Stylus pressure adjustment ring Anti-skating knob Lifter lever Armrest Tone arm 3 Balance the tone arm. • Move the counterweight forward or backward so that the tone arm is parallel to the turntable surface when you are not touching it. Turntable surface Tone arm Counterweight Getting Started 6 Turn the counterweight in the direction of arrow "A" and set to the appropriate stylus pressure for the cartridge. The appropriate stylus pressure for the included cartridge is 2.0 g. Set to "2". 7 Turn the anti-skating knob and set to the same value as for the cartridge's stylus pressure. • The proper anti-skating value can be achieved. Cartridge Turntable (Weight too far to the back) (Weight too far to the front) Stylus pressure and anti-skating adjustment NOTE: • Be very careful not to damage the stylus tip on the turntable sheet, etc. 1 Set the anti-skating knob to "0". 2 Lower the lifter lever and move the tone arm over the turntable. For cartridges with removable stylus covers, remove the stylus cover. 4 Set the tone arm back on the armrest. 5 Holding the counterweight with a finger so that it does not move, turn the stylus pressure adjustment ring so that it's "0" mark is lined up with the center line of the tone arm's rear shaft. Counterweight Center line A Stylus pressure adjustment ring Setting reference point 3 ENGLISH
-
 1
1 -
 2
2 -
 3
3 -
 4
4 -
 5
5 -
 6
6 -
 7
7 -
 8
8 -
 9
9 -
 10
10 -
 11
11
 |
 |
