Denon AVR 4308 Owners Manual - Page 63
Remote Lock Mode, Resetting the Microprocessor, Panel Lock Mode, Personal Memory Plus Function, Last - avr 4308ci reset
 |
UPC - 705105566306
View all Denon AVR 4308 manuals
Add to My Manuals
Save this manual to your list of manuals |
Page 63 highlights
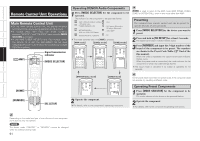
Getting Started Connections Setup Playback Remote Control Multi-Zone Information Troubleshooting Personal Memory Plus Function This function sets the settings (input mode, surround mode, etc.) last selected for the individual input sources. When you switch to an input source, the settings are automatically set to the ones that were set the last time that input source was used. The surround parameters, tone adjustment, room EQ settings and the volumes of the different speakers are stored for the individual surround modes. Last Function Memory This stores the settings as they were directly before the standby mode was set. When the power is turned back on, the settings are restored to as they were directly before the standby mode was set. Backup Memory The various settings are backed up for about 1 week, even if the power is turned off or the power cord is disconnected. Panel Lock Mode The buttons on the main unit can be locked if not using them. Locking operation of all the main unit buttons When this is set, none of the buttons on the main unit can be used. 1 Turn off the power using . 2 Press while simultaneously pressing and . To operate only 1 Turn off the power using . 2 Press while simultaneously pressing and . Perform the operation below to cancel the setting. q Press . w Press while simultaneously pressing and . Remote Lock Mode This setting can be made so that the remote control unit cannot operate the AVR-4308CI, for example when not using it, etc. 1 Turn off the power using . 2 Press while simultaneously pressing and . "Remote Lock" appears on the display. To cancel, perform the same operation as above. Resetting the Microprocessor Perform this procedure if the display is abnormal or if operations cannot be performed. When the microprocessor is reset, all the settings are reset to their default values. 1 Turn off the power using . 2 Press while simultaneously pressing and . 3 Once the display starts flashing at intervals of about 1 second, release the two buttons. If in step 3 the display does not flash at intervals of about 1 second, start over from step 1. 60
-
 1
1 -
2
-
3
-
4
-
5
-
6
-
7
-
8
-
9
-
10
-
11
-
12
-
13
-
14
-
15
-
16
-
17
-
18
-
19
-
20
-
21
-
22
-
23
-
24
-
25
-
26
-
27
-
28
-
29
-
30
-
31
-
32
-
33
-
34
-
35
-
36
-
37
-
38
-
39
-
40
-
41
-
42
-
43
-
44
-
45
-
46
-
47
-
48
-
49
-
50
-
51
-
52
-
53
-
54
-
55
-
56
-
57
-
 58
58 -
 59
59 -
 60
60 -
 61
61 -
 62
62 -
 63
63 -
 64
64 -
 65
65 -
 66
66 -
 67
67 -
 68
68 -
69
-
70
-
71
-
72
-
73
-
74
-
75
-
76
-
77
-
78
-
79
-
80
-
81
-
82
-
83
-
84
-
85
-
86
-
87
-
88
-
89
-
90
-
91
-
92
-
93
-
94
-
95
-
96
-
97
-
98
-
99
-
100
-
101
-
102
-
103
-
104
-
105
-
106
-
107
-
108
-
109
-
110
 |
 |
