D-Link DGS-6600-48T Hardware Installation Guide - Page 59
Installing Line Cards in the DGS-6600 Series Switch
 |
View all D-Link DGS-6600-48T manuals
Add to My Manuals
Save this manual to your list of manuals |
Page 59 highlights
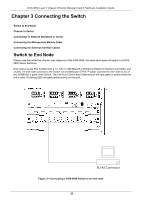
DGS-6600 Layer 3 Chassis Ethernet Managed Switch Hardware Installation Guide Figure 2-11 Schematic diagram for removing a line card Installing Line Cards in the DGS-6600 Series Switch Carry out the following steps to install boards in the DGS-6600 Series Switch: 1. Remove the component card or blank panel as instructed in the section Removing Line Cards from the DGS-6600. 2. Insert the new board into the guide rail of the vacant slot. 3. Use the levers on the left and right hand side to push the board into position and tighten the two captive screws on the board using a straight screw driver. CAUTION: 1. Take care not to hold the edge of the PCB or collide the components of the PCB. 2. Always use the levers to plug/unplug a PCB module. Never use force to remove a PCB module. 48
-
 1
1 -
2
-
3
-
4
-
5
-
6
-
7
-
8
-
9
-
10
-
11
-
12
-
13
-
14
-
15
-
16
-
17
-
18
-
19
-
20
-
21
-
22
-
23
-
24
-
25
-
26
-
27
-
28
-
29
-
30
-
31
-
32
-
33
-
34
-
35
-
36
-
37
-
38
-
39
-
40
-
41
-
42
-
43
-
44
-
45
-
46
-
47
-
48
-
49
-
50
-
51
-
52
-
53
-
 54
54 -
 55
55 -
 56
56 -
 57
57 -
 58
58 -
 59
59 -
 60
60 -
 61
61 -
 62
62 -
 63
63 -
 64
64 -
65
-
66
-
67
-
68
-
69
-
70
-
71
-
72
-
73
-
74
-
75
-
76
-
77
-
78
-
79
-
80
-
81
-
82
-
83
-
84
-
85
-
86
-
87
-
88
-
89
-
90
-
91
-
92
-
93
-
94
-
95
-
96
 |
 |
