Compaq 470007-798 Making Hardware Changes - Compaq Deskpro Family of Personal - Page 87
Be sure the guide screws line up with the guide slots
 |
UPC - 720591653163
View all Compaq 470007-798 manuals
Add to My Manuals
Save this manual to your list of manuals |
Page 87 highlights
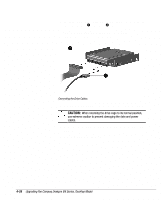
5. Install the drive and adapter in the desired drive bay by sliding it into the front of the drive cage; secure the drive with the green latch. ✎ Be sure the guide screws line up with the guide slots in the drive cage. You may need to tilt the drive cage forward to its upright position to secure the green latch. Installing an Adapter with a 3.5-Inch Drive CAUTION: Before completing the following step, note that the drive slides easily out of the drive cage. Do not allow the drive to strike a hard surface if it slides from the drive cage. Excessive shock can damage the drive. Making Hardware Changes 4-27
-
 1
1 -
2
-
3
-
4
-
5
-
6
-
7
-
8
-
9
-
10
-
11
-
12
-
13
-
14
-
15
-
16
-
17
-
18
-
19
-
20
-
21
-
22
-
23
-
24
-
25
-
26
-
27
-
28
-
29
-
30
-
31
-
32
-
33
-
34
-
35
-
36
-
37
-
38
-
39
-
40
-
41
-
42
-
43
-
44
-
45
-
46
-
47
-
48
-
49
-
50
-
51
-
52
-
53
-
54
-
55
-
56
-
57
-
58
-
59
-
60
-
61
-
62
-
63
-
64
-
65
-
66
-
67
-
68
-
69
-
70
-
71
-
72
-
73
-
74
-
75
-
76
-
77
-
78
-
79
-
80
-
81
-
 82
82 -
 83
83 -
 84
84 -
 85
85 -
 86
86 -
 87
87 -
 88
88 -
 89
89 -
 90
90 -
 91
91 -
 92
92 -
93
-
94
-
95
-
96
-
97
-
98
-
99
-
100
-
101
-
102
-
103
-
104
-
105
-
106
-
107
-
108
-
109
-
110
-
111
-
112
-
113
-
114
-
115
-
116
-
117
-
118
-
119
-
120
-
121
-
122
-
123
-
124
-
125
-
126
-
127
-
128
-
129
-
130
-
131
-
132
-
133
-
134
-
135
-
136
-
137
-
138
-
139
-
140
-
141
-
142
-
143
-
144
-
145
-
146
-
147
-
148
-
149
-
150
-
151
-
152
 |
 |

Making Hardware Changes
4-27
5.
Install the drive and adapter in the desired drive bay by
sliding it into the front of the drive cage; secure the drive
with the green latch.
Be sure the guide screws line up with the guide slots in
the drive cage. You may need to tilt the drive cage
forward to its upright position to secure the green latch.
Installing an Adapter with a 3.5-Inch Drive
CAUTION:
Before completing the following step, note that the
drive slides easily out of the drive cage. Do not allow the drive to
strike a hard surface if it slides from the drive cage. Excessive
shock can damage the drive.