Brother International TL-847A Instruction Manual - English and Spanish
Brother International TL-847A Manual
 |
View all Brother International TL-847A manuals
Add to My Manuals
Save this manual to your list of manuals |
Brother International TL-847A manual content summary:
- Brother International TL-847A | Instruction Manual - English and Spanish - Page 1
TN-841A , 842A, 845A 872A, 875A TL-847A , 848A INSTRUCTION MANUAL BEDIENUNGSANLEITUNG MANUEL D'INSTRUCTIONS MANUAL DE INSTRUCCIONES TWIN NEEDLE LOCK STITCHER Please read this manual before using the machine. Please keep this manual within easy reach for quick reference. ZWEINADEL- - Brother International TL-847A | Instruction Manual - English and Spanish - Page 2
you very much for buying a BROTHER sewing machine. Before using your new machine, please read the safety instructions below and the explanations given in the instruction manual. With industrial sewing machines, it oil out of the reach of children. - i - TN-8400, 8700 (English) TL-8400 (English) - Brother International TL-847A | Instruction Manual - English and Spanish - Page 3
Brother dealer or a qualified technician. ¡ If the machine develops a problem, contact your nearest Brother technician. ¡ Ask your Brother dealer or a qualified replacement parts as specified by Brother. ¡If any safety devices have using the machine. ¡Any problems in machine operation which result - Brother International TL-847A | Instruction Manual - English and Spanish - Page 4
einem Fachmann montiert werden. ¡ Falls Elektrikerarbeiten gemacht werden müssen, wenden Sie sich an Ihren Brother-Händler oder an einen qualifizierten Elektriker. ¡ Weil die Nähmaschine mehr als 46 kg wiegt das Öl nicht in Reichweite von Kindern auf. - iii - TN-8400, 8700 (German) TL-8400 (German) - Brother International TL-847A | Instruction Manual - English and Spanish - Page 5
che auftreten, muß der Netzschalter sofort ausgeschaltet werden. Wenden Sie sich danach an den nächsten Brother-Händler oder an einen qualifizierten Fachmann. ¡ Bei einer Betriebsstörung wenden Sie sich bitte an ückgeführt werden können, werden nicht durch die Garantie gedeckt. TN-8400, 8700 TL-8400 - Brother International TL-847A | Instruction Manual - English and Spanish - Page 6
machine à coudre BROTHER. Avant d'utiliser votre nouvelle machine, veuillez lire attentivement les instructions de sécurité ci-dessous et les explications données dans le manuel d'instructions. Pour utiliser les ées. Ranger l'huile hors de portée des enfants. TN-8400, 8700 (French) TL-8400 (French) - Brother International TL-847A | Instruction Manual - English and Spanish - Page 7
risquera de se blesser ou d'endommager la machine. ¡ Utiliser seulement les pièces de rechange recommandées par Brother. ¡ Si des dispositifs de sécurité ont été déposés, veiller absolument à les remettre à leur place de la machine ne sera pas couverte par la garantie. - vi - TN-8400, 8700 TL-8400 - Brother International TL-847A | Instruction Manual - English and Spanish - Page 8
haber adquirido una máquina de coser BROTHER. Antes de usar su nueva máquina, por favor lea las instrucciones de seguridad a continuación y las explicaciones en este manual. Al usar máquinas de coser el aceite lubricante lejos del alcance de los niños. TN-8400, 8700 (Spanish) TL-8400 (Spanish) - Brother International TL-847A | Instruction Manual - English and Spanish - Page 9
heridas o la máquina podría resultar dañada. ¡ Usar sólo las piezas de repuesto especificadas por Brother. ¡ Si se hubieran desmontado alguno de los dispositivos de seguridad, asegurarse de volver a instalarlos a su en la máquina no serán cubiertos por la garantía. - viii - TN-8400, 8700 TL-8400 - Brother International TL-847A | Instruction Manual - English and Spanish - Page 10
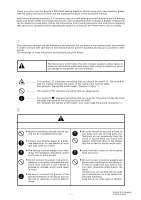
wenden Sie sich an den nächsten Brother-Händler. 5 Les étiquettes d'avertissement suivantes sont fixées sur la machine à coudre. Veiller à suivre les instructions figurant sur les étiquettes à tout moment segura, se corre el peligro de sufrir golpes eléctricos serios. - ix - TN-8400, 8700 TL-8400 - Brother International TL-847A | Instruction Manual - English and Spanish - Page 11
1 3 w q e - x - 2 TN-8400, 8700 TL-8400 - Brother International TL-847A | Instruction Manual - English and Spanish - Page 12
bobbin or cap 26 6-4-1. Installing the bobbin [841A, 842A, 847A, 872A 26 6-4-2. Installing the cap [845A, 848A, 875A] Number of stitches: quick-reference guide 34 7. SEWING 35 7-1. Sewing 36 7-2. Backtacking [842A, 845A, 847A, 848A, 872A, 875A 36 TROUBLESHOOTING GUIDE 75 - xi - TN-8400, 8700 - Brother International TL-847A | Instruction Manual - English and Spanish - Page 13
6-4. Einsetzen der Spule bzw. der Spulenkapsel ..... 26 6-4-1. Einsetzen der Spule [841A, 842A, 847A, 872A 26 6-4-2. Einsetzen der Spulenkapsel [845A, 848A, 875A 27 6-5. Einfädeln des Oberfadens Austauschen der Oberfadenspannungsvorrichtung 74 14. FEHLERSUCHE 77 - xii - TN-8400, 8700 TL-8400 - Brother International TL-847A | Instruction Manual - English and Spanish - Page 14
rieur 25 6-4. Installation de la canette ou du capuchon ....... 26 6-4-1. Installation de la canette [841A, 842A, 847A, 872A 26 6-4-2. Installation du capuchon [845A, 848A, 875A 27 6-5. Enfilage du fil supérieur 29 6-6. supérieur 74 14. RECHERCHES DE PANNES 79 - xiii - TN-8400, 8700 TL-8400 - Brother International TL-847A | Instruction Manual - English and Spanish - Page 15
del hilo inferior 25 6-4. Instalación de la bobina o tapa 26 6-4-1. Instalación de la bobina [841A, 842A, 847A 872A 26 6-4-2. Instalación de la tapa [845A, 848A, 875A 27 6-5. Enhebrado del hilo superior 29 6-6. Ajuste del GUIA PARA LA LOCALIZACION DE FALLAS 81 - xiv - TN-8400, 8700 TL-8400 - Brother International TL-847A | Instruction Manual - English and Spanish - Page 16
NOMBRES DE LAS PIEZAS PRINCIPALES 1. NAMES OF MAJOR PARTS 1. HAUPTTEILE 1. NOM DES PIECES PRINCIPALES 1. NOMBRES DE LAS PIEZAS PRINCIPALES TN-841A !0 e w o TN-842A, 872A TL-847A r t !1 !0 e w o r t y !1 q q u TN-845A, 875A TL-848A w !0 e o q r t y !1 i !1 u - 1 - TN-8400, 8700 - Brother International TL-847A | Instruction Manual - English and Spanish - Page 17
jauge d'huile y Levier de couture inverse !1 Couvercle de courroie e Ventanilla medidora del aceite y Palanca de costura hacia atrás !1 Cubierta de la correa - 2 - TN-8400, 8700 TL-8400 - Brother International TL-847A | Instruction Manual - English and Spanish - Page 18
DE LA MACHINE 2. ESPECIFICACIONES DE LA MAQUINA BROTHER INDUSTRIES, LTD. T -84 A- [N] Needle mm 4 mm 4 mm 5 mm 5 mm 5 mm 5 mm 842A 845A 847A 848A 01F 02F 03F 003 005 003 005 007 001 001 Foundation Miederwaren Fondation base mm 5 mm 4 mm 4 mm 4 mm 4 mm - 3 - TN-8400, 8700 TL-8400 - Brother International TL-847A | Instruction Manual - English and Spanish - Page 19
Nadel Aiguille DP x 5 DP x 5 #11-#16 #14-#22 Aguja 842A 01F 02F 03F 003 005 7 mm 7 mm 7 mm 7 mm 845A 847A 848A 003 005 007 001 001 13 mm 13 mm 13 mm 13 mm 1 mm 1 mm 1 mm 1 mm DP x 5 #9-#14 DP x No Yes Nicht Vorhanden vorhanden Non Oui No Sí - 4 - TN-8400, 8700 TL-8400 - Brother International TL-847A | Instruction Manual - English and Spanish - Page 20
2. TECHNISCHE DATEN 2. SPECIFICATIONS DE LA MACHINE 2. ESPECIFICACIONES DE LA MAQUINA BROTHER INDUSTRIES, LTD. TN-87 A- [872A] TWIN NEEDLE NEEDLE FEED LOCK STITCHER DP x 17 #16 - #23 No Nicht vorhanden Non No Yes Vorhanden Oui Sí Yes Vorhanden Oui Sí - 5 - TN-8400, 8700 TL-8400 - Brother International TL-847A | Instruction Manual - English and Spanish - Page 21
types types de crochets rotatifs suivants sont disponibles. Choisir le type 842A-003, 847A Cap Kappe type type 847A 841A-005, 842A-005 845A, 848A 872A - Brother International TL-847A | Instruction Manual - English and Spanish - Page 22
. Es eignet sich daher, wenn bei der Verarbeitung das Ma- S36995-901 (reinforced tip type) (mit verstärkter Spitze) 841A-003, 842A-003, 847A terial und der Faden nicht mit Öl verschmutzt werden (Type à pointe renforcée darf. ¡Voie de roulement en plastique (Tipo de punta reforzada) La - Brother International TL-847A | Instruction Manual - English and Spanish - Page 23
845A, 872A y 875A *2: Pieza estándar al momento de salir de fábrica para 847A y 848A Thread take-up spring type Fadenabnahmefeder Type de ressort de releveur de fil Tipo de resorte de tirahilos (Single) (einfach) (Simple Débil aprox. 17,64 N Muy débil aprox. 2,94 N - 8 - TN-8400, 8700 TL-8400 - Brother International TL-847A | Instruction Manual - English and Spanish - Page 24
¡ La partie supérieure de la table doit avoir 40 mm d'épaisseur et doit être assez solide pour pouvoir supporter le poids et les vibrations de la machine à coudre. ¡ Percer les trous comme indiqué dans l'illustration ci- R10 520.5 4-29 190 4-29 A 4-R10 R10 1200 - 9 - TN-8400, 8700 TL-8400 - Brother International TL-847A | Instruction Manual - English and Spanish - Page 25
> Power Motor ¡ Select the correct motor from those listed in the above table. ¡ Refer to the instruction manual for the motor for details on in- stalling and using the motor. Single-phase Three-phase 2-pole, las especificaciones de la corriente de su localidad. - 10 - TN-8400, 8700 TL-8400 - Brother International TL-847A | Instruction Manual - English and Spanish - Page 26
exclusivement à un technicien qualifié. ¡Pour tout travail concernant le système électrique, s'adresser à un concessionnaire Brother ou à un électricien qualifié. ¡La machine à coudre pèse plus de 46 kg. L'installation nécessite de la correa en la cabeza de la máquina. - 11 - TN-8400, 8700 TL-8400 - Brother International TL-847A | Instruction Manual - English and Spanish - Page 27
graisseur en plastique u dans le réservoir d'huile q. 5. Atornillar la copa de lubricación de plástico u en el depósito de aceite q. - 12 - TN-8400, 8700 TL-8400 - Brother International TL-847A | Instruction Manual - English and Spanish - Page 28
bien colocado en el orificio de la mesa, la cabeza de la máquina no quedará bien estable al inclinarla hacia atrás. - 13 - TN-8400, 8700 TL-8400 - Brother International TL-847A | Instruction Manual - English and Spanish - Page 29
releveur r r de barre de pied presseur. t 2. Ajuste del levantador de rodilla. 1) Bajar el prensatelas t usando el levantador de barra de prensatelas r. - 14 - TN-8400, 8700 TL-8400 - Brother International TL-847A | Instruction Manual - English and Spanish - Page 30
placa de aguja cuando se presiona completamente la placa de levantador de rodilla q. 8) Después de ajustar completamente, apretar fuertemente la tuerca o. - 15 - TN-8400, 8700 TL-8400 - Brother International TL-847A | Instruction Manual - English and Spanish - Page 31
de la bobina q hacia atrás y verificar que exista una separación de aproximadamente 8 mm entre la rueda de la bobinadora w y la correa e. - 16 - TN-8400, 8700 TL-8400 - Brother International TL-847A | Instruction Manual - English and Spanish - Page 32
correa D t de manera que se superponga a la cubierta de la correa U q unos 2-3 mm, y luego apretar provisionalmente los dos tornillos y. 2-3 mm v q vt - 17 - TN-8400, 8700 TL-8400 - Brother International TL-847A | Instruction Manual - English and Spanish - Page 33
while referring to the cotton stand instruction manual, and then install the cotton stand porte-bobine q en se reportant au manuel d'instructions de la broche porte-bobine, puis installer . Armar el soporte del carrete q consultando el manual de instrucciones del soporte, y luego instalar el soporte - Brother International TL-847A | Instruction Manual - English and Spanish - Page 34
utilisée pendant une longue période. ¡ Utiliser seulement l'huile de lubrification (Nisseki Sewing Lube 10) recommandée par Brother. ¡ La máquina de coser debe ser lubricada y se le debe agregar aceite antes de ser usada por la mirilla para el nivel de aceite w. - 19 - TN-8400, 8700 TL-8400 - Brother International TL-847A | Instruction Manual - English and Spanish - Page 35
d'huile les réservoirs auxiliaires gauche et droit environ à moitié. Llenar aproximadamente hasta la mitad los tanques de aceite secundarios izquierdo y derecho. - 20 - TN-8400, 8700 TL-8400 - Brother International TL-847A | Instruction Manual - English and Spanish - Page 36
rotation to the correct direction while referring to the instruction manual for the motor. 1. Schließen Sie den sens de rotation correct tout en se reportant au manuel d'instructions du moteur. 1. Insertar el enchufe del cable de alimentaci manual de instrucciones del motor. - 21 - TN-8400, 8700 - Brother International TL-847A | Instruction Manual - English and Spanish - Page 37
las agujas w con su ranura larga hacia adentro, insertarlas completamente en las barras de la aguja, y volver a apretarlas con los tornillos q. - 22 - TN-8400, 8700 TL-8400 - Brother International TL-847A | Instruction Manual - English and Spanish - Page 38
izquierda. 2. Después de tirar hacia arriba las perillas de los cangrejos e, sacar la esquina de la tapa r para desmontar la tapa r. - 23 - TN-8400, 8700 TL-8400 - Brother International TL-847A | Instruction Manual - English and Spanish - Page 39
the thread cannot be wound on evenly, loosen the screw r and move the bobbin winder guide t to the side where there is less thread. * Turn the adjustment screw y to D e r F a d e n s o l l t e h ö c h s t e n s z u 8 0 % d e r Spulenkapazität aufgewickelt werden. - 24 - TN-8400, 8700 TL-8400 - Brother International TL-847A | Instruction Manual - English and Spanish - Page 40
canette reviendra automatiquement à sa place. * Si le fil ne se bobine pas uniformément, desserrer la vis r et déplacer le guide t du bobineur de canette vers le côté où il y a moins de fil. * Tourner la vis de réglage y pour ximo de 80% de la capacidad de la bobina. - 25 - TN-8400, 8700 TL-8400 - Brother International TL-847A | Instruction Manual - English and Spanish - Page 41
Installing the bobbin [841A, 842A, 847A, 872A] 6-4-1. Einsetzen der Spule [841A, 842A, 847A, 872A] 6-4-1. Installation de la canette [841A, 842A, 847A, 872A] 6-4-1. Instalación de la bobina [841A, 842A, 847A, 872A] q w r e 50 mm. 7. Cerrar las placas laterales. - 26 - TN-8400, 8700 TL-8400 - Brother International TL-847A | Instruction Manual - English and Spanish - Page 42
és del muelle de prevención de flojedades en el hilo r. 3) Pasar el hilo a través del agujero del hilo t y sacar unos 50 mm. - 27 - TN-8400, 8700 TL-8400 - Brother International TL-847A | Instruction Manual - English and Spanish - Page 43
posición superior. 4. Insertar la tapa w en el cangrejo. 5. Empujar la perilla del cangrejo u para que quede horizontal. 6. Cerrar la mesa deslizante. - 28 - TN-8400, 8700 TL-8400 - Brother International TL-847A | Instruction Manual - English and Spanish - Page 44
. ¡ La posición del protector de dedos w puede ser ajustada. Se debe asegurar de bajarlo una vez que haya terminado de enhebrar. - 29 - TN-8400, 8700 TL-8400 - Brother International TL-847A | Instruction Manual - English and Spanish - Page 45
q w [841A, 842A, 847A, 872A] [845A, 848A, sintético Arm thread guide Fadenführung Guide-fil du bras . Arm thread guide Fadenführung Guide-fil du bras Guiahílo del guide. Bei Verwendung von Synthetik-Fäden den mitgelieferten Filz in die Fadenführung einsetzen. Placer le feutre dans le guide - Brother International TL-847A | Instruction Manual - English and Spanish - Page 46
a funcionar si por descuido se pisara el pedal, lo que podría resultar en heridas. [842A, 845A, 847A, 848A, 872A, 875A] Turn the stitch length dial q clockwise or counterclockwise so that the desired stitch length mayor sea el número, más larga será la puntada. - 31 - TN-8400, 8700 TL-8400 - Brother International TL-847A | Instruction Manual - English and Spanish - Page 47
ón q salte hacia afuera.) Nota: No oprimir el botón del regulador de la alimentación q mientras se está usando la máquina de coser. - 32 - TN-8400, 8700 TL-8400 - Brother International TL-847A | Instruction Manual - English and Spanish - Page 48
deje de funcionar la barra de aguja de la derecha: Parada de aguja Mover la palanca de detención q hacia la posición "R". - 33 - TN-8400, 8700 TL-8400 - Brother International TL-847A | Instruction Manual - English and Spanish - Page 49
q volverá su posición original de forma automática. 6-7-2. Number of stitches: quick-reference guide 6-7-2. Bestimmung der Stichzahl 6-7-2. Tableau fixant le nombre de points 6-7-2. Número de puntadas: para una largo de puntada de 2,9 mm, el número de puntadas será 6. - 34 - TN-8400, 8700 TL-8400 - Brother International TL-847A | Instruction Manual - English and Spanish - Page 50
piezas móviles o colocar ningún objeto sobre la máquina al coser, pues podría resultar en heridas o la máquina podría resultar dañada. - 35 - TN-8400, 8700 TL-8400 - Brother International TL-847A | Instruction Manual - English and Spanish - Page 51
Backtacking [842A, 845A, 847A, 848A, 872A, 875A] 7-2. Verriegeln [842A, 845A, 847A, 848A, 872A, 875A] 7-2. Point d'arrêt [842A, 845A, 847A, 848A, 872A, 875A] 7-2. Rematado [842A, 845A, 847A, 848A, 872A, 875A inicial, la alimentación continuará de siendo hacia adelante. - 36 - TN-8400, 8700 TL-8400 - Brother International TL-847A | Instruction Manual - English and Spanish - Page 52
q für die verschiedenen Stoff- und Fadenarten eingestellt werden. Less tension Geringere Spannung * For caps * Im Falle einer Spulenkapsel More tension Höhere Spannung - 37 - TN-8400, 8700 TL-8400 - Brother International TL-847A | Instruction Manual - English and Spanish - Page 53
Für dicke Stoffe Presser foot pressure Stoffdrückerfußdruck 29.4 N Adjustment screw height Einstellschraube 31 mm 39.2 N 28 mm 49 N 26 mm - 38 - TN-8400, 8700 TL-8400 - Brother International TL-847A | Instruction Manual - English and Spanish - Page 54
de ajuste de tensión del hilo inferior q. Moins de tension Menos tensión * Pour les capuchons * Para tapas Pulus de tension Más tensión - 39 - TN-8400, 8700 TL-8400 - Brother International TL-847A | Instruction Manual - English and Spanish - Page 55
d'épaisseur moyenne Para tejidos de grosor medio 39,2 N 28 mm Pour des matériaux épais Para tejidos gruesos 49 N 26 mm - 40 - TN-8400, 8700 TL-8400 - Brother International TL-847A | Instruction Manual - English and Spanish - Page 56
. q Needle feed Nadeltransport q Lower feed Untertransport w Needle bar rocking crank assembly Nadelstangenkipphebel y y Needle feed Nadeltransport e Lower feed Untertransport t Timing pulley D r Steuerscheibe D - 41 - TN-8400, 8700 TL-8400 - Brother International TL-847A | Instruction Manual - English and Spanish - Page 57
. 10. Stellen Sie den Abstand zwischen dem Öffner und dem Drehgreifer auf 0,1-0,2 mm ein. 11. Bringen Sie den Stoffdrückerfuß an. - 42 - TN-8400, 8700 TL-8400 - Brother International TL-847A | Instruction Manual - English and Spanish - Page 58
e w Ensemble d'engrenage t à balancier de la barre à aiguille Poulie de synchronisation D r Conjunto de eje oscilante Polea de sincronización D de barra de aguja - 43 - TN-8400, 8700 TL-8400 - Brother International TL-847A | Instruction Manual - English and Spanish - Page 59
nement à sa place. 08. Monter la plaque à aiguille (pour l'entraînement inférieur). Faire attention au support du crochet ratatif lors du montage. 09. Régler de manière que l'écart entre le dispositif d'ouverture sea 0,1-0,2 mm. 11. Instalar el pie del prensatelas. - 44 - TN-8400, 8700 TL-8400 - Brother International TL-847A | Instruction Manual - English and Spanish - Page 60
be carried out each day in order to maintain the performance of this machine and to ensure a long service life. Furthermore, if the sewing machine has not been used for a long period of time, carry out Mantener el aceite lubricante lejos del alcance de los niños. - 45 - TN-8400, 8700 TL-8400 - Brother International TL-847A | Instruction Manual - English and Spanish - Page 61
lwanne ein. s Ajout d'huile * Utiliser seulement de l'huile de graissage (Nisseki Sewing Lube 10) spécifiée par Brother. 1. Si le niveau d'huile baisse jusqu'à la ligne de référence inférieure marquée sur la fenêtre q el recipiente de aceite e en la bandeja de aceite. - 46 - TN-8400, 8700 TL-8400 - Brother International TL-847A | Instruction Manual - English and Spanish - Page 62
punta de la aguja estuviera rota, la aguja deberá ser reemplazada. 3. Bajar el protector de dedos r. 4. Realizar una costura de prueba. - 47 - TN-8400, 8700 TL-8400 - Brother International TL-847A | Instruction Manual - English and Spanish - Page 63
inspection of the sewing machine should only be carried out by qualified personnel. ¡ Ask your Brother dealer or a qualified electrician to carry out any maintenance and inspection of the electrical system. à respecter scrupuleusement toutes les précautions de sécurité. - 48 - TN-8400, 8700 TL-8400 - Brother International TL-847A | Instruction Manual - English and Spanish - Page 64
por personal especializado. ¡Consultar a su distribuidor Brother o un electricista calificado por cualquier trabajo de tête de machine vers l'arrière. 3. Desserrer la vis w relever ou abaisser le support e des griffes de telle sorte que les griffes q se relèvent d'environ 1,0 mm -8400, 8700 TL-8400 - Brother International TL-847A | Instruction Manual - English and Spanish - Page 65
t. 6. Ajustar la presión del prensatelas girando el tornillo de ajuste del prensatelas w, y luego apretarlo con la tuerca q. (Consultar la página 40.) - 50 - TN-8400, 8700 TL-8400 - Brother International TL-847A | Instruction Manual - English and Spanish - Page 66
fijación i. 2. Aflojar la perilla y, y luego girar la perilla de ajuste o para ajustar la tensión. 3. Apretar el tornillo i, y luego apretar la perilla y. - 51 - TN-8400, 8700 TL-8400 - Brother International TL-847A | Instruction Manual - English and Spanish - Page 67
à la position médiane de la plage d'utilisation du guide !0 du ressort du releveur de fil. 1. Desserrer la vis !1. 2. Desserrer le bouton y, puis tourner les guides !0 des ressorts de releveur de fil gauche et droit el tornillo !1, y luego apretar la perilla y. - 52 - TN-8400, 8700 TL-8400 - Brother International TL-847A | Instruction Manual - English and Spanish - Page 68
Serrer la vis C de manière que l'engrenage t de l'arbre inférieur entre légèrement en contact avec la plaque y du guide-fil. En outre, serrer la vis C sans l'éloigner de sa butée. 1. Inclinar hacia atrás la cabeza de la máquina. C sin moverlo de su posición de parada. - 53 - TN-8400, 8700 TL-8400 - Brother International TL-847A | Instruction Manual - English and Spanish - Page 69
de ajuste o estén flojos, de lo contrario se cambiará la sincronización entre la aguja y el cangrejo. 4. Apretar los tornillos de ajuste o. - 54 - TN-8400, 8700 TL-8400 - Brother International TL-847A | Instruction Manual - English and Spanish - Page 70
0,2 mm cuando el abridor !0 se empuja en la dirección de la flecha tanto como sea posible. 2. Apretar el tornillo de fijación !1. - 55 - TN-8400, 8700 TL-8400 - Brother International TL-847A | Instruction Manual - English and Spanish - Page 71
de la barra de agujas [841A, 842A, 847A, 872A] a !3 !2 841A 842A 872A 847A s Needle bar height 1. Change the stitch length en haut de la barre à aiguille !2 doit être alignée avec le bord inférieur du support !3 de la barre à aiguille. 4. Desserrer la vis !4 et élever et abaisser la TL-8400 - Brother International TL-847A | Instruction Manual - English and Spanish - Page 72
AJUSTES ESTANDARES [841A, 842A, 847A, 872A] s Needle bar lift b (H) mm !2 !2 Needle height 847A 841A Nadelhöhe Hauteur de l'aiguille !6 003 005 2 mm 2 mm 2 mm 2 mm 3 mm 3 mm 3 mm 3 mm 2.4 mm 2,4 mm 2,4 mm 2,4 mm 847A 001 2 mm 2 mm 2 mm 2 mm 2 mm 2 mm 2 mm 2 mm 2 mm 2 mm 2 mm 2 mm - Brother International TL-847A | Instruction Manual - English and Spanish - Page 73
11. The reference line b on the needle bar !2 will be aligned with the lower edge of the needle bar supporter !3. The rotary hook tip !5 must be aligned with the center of the needle at this time. 12. Tilt back . Instalar el alimentador. 16. Instalar la placa de aguja. - 58 - TN-8400, 8700 TL-8400 - Brother International TL-847A | Instruction Manual - English and Spanish - Page 74
H). The reference line b on the needle bar !2 will be aligned with the lower edge of the needle bar supporter !3. The rotary hook tip !5 must be aligned with the center of the needle at this time. 05. Tilt back 11. Install the feed dog. 12. Install the needle plate. - 59 - TN-8400, 8700 TL-8400 - Brother International TL-847A | Instruction Manual - English and Spanish - Page 75
de H.) La ligne de référence b marquée sur la barre à aiguille !2 sera alignée avec le bord inférieur du support !3 de la barre à aiguille. A ce moment, l'extrémité du crochet rotatif !5 doit être alignée avec le centre el alimentador. 12. Instalar la placa de aguja. - 60 - TN-8400, 8700 TL-8400 - Brother International TL-847A | Instruction Manual - English and Spanish - Page 76
: Lösen Sie die Schmierungsschraube q nicht zu stark, weil sonst das Öl im Ölbehälter rasch aufgebraucht wird. s Guide de réglage de lubrification 1. Incliner la tête de machine vers l'arrière. 2. Tourner la vis q de ré en el tanque de aceite se gastará rápidamente. - 61 - TN-8400, 8700 TL-8400 - Brother International TL-847A | Instruction Manual - English and Spanish - Page 77
el papel. (El ajuste estará bien si al cabo de 10 segundos se esparce la cantidad de aceite indicada a la izquierda.) - 62 - TN-8400, 8700 TL-8400 - Brother International TL-847A | Instruction Manual - English and Spanish - Page 78
Ligne de référence Línea de referencia [841A] Mark Markierung Repère Marca w q [842A, 845A, 847A, 848A, 872A, 875A] Red dot Roter Punkt Point rouge Punto rojo 1. Remove the needles. 2. Remove the quina. 7. Cambiar la cubierta de la correa. 8. Instalar las agujas. - 63 - TN-8400, 8700 TL-8400 - Brother International TL-847A | Instruction Manual - English and Spanish - Page 79
¡ Les jauges doivent être remplacées exclusivement par des pièces spécifiées par Brother. ¡ El cambio de las piezas calibradas debe ser realizado por personal técnico calificado. ¡ Desconectar solo deben ser cambiadas por las piezas especificadas por Brother. - 64 - TN-8400, 8700 TL-8400 - Brother International TL-847A | Instruction Manual - English and Spanish - Page 80
Sie das Maschiennoberteil zurück. 9. Incliner la tête de machine vers l'arrière 9. Inclinar la cabeza de la máquina hacia atrás. - 65 - TN-8400, 8700 TL-8400 - Brother International TL-847A | Instruction Manual - English and Spanish - Page 81
Attach the feed dog q. [841A, 842A, 847A, 872A] 1) Turn the machine pulley and check q anbringen. [841A, 842A, 847A, 872A] 1) Drehen Sie die Fixer les griffes q. [841A, 842A, 847A, 872A] 1) Tourner la poulie de Colocar el alimentador q. [841A, 842A, 847A, 872A] 1) Girar la polea de la - Brother International TL-847A | Instruction Manual - English and Spanish - Page 82
LA LARGEUR D'AIGUILLE) 12. CAMBIO DE LAS PIEZAS CALIBRADAS (CAMBIO DEL ANCHO DE LA AGUJA) a 841A 842A 872A t a 847A A B C 845A 848A 875A y D t e r 0.05 mm 0,05 mm 4. Check the needle bar height. a 0,05 mm. Después de ajustar, apretar los tornillos A, B y C. - 67 - TN-8400, 8700 TL-8400 - Brother International TL-847A | Instruction Manual - English and Spanish - Page 83
center Nadelmitte Centre de l'aiguille Centro de las agujas 1-1.5 mm 841A - 842A 845A- - 2.4 mm 872A 875A - 847A 848A --- 2.0 mm 07. Adjust the needle bar lift amount. 1) Set the stitch length to either 2 (approx. la placa de agujas. 10. Colocar el prensatelas. - 68 - TN-8400, 8700 TL-8400 - Brother International TL-847A | Instruction Manual - English and Spanish - Page 84
auf. ¡ Les pièces en option doivent être remplacées exclusivement par des pièces spécifiées par Brother. ¡ Veiller à mettre des lunettes et des gants de protection lors de la manipulation d'huile lubrifiante, afin de pr aceite lubricante lejos del alcance de los niños. - 69 - TN-8400, 8700 TL-8400 - Brother International TL-847A | Instruction Manual - English and Spanish - Page 85
ajuste o. 12. Girar la polea de la máquina para mover la barra de agujas a su posición superior. 13. Desmontar el cangrejo !0. - 70 - TN-8400, 8700 TL-8400 - Brother International TL-847A | Instruction Manual - English and Spanish - Page 86
basse Posición inferior b b !2 !2 841A 842A 872A 847A 845A 848A 875A s Installation 1. Insert the new rotary hook en bas de la barre à aiguille soit alignée avec le bord inférieur du support !3 de la barre à aiguille. Ensuite, serrer les trois vis o. REMARQUE: Afin d'é 8400, 8700 TL-8400 - Brother International TL-847A | Instruction Manual - English and Spanish - Page 87
. Tragen Sie 1-2 Tropfen Öl auf den linken und rechten Greiferlaufring !6 auf. 15. Stellen Sie die Greiferschmierung wie auf Seite 61 beschrieben ein. - 72 - TN-8400, 8700 TL-8400 - Brother International TL-847A | Instruction Manual - English and Spanish - Page 88
w. 14. Agregar 1-2 gotas de aceite a las pistas de cangrejo izquierda y derecha !6. 15. Ajustar la lubricación del cangrejo consultando la página 61. - 73 - TN-8400, 8700 TL-8400 - Brother International TL-847A | Instruction Manual - English and Spanish - Page 89
con el tornillo w. 2. Ajustar la tensión del resorte de tirahilos r. (Consultar la página 51.) 3. Apretar el tornillo q. 4. Cerrar la placa delantera. - 74 - TN-8400, 8700 TL-8400 - Brother International TL-847A | Instruction Manual - English and Spanish - Page 90
14. GUIA PARA LA LOCALIZACION DE FALLAS 14. TROUBLESHOOTING GUIDE Be sure to check the following before calling an authorized service station. CAUTION ¡ Turn off the power switch and disconnect the power cord before carrying out troubleshooting. The motor will keep turning even after the power - Brother International TL-847A | Instruction Manual - English and Spanish - Page 91
Problem 4. Skipped stitches 5. Poor thread tightening 6. Broken needles 14. TROUBLESHOOTING GUIDE pulley. 5 Depending on the type of material, skipped stitches may install the feed dog. [841A, 842A, 847A, 872A] If the needle bar has . 66 (Step 3) Caution ¡ If problems 2 to 6 above are not due - Brother International TL-847A | Instruction Manual - English and Spanish - Page 92
14. TROUBLESHOOTING GUIDE 14. FEHLERSUCHE 14. RECHERCHES DE PANNES 14. GUIA PARA LA LOCALIZACION DE FALLAS 14. FEHLERSUCHE Prüfen Sie bei einer Störung bitte die , so daß der Riemen 10-14 mm eingedrückt wird, wenn er mit einem Finger gedrückt wird. - 77 - TN-8400, 8700 (German) TL-8400 (German) - Brother International TL-847A | Instruction Manual - English and Spanish - Page 93
14. TROUBLESHOOTING GUIDE 14. FEHLERSUCHE 14. RECHERCHES DE PANNES 14. GUIA Transporteurs einsticht, muß der Transporteur nochmals neu angebracht werden. [841A, 842A, 847A, 872A] Falls die Nadelstange gedreht wurde, muß sie nochmals gedreht 66 . - 78 - TN-8400, 8700 (German) TL-8400 (German) - Brother International TL-847A | Instruction Manual - English and Spanish - Page 94
14. TROUBLESHOOTING GUIDE 14. FEHLERSUCHE 14. RECHERCHES DE PANNES 14. GUIA PARA LA LOCALIZACION DE FALLAS 14. RECHERCHES DE PANNES Vérifier les points suivants avant la courroie trapézoïdale s'enfonce de 10-14 mm lorsqu'on l'enfonce avec un doigt. - 79 - TN-8400, 8700 (French) TL-8400 (French) - Brother International TL-847A | Instruction Manual - English and Spanish - Page 95
6. Aiguilles cassées 14. TROUBLESHOOTING GUIDE 14. FEHLERSUCHE 14. RECHERCHES DE remplacer la poulie de moteur. 5 Selon le type de tissu utilisé, des points sautés peuvent quand , réinstaller la griffe d'entraînement. [841A, 842A, 847A, 872A] Si la barre à aiguille a tourné, la TL-8400 (French) - Brother International TL-847A | Instruction Manual - English and Spanish - Page 96
14. TROUBLESHOOTING GUIDE 14. FEHLERSUCHE 14. RECHERCHES DE PANNES 14. GUIA PARA LA LOCALIZACION DE FALLAS 14. GUIA PARA LA LOCALIZACION DE FALLAS Se recomienda verificar que la deflexión de la correa en V sea 10-14 mm cuando se empuja con un dedo. - 81 - TN-8400, 8700 (Spanish) TL-8400 (Spanish) - Brother International TL-847A | Instruction Manual - English and Spanish - Page 97
no está bien apretado. 6. Agujas rotas 14. TROUBLESHOOTING GUIDE 14. FEHLERSUCHE 14. RECHERCHES DE PANNES 14. GUIA en el alimentador, volver a instalar el alimentador. [841A, 842A, 847A, 872A] Si la barra de agujas no volviera, girarla para dejarla en TN-8400, 8700 (Spanish) TL-8400 (Spanish) - Brother International TL-847A | Instruction Manual - English and Spanish - Page 98
INSTRUCTION MANUAL BEDIENUNGSANLEITUNG MANUEL D'INSTRUCTIONS MANUAL DE INSTRUCCIONES BROTHER INDUSTRIES, LTD. 15-1, Naeshiro-cho, Mizuho-ku, Nagoya 467-8561, Japan. Phone: 81-52-824-2177 118-W42 S92W42-102 2002.03. B (1)
-
 1
1 -
 2
2 -
 3
3 -
 4
4 -
 5
5 -
 6
6 -
 7
7 -
8
-
9
-
10
-
11
-
12
-
13
-
14
-
15
-
16
-
17
-
18
-
19
-
20
-
21
-
22
-
23
-
24
-
25
-
26
-
27
-
28
-
29
-
30
-
31
-
32
-
33
-
34
-
35
-
36
-
37
-
38
-
39
-
40
-
41
-
42
-
43
-
44
-
45
-
46
-
47
-
48
-
49
-
50
-
51
-
52
-
53
-
54
-
55
-
56
-
57
-
58
-
59
-
60
-
61
-
62
-
63
-
64
-
65
-
66
-
67
-
68
-
69
-
70
-
71
-
72
-
73
-
74
-
75
-
76
-
77
-
78
-
79
-
80
-
81
-
82
-
83
-
84
-
85
-
86
-
87
-
88
-
89
-
90
-
91
-
92
-
93
-
94
-
95
-
96
-
97
-
98
 |
 |

TN-841A, 842A, 845A
872A, 875A
TL-847A, 848A
INSTRUCTION MANUAL
BEDIENUNGSANLEITUNG
MANUEL D’INSTRUCTIONS
MANUAL DE INSTRUCCIONES
TWIN NEEDLE LOCK STITCHER
Please read this manual before using the machine.
Please keep this manual within easy reach for quick reference.
ZWEINADEL-STEPPSTICHMASCHINE
Bitte vor Gebrauch der Maschine diese Anleitung lesen!
Bitte halten Sie diese Anleitung stets griffbereit zur schnellen Orientierung!
PIQUEUSE POINT NOUE - 2 AIGUILLES
Veuillez lire ce manuel avant d’utiliser la machine.
Veuillez garder ce manuel près de vous pour une vérification rapide.
DOS AGUJAS DOBLE ARRASTRE
Por favor lea este manual antes de usar la máquina.
Por favor guarde este manual al alcance de la mano para una rápida referencia.