Brother International BAS-511 Instruction Manual - English - Page 44
Ick-Vol,07,-AU
 |
View all Brother International BAS-511 manuals
Add to My Manuals
Save this manual to your list of manuals |
Page 44 highlights
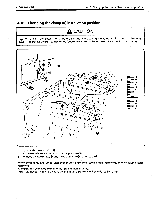
4. OPERATIONS 4-15. Using the stacker MODE • AltUTI LATX CRetRrt C I THREAD BREAKAGE ERGE CY 0 brother BAS -511 ° SEWING ONLY Fit ARV ill IR BOBBIN EMPTY I I ° FEED ONLY ZOO= SELECT PROGRAMMING HERO 4 2.;.• • NO OF HOLES -Ick-Vol,)07,-AU A ENTER 1 • 7YCIPN- DISTANCE ri ri s. I Ell r CT CI 29"1,94Zil STACKER TIMING Fite 7i9 ' BOBBIN T. COUNTER ENTER I LJ daft SELECT IE7Rfflt EMERGENCY 10 • Adjustments can be made as follows if the material is particularly uneven when the material is draped over the stacker. 1. Press the SELECT switch ® twice if the machine is in automatic mode and the clamps are at the material setting position, or once if the machine is in feed only mode and the clamps are at the material setting position. The STACKER TIMING indicator will start to flash and the stacker timing will be shown on the LED display (I) in millimeter units. 2. Press the LED display setting switches iD to set the stacker timing value. If the material drapes as in Fig. A, DECREASE the displayed timing. If the material drapes as in Fig. B, INCREASE the displayed timing. The displayed number indicates millimeters (mm). If in Fig. A, dimension C = 100 mm, increase the display by 100 + 2 = 50 mm. If in Fig. B, dimension C = 100 mm, decrease the display by 100 + 2 = 50 mm. 3. Press the DISTANCE ENTER switch The stacker timing setting will then be recorded. (NOTE) . If a value between 0 - 199 is set, the setting will automatically be changed to 200.
-
 1
1 -
2
-
3
-
4
-
5
-
6
-
7
-
8
-
9
-
10
-
11
-
12
-
13
-
14
-
15
-
16
-
17
-
18
-
19
-
20
-
21
-
22
-
23
-
24
-
25
-
26
-
27
-
28
-
29
-
30
-
31
-
32
-
33
-
34
-
35
-
36
-
37
-
38
-
 39
39 -
 40
40 -
 41
41 -
 42
42 -
 43
43 -
 44
44 -
 45
45 -
 46
46 -
 47
47 -
 48
48 -
 49
49 -
50
 |
 |
