Brother International BAS-511 Instruction Manual - English - Page 14
Operations
 |
View all Brother International BAS-511 manuals
Add to My Manuals
Save this manual to your list of manuals |
Page 14 highlights
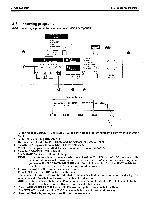
4. OPERATIONS 4-1. Explanation of the operation panel and main unit switches 4. OPERATIONS 4-1. Explanation of the operation panel and main unit switches 0 ViZi'Y5L+.No. PROGRAM NO. MODE O O VI AUTOMATIC TROUBLE L*tAtt O THREAD BREAKAGE g,egg'it EMERGENCY O brother BAS-511 O ffi SEWING ONLY O FEED ONLY #R SELE0CT rTh MALI , "--". BOBBIN EMPTY r5-i2h1 RESET POWER O PR▪ OGRAM SET • I PROGRAMMING ERROR 4 • A' trIZ NO. OF HOLES 1 2 3 4 5 6 7 8 9 10 ENTER • 7P DISTANCE n nn CORRECT STACKER TIMING C BOBBIN T. COUNTER "t'..) h ENTER Li 412 SELECT 4MPit EMERGENCY 1. PROGRAM NUMBER • Indicates the number of the currently-selected program. • If the program number is between 10 -19, the first digit is displayed with a decimal point. 2. Program selection switch • This switch is used to change the program number. However, for program numbers 0 and 15 - 19, the distance between holes is always uniform, whereas for program numbers 5 -19 • The program number is incremented by 1 each time this switch is pressed. The program number will return to 0 after 9 is selected (if DIP switch 1-2 is OFF), or after 19 is selected (if DIP switch 1-2 is ON). • In automatic and feed only modes, this switch can be used only when material has been set. 3. MODE selector • This switch is used top change the mode. • The mode changes in the following order each time this switch is pressed. AUTOMATIC -) PROGRAM SET -3 FEED ONLY SEWING ONLY -4 AUTOMATIC ... [ AUTOMATIC Set here for automatic sewing. [ SEWING ONLY Set here for trial sewing or manual sewing. [ FEED ONLY Set here to operate the clamp only. [ PROGRAM SET I Set here when programming a pattern. 4. RESET switch • This switch is used to reset emergency stops and errors. • It is also used to clear the clamp (L) setting position display.
-
 1
1 -
2
-
3
-
4
-
5
-
6
-
7
-
8
-
 9
9 -
 10
10 -
 11
11 -
 12
12 -
 13
13 -
 14
14 -
 15
15 -
 16
16 -
 17
17 -
 18
18 -
 19
19 -
20
-
21
-
22
-
23
-
24
-
25
-
26
-
27
-
28
-
29
-
30
-
31
-
32
-
33
-
34
-
35
-
36
-
37
-
38
-
39
-
40
-
41
-
42
-
43
-
44
-
45
-
46
-
47
-
48
-
49
-
50
 |
 |
