Black & Decker HSVJ520JMBF27 Instruction Manual - Page 6
Dry pick up, Optimizing the suction force, EMPTYING AND CLEANING, THE PRODUCT, WARNING - replacement filter
 |
View all Black & Decker HSVJ520JMBF27 manuals
Add to My Manuals
Save this manual to your list of manuals |
Page 6 highlights
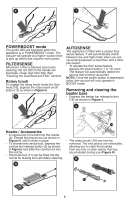
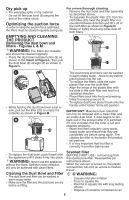
Dry pick up • For everyday spills of dry material. • Do not fill the dust bowl (8) beyond the end of the intake chute. Optimizing the suction force In order to keep the suction force optimised, the filters must be cleared regularly during use. EMPTYING AND CLEANING TRfilHetemErosPv-RinFOgigDtuhUreeCsdTuLs&t bMowl and WARNING: The filters are reusable and should be cleaned regularly. • Press the dust bowl release button (9) as shown in the insert of Figure L, then pull the dust bowl (8) straight off as shown in Figure L. For a more thorough cleaning • Remove the dust bowl and filter assembly as described above. • To separate the plastic filter (21) from the cloth filter (22), twist the plastic filter in a counterclockwise direction and lift it off of the cloth filter as shown in Figure N. • Shake or lightly brush any loose dust off both filters. N 22 21 L • While holding the dust bowl over a bin or sink, pull out the filter (20) to empty the contents as shown in Figure M. M 20 • The dust bowls and filters can be washed in warm soapy water. Allow to dry before placing back into the vac. • To replace the filters, slide the outer plastic filter over the cloth filter. • Align the wings of the plastic filter with the slots in the cloth filter and twist in a clockwise direction. • Place filters back into the bowl pressing firmly to ensure a secure fit. • To replace dust bowl, place it back onto the handle until it "clicks" firmly into position. IMPORTANT: Maximum dust collection will only be obtained with a clean filter and an empty dust bowl. If dust begins to fall back out of the product after it is switched off, this indicates that the bowl is full and requires emptying. • Wash the filters regularly using warm, soapy water and ensure that they are completely dry before using again. The cleaner the filter is, the better the product will perform. • It is very important that the filter is correctly in position before use. • To replace the dust bowl, push it back onto the appliance until it clicks firmly into place. WARNING: Never use the appliance without the filters. Optimum dust collection will only be achieved with clean filters. Cleaning the Dust Bowl and Filter • The dust bowl and filter can be washed in warm soapy water. • Make sure the filter and the dust bowl are dry before re-fitting. Scented filter BEFORE FIRST USE - remove bag from the scented pre-filter. Reassemble per instructions above. When the vacuum is turned on, the plastic scented filter will emit an aroma to freshen the air. WARNING: · Causes mild skin irritation · Toxic to aquatic life · Harmful to aquatic life with long lasting effects. · Dispose of contents/ containers to an 6
-
 1
1 -
 2
2 -
 3
3 -
 4
4 -
 5
5 -
 6
6 -
 7
7 -
 8
8 -
 9
9 -
 10
10 -
 11
11 -
 12
12 -
13
-
14
-
15
-
16
-
17
-
18
-
19
-
20
-
21
-
22
-
23
-
24
-
25
-
26
-
27
-
28
 |
 |
