BenQ SW270C User Manual
BenQ SW270C Manual
 |
View all BenQ SW270C manuals
Add to My Manuals
Save this manual to your list of manuals |
BenQ SW270C manual content summary:
- BenQ SW270C | User Manual - Page 1
LCD Monitor User Manual PhotoVue Photographer Monitor | SW Series - BenQ SW270C | User Manual - Page 2
or computer language, in any form or by any means, electronic, mechanical, magnetic, optical, chemical, manual or otherwise, without the prior written permission of BenQ Corporation. Disclaimer BenQ Corporation makes no representations or warranties, either expressed or implied, with respect to the - BenQ SW270C | User Manual - Page 3
2. Visit the local website from www.BenQ.com. The website layout and content may vary by region/country. • User manual and related document: www.BenQ.com > Support > Download & FAQ > model name > User Manual • Drivers and applications: www.BenQ.com > Support > Download & FAQ > model name > Software - BenQ SW270C | User Manual - Page 4
be used. • Use only the power cord provided by BenQ. Never use a power cord that appears to be damaged TYPE. DISPOSE OF USED BATTERIES ACCORDING TO THE INSTRUCTIONS. For models with adapter: • Use only not attempt to service the power adapter. There are no service parts inside. Replace the unit - BenQ SW270C | User Manual - Page 5
above mentioned misuse or other accident such as dropping or mishandling occurs, contact qualified service personnel for servicing. • Contact your place of purchase or visit the local website from www.BenQ.com for more support. Caution • The monitor should be 50 ~ 70 cm (20 ~ 28 inches) away from - BenQ SW270C | User Manual - Page 6
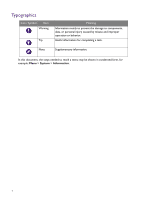
Typographics Icon / Symbol Item Warning Tip Meaning Information mainly to prevent the damage to components, data, or personal injury caused by misuse and improper operation or behavior. Useful information for completing a task. Note Supplementary information. In this document, the steps needed - BenQ SW270C | User Manual - Page 7
...2 Product support ...3 Getting the monitor wall mounting kit 33 Getting the most from your BenQ monitor 34 Downloading the LCD Monitor driver files from the Internet SW271 only 41 Hotkey Puck G2 and its basic operations (SW270C only 43 Basic menu operation ...45 Customizing the hot keys...46 - BenQ SW270C | User Manual - Page 8
Troubleshooting ...70 Frequently asked questions (FAQ) ...70 Need more help?...72 Appendix: Advanced software 73 5/6/20 SW320-EM-V0 8 - BenQ SW270C | User Manual - Page 9
Getting started When unpacking please check you have the following items. If any are missing or damaged, please contact the place of purchase for a replacement. BenQ LCD Monitor (For edge-to-edge models) Monitor Stand Monitor Base Quick Start Guide Quick Start Guide Getting started 9 - BenQ SW270C | User Manual - Page 10
Safety Instructions Regulatory Statements Power Cord (Picture may differ from product supplied for your region.) Video Cable: DP (Optional accessory) IF and is full-featured, with power delivery and video / audio / data transfer functions. 10 Getting started Safety Instructions SRteagteumlaetonrtys - BenQ SW270C | User Manual - Page 11
only) Shading hood (SW320 / SW271 only) Lt Rt L2 L1 R2 R1 Shading hood for landscape orientation (SW270C only) L2 Lt Rt R2 • Available accessories and the pictures shown here may differ from the actual contents and the product supplied for your region. - BenQ SW270C | User Manual - Page 12
Getting to know your monitor Front view (For edge-to-edge models) 1. Control buttons 2. Power button Back view 12 12 3. Cable management hole 4. Input and output ports (vary by model, see Input and output ports on page 13) 7 5. Kensington lock slot 6 6. USB ports (downstream; connecting to USB - BenQ SW270C | User Manual - Page 13
on the website for details. SW320 1 2 3 4 5 67 SW271 / SW270C 1. AC power input jack 2. Hotkey Puck / Hotkey Puck G2 socket 3. HDMI port 1 2 3 4 8 76 • Depending on the product specifications, the supported resolution and timing may vary. • Above diagram may vary depending on the model. - BenQ SW270C | User Manual - Page 14
Connections The following connection illustrations are for your reference only. For cables that are not supplied with your product, you can purchase them separately. For detailed connection methods, see page 19 - 21. SW320 SD card USB peripherals Speakers / Headphone PC/Notebook 14 Getting to know - BenQ SW270C | User Manual - Page 15
Puck (SW320 / SW271) Speakers / Headphone PC / Notebook • (SW271) If USB-C™ Alternate mode (DP Alt mode) is enabled, USB 2.0 is available from the USB downstream ports. (SW270C) If USB-C™ Alternate mode (DP Alt mode) is enabled, USB 3.1 Gen 1 (5 Gb/s) is available from the USB downstream ports - BenQ SW270C | User Manual - Page 16
function, your monitor helps supply power to the connected USB-C™ devices. SW270C USB-C™ Power Delivery 5V / 3A 9V / 3A 12V / 3A 15V / 3A 20V / 3A • A connected device needs to be equipped with a USB-C™ connector that supports charging function via USB power delivery. • The connected device can be - BenQ SW270C | User Manual - Page 17
. Do not plug-in or turn-on the power to the monitor until instructed to do so. • The following illustrations are for your reference only. The purchased model. • The supported timing may vary by input signal. Download Resolution file from the website (see Product support on page 3). Refer to - BenQ SW270C | User Manual - Page 18
Tighten the thumbscrew on the bottom of the monitor base as illustrated. And then turn the stand counterclockwise to face forward. Orient and align the stand arm with the monitor ( 1 ), push them together until they click and lock into place ( 2 ). Gently attempt to pull them back apart to check - BenQ SW270C | User Manual - Page 19
power delivery to the laptop. Additional power supply to the connected laptop is required. (SW270C) The USB-C™ port on the monitor supports power delivery. See Power delivery of USB-C™ port on your monitor (SW270C only) on page 16 for more information. If a USB-C™ cable is not included in the - BenQ SW270C | User Manual - Page 20
-C™ port is in use. 5. Connect the memory card. Insert an SD or MMC memory card following the direction indicated on the card to exchange files. Supported memory card formats are as follows: •SD / SDHC / SDXC •MMC 20 How to assemble your monitor hardware - BenQ SW270C | User Manual - Page 21
. For more information on Hotkey Puck / Hotkey Puck G2, see Hotkey Puck (SW320 / SW271 only) on page 41 / Hotkey Puck G2 and its basic operations (SW270C only). 7. Connect the power cable to the monitor. Plug one end of the power cord into the socket labelled on the rear of the monitor - BenQ SW270C | User Manual - Page 22
by pressing the power button on the monitor. Turn on the computer too, and follow the instructions in Getting the most from your BenQ monitor on page 34 to install the monitor software. To extend the service life of the product, we recommend that you use your computer's power management function. 22 - BenQ SW270C | User Manual - Page 23
How to detach the stand and the base 1. Prepare the monitor and area. Turn off the monitor and the power before unplugging the power cable. Turn off the computer before unplugging the monitor signal cable. Protect the monitor and screen by clearing a flat open area on your desk and placing a soft - BenQ SW270C | User Manual - Page 24
Turn the stand counterclockwise until you cannot go further. And then detach the base from the stand. 24 How to assemble your monitor hardware - BenQ SW270C | User Manual - Page 25
Installing shading hood (optional step) • SW270C came with shading hood for landscape installation only. • To prevent glare or most of unwanted reflections from other light sources off your screen, you can - BenQ SW270C | User Manual - Page 26
3. Attach to the right side of the monitor. 2 Align the hooks on the hood (plate R2) with the holes on the right side of the monitor, and insert the hooks. After that, press down plate (Rt) to fix it firmly. 1 4. Install the left hoods. Align the arrow on plate (Lt) with the one on plate (L2) and - BenQ SW270C | User Manual - Page 27
the instruction manuals of the colorimeter you purchased and the provided software (e.g., Palette Master Element) to complete the installation and calibration process. Portrait installation SW270C came with with plate (R2) to the end as illustrated. How to assemble your monitor hardware 27 - BenQ SW270C | User Manual - Page 28
3. Attach to the right side of the monitor. Align the hooks on the hood with the holes on the right side of the monitor, and insert the hooks. After that, press down plate (Rt) to fix it firmly. 2 1 4. Install the left hoods. Align the arrow on plate (L1) with the one on plate (L2) L1 and - BenQ SW270C | User Manual - Page 29
, slide to open the cover on the top plate so the colorimeter can be installed. Follow the instruction manuals of the colorimeter you purchased and the provided software (e.g., Palette Master Element) to complete the installation and calibration process. How to assemble your monitor hardware 29 - BenQ SW270C | User Manual - Page 30
Adjusting the monitor height To adjust the monitor height, hold both the left and the right sides of the monitor to lower the monitor or lift it up to the desired height. If your monitor is an edge-to-edge monitor, handle it with care. Avoid finger pressure on the screen surface. Adjust the screen - BenQ SW270C | User Manual - Page 31
Rotating the monitor Rotate the monitor before installing the shading hood. See Portrait installation on page 27 for more information. 1. Pivot the display. Before rotating the monitor with a portrait viewing orientation, the display has to be rotated 90 degrees. Right-click the - BenQ SW270C | User Manual - Page 32
4. Adjust the monitor to the desired viewing angle. Viewing angle adjustment You may position the screen to the desired angle with monitor tilt, swivel, and height adjustment functions. Check the product specifications on the website for details. If your monitor is an edge-to-edge monitor, handle it - BenQ SW270C | User Manual - Page 33
support instruction manuals of the wall mount bracket you purchased to complete the installation. Use four M4 x 10 mm screws to fix a VESA standard wall mount bracket to the monitor. Make sure that all screws are tightened and secured properly. Consult a professional technician or BenQ service - BenQ SW270C | User Manual - Page 34
its Found New Hardware wizard. Follow the wizard instructions. Further details and step-by-step instructions for either an automatic (new) or upgrade driver files from the Internet 1. Download the correct driver files from www.BenQ.com > Support > Download & FAQ > model name > Software. 2. On your - BenQ SW270C | User Manual - Page 35
How to install the monitor on a new computer This instruction details the procedure for selecting and installing the BenQ LCD Monitor driver software on a new computer which has never had a monitor driver installed before. This instruction is only suitable for a computer which has never been used - BenQ SW270C | User Manual - Page 36
instruction details the procedure for manually updating the existing monitor driver software on your Microsoft Windows computer. It is currently tested as compatible for Windows 10, Windows 8 (8.1), and Windows 7 Operating System (OS). The BenQ automate the task and guide you through the file selection - BenQ SW270C | User Manual - Page 37
Software window, select the option Browse my computer for driver software. 7. Click Browse and locate the driver files downloaded from the Internet as instructed in Downloading the LCD Monitor driver files from the Internet on page 34. 8. Click Close. You may be prompted to restart your computer - BenQ SW270C | User Manual - Page 38
Software window, select the option Browse my computer for driver software. 7. Click Browse and locate the driver files downloaded from the Internet as instructed in Downloading the LCD Monitor driver files from the Internet on page 34. 8. Click Close. You may be prompted to restart your computer - BenQ SW270C | User Manual - Page 39
Software window, select the option Browse my computer for driver software. 7. Click Browse and locate the driver files downloaded from the Internet as instructed in Downloading the LCD Monitor driver files from the Internet on page 34. 8. Click Close. You may be prompted to restart your computer - BenQ SW270C | User Manual - Page 40
How to adjust your monitor The control panel No. Name 1. Control keys 2. Power key 1 2 Description Accesses the functions or menu items displayed on the screen, right next to each key. Turns the power on or off. 40 How to adjust your monitor - BenQ SW270C | User Manual - Page 41
. • You need to connect the Hotkey Puck to your monitor prior to use. Follow the instructions in Connect the Hotkey Puck / Hotkey Puck G2 to the monitor. on page 21. • Hotkey Puck is designed for BenQ LCD Monitor exclusively and is available for compatible models only. Do not connect it to other - BenQ SW270C | User Manual - Page 42
No. Name Description 5. Navigation buttons • : For Up/Increase adjustment. For Down/Decrease adjustment. ) • : Enters sub menus. • : Returns to the previous menu. 6. OK key ( ) • Activates the hot key menu. • Selects menu items. 42 How to adjust your monitor - BenQ SW270C | User Manual - Page 43
need to connect the Hotkey Puck G2 to your monitor prior to use. Follow the instructions in Connect the Hotkey Puck / Hotkey Puck G2 to the monitor. on page 21. • Hotkey Puck G2 is designed for BenQ LCD Monitor exclusively and is available for compatible models only. Do not connect it to - BenQ SW270C | User Manual - Page 44
No. Name Description 4 Controller Key 2 • Press to switch to sRGB (Color Mode). • Press and hold for 3 seconds to bring up the setup menu to change the default setting. Alternatively, see Customizing the Controller Keys on Hotkey Puck G2 on page 44. 5 Controller Key 3 • Press to switch to B+W - BenQ SW270C | User Manual - Page 45
Basic menu operation All OSD (On Screen Display) menus can be accessed by the control keys. You can use the OSD menu to adjust all the settings on your monitor. 1 2 4 3 1. Press any of the control keys. 2. The hot key menu is displayed. The left three controls are custom keys and are - BenQ SW270C | User Manual - Page 46
Puck G2) See Customizing the Controller Keys on Hotkey Puck G2 on page 44 for more information. Working with HDR technology • Your monitor supports HDR10 technology. • The information regarding HDR-compatible devices and content in this document is most up-to-date at the time of publication. For - BenQ SW270C | User Manual - Page 47
, 2160p (may vary by manufacturer) Supported resolution or modes (SW320 / SW271) 3840 x 2160 @ 24 Hz, 50 Hz, or 60 Hz (SW270C) 2560 x 1440 @ 60 Hz Commonly varies by model. Find your model for appropriate statement. SW270C If the instructions in Working with HDR technology on page 46 are followed - BenQ SW270C | User Manual - Page 48
on page 46 to check if a supported player, content, and the certified cable Change the display and color settings manually from the related OSD menus. Depending Guide). See Appendix: Advanced software on page 73. • To apply the calibrated result, go to Color Adjustment > Color Mode > calibration - BenQ SW270C | User Manual - Page 49
Refer to the following table to find your main source and its supporting second sources. SW320 Main source Inputs HDMI DP Mini DP Possible second sources HDMI DP Mini DP V V V V V V SW271 / SW270C Main source Inputs HDMI-1 HDMI-2 DP USB-C™ Possible second sources HDMI-1 V V V HDMI - BenQ SW270C | User Manual - Page 50
: • Display menu on page 51 • Color Adjustment menu on page 53 • PIP/PBP menu on page 60 • System menu on page 63 • Controller Key menu (SW270C only) on page 68 50 Navigating the main menu - BenQ SW270C | User Manual - Page 51
. Item Input Function Range Use this to change the input to that appropriate to your video cable connection type. (SW320) • HDMI • DP • Mini DP (SW271 / SW270C) • HDMI-1 • HDMI-2 • DP • USB-C Navigating the main menu 51 - BenQ SW270C | User Manual - Page 52
Item Aspect Ratio Function This feature is provided to allow aspect ratios other than 16:9 to be displayed without geometric distortion. Full Scales the input image to fill the screen. Ideal for 16:9 aspect images. Aspect The input image is displayed without geometric distortion filling as - BenQ SW270C | User Manual - Page 53
Color Adjustment menu Available menu options may vary depending on the input sources, functions and settings. Menu options that are not available will become grayed out. And keys that are not available will be disabled and the corresponding OSD icons will disappear. For models without certain - BenQ SW270C | User Manual - Page 54
Item Function Color Mode Select a color mode that best suits the type of images shown on the screen. Range See Available color modes for each model on page 57 for the available color modes of the purchased model. Adobe RGB For better color matching representation with Adobe® RGB compatible - BenQ SW270C | User Manual - Page 55
Element and your colorimeter (purchased separately). Visit the website for software download and more information Calibration (Palette Master Element How-to-Use Guide). 3 See Appendix: Advanced software on page 73. (selected model only) Brightness Contrast Custom 1 Applies a combination - BenQ SW270C | User Manual - Page 56
Item Function Range Gamma Adjusts the tone luminance. • 1.6 • 1.8 • 2.0 • 2.2 • 2.4 • 2.6 • sRGB (selected models only) Color Gamut Adobe RGB Suitable for Adobe® RGB compatible peripherals. sRGB Suitable for sRGB compatible peripherals. Rec. 709 For better color matching representation - BenQ SW270C | User Manual - Page 57
B+W Rec.709 DCI-P3 Display P3 M-book HDR DICOM Darkroom Calibration 1 Calibration 2 Calibration 3 Custom 1 Custom 2 CAD / CAM Animation SW320 V V V V V V V V V V V V V SW271 V V V V V V V V V V V V V SW270C V V V V V V V V V V V V V V Available menu options for each color mode Depending on the - BenQ SW270C | User Manual - Page 58
V V V N/A HDR N/A N/A V N/A Calibration 1 N/A N/A V N/A Calibration 2 N/A N/A V N/A Calibration 3 N/A N/A V N/A Custom 1 V V N/A N/A N/A N/A N/A N/A V V N/A V V N/A V V N/A V V V V V V SW270C Color Mode Brightness Contrast Adobe RGB V V Sharpness - BenQ SW270C | User Manual - Page 59
SW270C Settings Color Mode Brightness Contrast Sharpness sRGB V V V Color Temp. 5000K / 6500K Gamma 2.2 / sRGB Color Gamut 6500K DICOM V V V N/A HDR V V V N/A Calibration 1 N/A N/A V N/A Calibration 2 N/A N/A V N/A Calibration 3 N/A N/A V N/A Custom 1 V V V V - BenQ SW270C | User Manual - Page 60
PIP/PBP menu Available menu options may vary depending on the input sources, functions and settings. Menu options that are not available will become grayed out. And keys that are not available will be disabled and the corresponding OSD icons will disappear. For models without certain functions, - BenQ SW270C | User Manual - Page 61
source for the PIP/PBP mode. Determines the size of the inset window in the PIP mode. (SW320) • HDMI • DP • Mini DP (SW271 / SW270C) • HDMI-1 • HDMI-2 • DP • USB-C • Small • Medium • Large H. Position V. Position Adjusts the horizontal position of the inset window in the PIP 0~100 mode. Adjusts - BenQ SW270C | User Manual - Page 62
Item Sharpness Function Adjusts the sharpness of the inset window (sub window) in the PIP/PBP mode. Range 0~10 To adjust the contrast and the sharpness of the main source, go to the Color Adjustment menu. See page 55 for more information. 62 Navigating the main menu - BenQ SW270C | User Manual - Page 63
System menu Available menu options may vary depending on the input sources, functions and settings. Menu options that are not available will become grayed out. And keys that are not available will be disabled and the corresponding OSD icons will disappear. For models without certain functions, their - BenQ SW270C | User Manual - Page 64
any key for 10 seconds. CAL. Reminder Sets to remind you when monitor calibration is • ON recommended. When the monitor is in use, the used time USB-C Awake If this function is disabled, the USB-C™ port is not (SW270C supplied with power while the monitor is in standby only) mode. To keep - BenQ SW270C | User Manual - Page 65
that matches the RGB range setting on the connected (SW320 / HDMI device. SW271 only) 0 ~ 5 • Auto Detect • RGB (0~255) • RGB (16~235) RGB PC Range (SW270C only) Determines the range of color scales. Select an option that matches the RGB range setting on the connected HDMI / DP device. • Auto - BenQ SW270C | User Manual - Page 66
the Controller Keys for Hotkey Puck G2 that came with SW270C, go to Controller Key menu (SW270C only) on page 68. Controller Key 1 Controller Key 709 • DCI-P3 • HDR • DICOM (SW271 only) • Darkroom • Calibration 1 • Calibration 2 • Calibration 3 (SW271 only) • Custom 1 • Custom 2 • CAD / CAM ( - BenQ SW270C | User Manual - Page 67
Name • HDR (SW271 only) Resets all mode, color and geometry settings to the factory default values. • YES • NO Options for data transfer via USB-C™ (SW271 / SW270C only) SW271 Refresh rate USB transmission speed 3840 x 2160@60Hz + USB 2.0 3840 x 2160@30Hz + USB 3.1 60 Hz 30 Hz 480Mbps 5Gbps - BenQ SW270C | User Manual - Page 68
Key 1, 2, 3 Function Range Sets the function to be accessed by controller key 1 / 2 / 3 on Hotkey Puck G2. See Hotkey Puck G2 and its basic operations (SW270C only) on page 43 for the location of the keys. Select a category first, and choose up to 3 options to be accessed by these keys. The - BenQ SW270C | User Manual - Page 69
Controller Key Dial Sets the function to be accessed by the Rotation key on Hotkey Puck G2. See Hotkey Puck G2 and its basic operations (SW270C only) on page 43 for the location of the key. Select a category first, and choose up to 3 options to be accessed by this key. • Color - BenQ SW270C | User Manual - Page 70
Troubleshooting Frequently asked questions (FAQ) Imaging The image is blurred. • Download Resolution file from the website (see Product support on page 3). Refer to "Adjusting the Screen Resolution". And then select the correct resolution, refresh rate and make adjustment based on these instructions - BenQ SW270C | User Manual - Page 71
website (see Product support on page 3). Refer to "Adjusting the Screen Resolution". And then select the correct resolution, refresh rate and make adjustment based on these instructions. Faint shadow from rate automatically. Just wait until the operating system is launched. Troubleshooting 71 - BenQ SW270C | User Manual - Page 72
. • Check if the input source has been selected to USB-C on Display > Input. Need more help? If your problems remain after checking this manual, please contact your place of purchase or visit the local website from www.BenQ.com for more support and local customer service. 72 Troubleshooting - BenQ SW270C | User Manual - Page 73
to enhance and extend the product functionality. Download the software and its user guide as instructed from the BenQ website. • Palette Master Element The Palette Master Element software simplifies calibration and reliably produces accurate color results. Palette Master Element can be used to
-
 1
1 -
 2
2 -
 3
3 -
 4
4 -
 5
5 -
 6
6 -
 7
7 -
8
-
9
-
10
-
11
-
12
-
13
-
14
-
15
-
16
-
17
-
18
-
19
-
20
-
21
-
22
-
23
-
24
-
25
-
26
-
27
-
28
-
29
-
30
-
31
-
32
-
33
-
34
-
35
-
36
-
37
-
38
-
39
-
40
-
41
-
42
-
43
-
44
-
45
-
46
-
47
-
48
-
49
-
50
-
51
-
52
-
53
-
54
-
55
-
56
-
57
-
58
-
59
-
60
-
61
-
62
-
63
-
64
-
65
-
66
-
67
-
68
-
69
-
70
-
71
-
72
-
73
 |
 |

LCD Monitor
User Manual
PhotoVue Photographer Monitor
|
SW Series