Asus A7M266 A7M266 User Manual - Page 27
Central Processing Unit CPU
 |
View all Asus A7M266 manuals
Add to My Manuals
Save this manual to your list of manuals |
Page 27 highlights
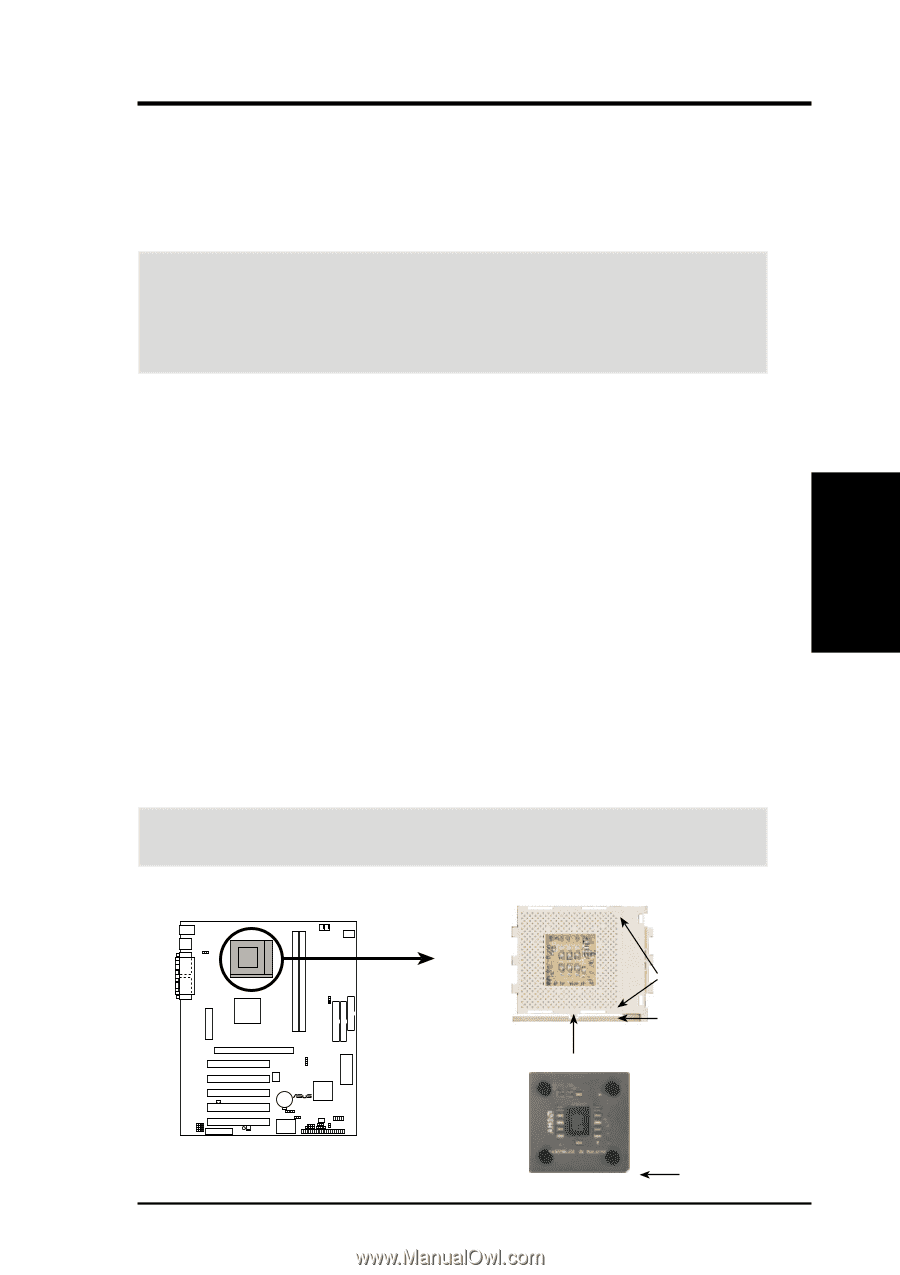
3. HARDWARE SETUP 3.6 Central Processing Unit (CPU) The motherboard provides a Socket 462 or Socket A for CPU installation. The CPU that came with the motherboard should have a fan and heatsink attached to it to prevent overheating. If this is not the case, then purchase and install a set before you turn on your system. WARNING! Make sure that the heatsink is mounted tightly against the processor. Make sure also that there is sufficient air circulation across the processor's heatsink by regularly checking that your CPU fan is working. Without sufficient circulation, the processor could overheat and damage both the processor and the motherboard. You may install an auxiliary fan, if necessary. To install a CPU, first turn off your system and remove its cover. Locate the Socket 462 and open it by first pulling the lever sideways away from the socket then upwards to a 90-degree angle. Insert the CPU with the correct orientation as shown. The notched corner should be orientated toward the blank space on the socket nearest the lever. Because the CPU has a corner pin for two of the four corners, the CPU will only fit in the orientation as shown. The picture is for reference only; you should have a CPU fan and heatsink that covers the face of the CPU. With the added weight of the CPU fan and heatsink, no force is required to insert the CPU. Once completely inserted, close the socket's lever while holding down the CPU. NOTES 1. When inserting or removing the CPU, make sure the ZIF socket arm is fully extended (90˚-100˚ upright) and that the CPU is kept parallel to the socket. Do NOT force the CPU into the socket as it will damage the pins. It should drop into the socket with minimal pressure. If not, check the CPU for bent pins or check the orientation of the CPU. 2. Do not forget to set the correct Bus Frequency for your processor or else boot-up may not be possible. 3. Socket A processors require a socket mounted thermal resistor. CAUTION! Be careful not to scrape the motherboard when mounting/unmounting a clamp-style processor fan or else damage may occur to the motherboard. 3. H/W SETUP CPU 01 01 A7M266 ® AMD™ Athlon LOCK A7M266 Socket A ASUS A7M266 User's Manual BLANK LEVER NOTCH 27
-
 1
1 -
2
-
3
-
4
-
5
-
6
-
7
-
8
-
9
-
10
-
11
-
12
-
13
-
14
-
15
-
16
-
17
-
18
-
19
-
20
-
21
-
 22
22 -
 23
23 -
 24
24 -
 25
25 -
 26
26 -
 27
27 -
 28
28 -
 29
29 -
 30
30 -
 31
31 -
 32
32 -
33
-
34
-
35
-
36
-
37
-
38
-
39
-
40
-
41
-
42
-
43
-
44
-
45
-
46
-
47
-
48
-
49
-
50
-
51
-
52
-
53
-
54
-
55
-
56
-
57
-
58
-
59
-
60
-
61
-
62
-
63
-
64
-
65
-
66
-
67
-
68
-
69
-
70
-
71
-
72
-
73
-
74
-
75
-
76
-
77
-
78
-
79
-
80
-
81
-
82
-
83
-
84
-
85
-
86
-
87
-
88
-
89
-
90
-
91
-
92
-
93
-
94
-
95
-
96
-
97
-
98
-
99
-
100
-
101
-
102
-
103
-
104
 |
 |