2011 Yamaha Motorsports Phazer M-TX Owners Manual - Page 73
2011 Yamaha Motorsports Phazer M-TX Manual

Page 73 highlights
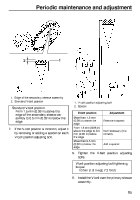
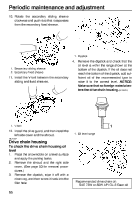
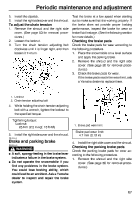
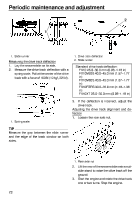
Periodic maintenance and adjustment 5. 6. 1. Install the dipstick. Install the right side cover and the shroud. Remove the shroud and the right side cover. (See page 50 for removal procedures.) Loosen the locknut. Turn the chain tension adjusting bolt clockwise until it is finger tight, and then loosen it 1/4 turn. To adjust the chain tension Test the brake at a low speed when starting out to make sure that it is working properly. If the brake does not provide proper braking performance, inspect the brake for wear or brake fluid leakage. (See the following section for more details.) 2. 3. Checking the brake pads Check the brake pads for wear according to the following procedure. 1. Place the snowmobile on a level surface and apply the parking brake. 2. Remove the shroud and the right side cover. (See page 50 for removal procedures.) 3. Check the brake pads for wear. If the brake pads reach the wear limit, ask a Yamaha dealer to replace them. 1. Locknut 2. Chain tension adjusting bolt 4. While holding the chain tension adjusting bolt with a wrench, tighten the locknut to the specified torque. Tightening torque: Locknut: 25 Nm (2.5 m·kgf, 18 ft·lbf) 1. Brake pad wear limit 5. Install the right side cover and the shroud. 4. Brake pad wear limit: 4.7 mm (0.19 in) Install the right side cover and the shroud. ESU13540 Brake and parking brake EWS00440 WARNING G Checking the parking brake pads Check the parking brake pads for wear according to the following procedure. 1. Remove the shroud and the right side cover. (See page 50 for removal procedures.) G A soft, spongy feeling in the brake lever indicates a failure in the brake system. Do not operate the snowmobile if you find any problems in the brake system. You could lose braking ability, which could lead to an accident. Ask a Yamaha dealer to inspect and repair the brake system. 67
-
 1
1 -
2
-
3
-
4
-
5
-
6
-
7
-
8
-
9
-
10
-
11
-
12
-
13
-
14
-
15
-
16
-
17
-
18
-
19
-
20
-
21
-
22
-
23
-
24
-
25
-
26
-
27
-
28
-
29
-
30
-
31
-
32
-
33
-
34
-
35
-
36
-
37
-
38
-
39
-
40
-
41
-
42
-
43
-
44
-
45
-
46
-
47
-
48
-
49
-
50
-
51
-
52
-
53
-
54
-
55
-
56
-
57
-
58
-
59
-
60
-
61
-
62
-
63
-
64
-
65
-
66
-
67
-
 68
68 -
 69
69 -
 70
70 -
 71
71 -
 72
72 -
 73
73 -
 74
74 -
 75
75 -
 76
76 -
 77
77 -
 78
78 -
79
-
80
-
81
-
82
-
83
-
84
-
85
-
86
-
87
-
88
-
89
-
90
-
91
-
92
-
93
-
94
-
95
-
96
-
97
-
98
-
99
-
100
-
101
-
102
 |
 |
