2011 Yamaha Motorsports Phazer M-TX Owners Manual - Page 63
2011 Yamaha Motorsports Phazer M-TX Manual

Page 63 highlights
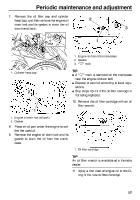
Periodic maintenance and adjustment 5. Remove the oil filler cap, wipe the dipstick clean, insert it back into the oil filler hole (without screwing it in), and then remove it again to check the oil level. 2. Start the engine, warm it up for 10-15 minutes, and then turn it off. The engine can also be warmed up by driving the snowmobile for 10-15 minutes. After operating the snowmobile, allow the engine to idle for at least 10 seconds before turning it off. Remove the shroud and the right side cover. (See page 50 for removal procedures.) Disconnect the oil level gauge coupler. NOTICE: Disconnect the oil level gauge coupler before removing the oil filler cap, otherwise the cable could twist and break. [ECS00452] TIP G 1. Oil filler cap 2. Dipstick G TIP The engine oil should be between the "H" and "L" level marks on the dipstick. 3. 4. 1. "H" level mark 2. "L" level mark 6. 1. Oil level gauge coupler 2. Oil filler cap If the engine oil is below the "L" level mark, add sufficient oil of the recommended type to raise it to the "H" level mark. (See page 84 for the recommended oil.) NOTICE: When adding the engine oil, be careful not to fill above the "H" level mark on the dipstick. Use only the recommended oil. (See page 84.) Make sure that no foreign material enters the engine oil tank. [ECS00462] 57
-
 1
1 -
2
-
3
-
4
-
5
-
6
-
7
-
8
-
9
-
10
-
11
-
12
-
13
-
14
-
15
-
16
-
17
-
18
-
19
-
20
-
21
-
22
-
23
-
24
-
25
-
26
-
27
-
28
-
29
-
30
-
31
-
32
-
33
-
34
-
35
-
36
-
37
-
38
-
39
-
40
-
41
-
42
-
43
-
44
-
45
-
46
-
47
-
48
-
49
-
50
-
51
-
52
-
53
-
54
-
55
-
56
-
57
-
 58
58 -
 59
59 -
 60
60 -
 61
61 -
 62
62 -
 63
63 -
 64
64 -
 65
65 -
 66
66 -
 67
67 -
 68
68 -
69
-
70
-
71
-
72
-
73
-
74
-
75
-
76
-
77
-
78
-
79
-
80
-
81
-
82
-
83
-
84
-
85
-
86
-
87
-
88
-
89
-
90
-
91
-
92
-
93
-
94
-
95
-
96
-
97
-
98
-
99
-
100
-
101
-
102
 |
 |
