2009 Yamaha Motorsports Zuma 125 Owners Manual - Page 45
2009 Yamaha Motorsports Zuma 125 Manual

Page 45 highlights
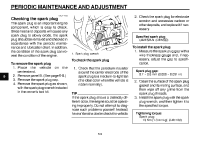
Panel, removing and installing PERIODIC MAINTENANCE AND ADJUSTMENT EAU18771 EAU19272 EAUT2532 EAU1722A Removing and installing panels The panels shown need to be removed to perform some of the maintenance jobs described in this chapter. Refer to this section each time a panel needs to be removed and installed. Panel A To remove the panel Remove the screw, and then pull outward on the areas shown. 2 1 Panel B To remove the panel 1. Remove panel A. (See page 6-8.) 2. Remove the screws and the quick fastener screws, and then take the panel off. 1 2 3 4 5 3 1 2 2 1 3 1. Panel A 2. Screw 6 1. Panel B 2. Screw 3. Quick fastener screw 1. Panel A 2. Panel B To install the panel Place the panel in the original position, and then install the screw. 7 8 9 To install the panel 1. Place the panel in the original position, and then install the screws and the quick fastener screws. 2. Install panel A. 6-45 6-8
-
 1
1 -
2
-
3
-
4
-
5
-
6
-
7
-
8
-
9
-
10
-
11
-
12
-
13
-
14
-
15
-
16
-
17
-
18
-
19
-
20
-
21
-
22
-
23
-
24
-
25
-
26
-
27
-
28
-
29
-
30
-
31
-
32
-
33
-
34
-
35
-
36
-
37
-
38
-
39
-
 40
40 -
 41
41 -
 42
42 -
 43
43 -
 44
44 -
 45
45 -
 46
46 -
 47
47 -
 48
48 -
 49
49 -
 50
50 -
51
-
52
-
53
-
54
-
55
-
56
-
57
-
58
-
59
-
60
-
61
-
62
-
63
-
64
-
65
-
66
-
67
-
68
-
69
-
70
-
71
-
72
-
73
-
74
-
75
-
76
-
77
-
78
-
79
-
80
-
81
-
82
-
83
-
84
-
85
-
86
-
87
-
88
 |
 |
