2007 Yamaha Motorsports Grizzly 450 4x4 Owners Manual - Page 106
2007 Yamaha Motorsports Grizzly 450 4x4 Manual

Page 106 highlights
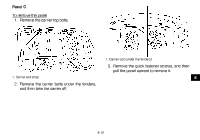
Panel E To remove the panel Remove the bolts, and then take the panel off. 1. Quick fastener screw 2. Panel C 8 To install the panel 1. Place the panel in the original position, and then install the quick fastener screws. 2. Place the carrier in the original position, and then install the carrier bolts under the fenders. 3. Install the carrier top bolts, and then tighten all bolts to the specified torques. Tightening torques: Carrier bolt (top): 34 Nm (3.4 m·kgf, 24 ft·lbf) Carrier bolt (under fenders): 7 Nm (0.7 m·kgf, 5.1 ft·lbf) 8-13 1. Panel E 2. Bolt To install the panel Place the panel in the original position and install the bolts. Panel F To remove the panel Pull outward on the areas shown.
-
 1
1 -
2
-
3
-
4
-
5
-
6
-
7
-
8
-
9
-
10
-
11
-
12
-
13
-
14
-
15
-
16
-
17
-
18
-
19
-
20
-
21
-
22
-
23
-
24
-
25
-
26
-
27
-
28
-
29
-
30
-
31
-
32
-
33
-
34
-
35
-
36
-
37
-
38
-
39
-
40
-
41
-
42
-
43
-
44
-
45
-
46
-
47
-
48
-
49
-
50
-
51
-
52
-
53
-
54
-
55
-
56
-
57
-
58
-
59
-
60
-
61
-
62
-
63
-
64
-
65
-
66
-
67
-
68
-
69
-
70
-
71
-
72
-
73
-
74
-
75
-
76
-
77
-
78
-
79
-
80
-
81
-
82
-
83
-
84
-
85
-
86
-
87
-
88
-
89
-
90
-
91
-
92
-
93
-
94
-
95
-
96
-
97
-
98
-
99
-
100
-
 101
101 -
 102
102 -
 103
103 -
 104
104 -
 105
105 -
 106
106 -
 107
107 -
 108
108 -
 109
109 -
 110
110 -
 111
111 -
112
-
113
-
114
-
115
-
116
-
117
-
118
-
119
-
120
-
121
-
122
-
123
-
124
-
125
-
126
-
127
-
128
-
129
-
130
-
131
-
132
-
133
-
134
-
135
-
136
-
137
-
138
-
139
-
140
-
141
-
142
-
143
-
144
-
145
-
146
-
147
-
148
-
149
-
150
-
151
-
152
-
153
-
154
-
155
-
156
-
157
-
158
-
159
-
160
-
161
-
162
-
163
-
164
-
165
-
166
-
167
-
168
-
169
-
170
-
171
-
172
-
173
-
174
-
175
-
176
 |
 |

8-13
8
To install the panel
1. Place the panel in the original position, and
then install the quick fastener screws.
2.
Place the carrier in the original position, and
then install the carrier bolts under the fenders.
3.
Install the carrier top bolts, and then tighten all
bolts to the specified torques.
Panel E
To remove the panel
Remove the bolts, and then take the panel off.
To install the panel
Place the panel in the original position and install
the bolts.
Panel F
To remove the panel
Pull outward on the areas shown.
1.
Quick fastener screw
2.
Panel C
Tightening torques:
Carrier bolt (top):
34 Nm (3.4 m·kgf, 24 ft·lbf)
Carrier bolt (under fenders):
7 Nm (0.7 m·kgf, 5.1 ft·lbf)
1.
Panel E
2. Bolt