2007 Yamaha Motorsports Apex RTX Owners Manual - Page 60
2007 Yamaha Motorsports Apex RTX Manual

Page 60 highlights
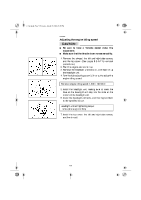
E_8gt.book Page 10 Tuesday, March 28, 2006 5:37 PM ESU04530 Adjusting the throttle cable 1. Remove the shroud. (See pages 8-5-8-7 for removal procedures.) 2. Remove the headlight unit bolts and the two top cover bolts near the headlight unit. 3. Disconnect the speedometer coupler and headlight couplers, and then remove the headlight unit. 4. Loosen the locknut. 5. Turn the adjuster in or out until the proper throttle lever free play is achieved. Throttle lever free play a: 2.0-3.0 mm (0.08-0.12 in) 1 Headlight unit bolt 2 Locknut 3 Adjuster 6. Tighten the locknut. 7. Connect the speedometer coupler and headlight couplers, and then install the headlight unit, making sure to insert the tabs on the headlight unit stay into the slots on the bottom of the headlight unit. 8. Install the headlight unit bolts, and then tighten them to the specified torque. Headlight unit bolt tightening torque: 3 Nm (0.3 m·kgf, 2.2 ft·lb) 9. Install the top cover bolts. 10. Install the shroud. 8-10
-
 1
1 -
2
-
3
-
4
-
5
-
6
-
7
-
8
-
9
-
10
-
11
-
12
-
13
-
14
-
15
-
16
-
17
-
18
-
19
-
20
-
21
-
22
-
23
-
24
-
25
-
26
-
27
-
28
-
29
-
30
-
31
-
32
-
33
-
34
-
35
-
36
-
37
-
38
-
39
-
40
-
41
-
42
-
43
-
44
-
45
-
46
-
47
-
48
-
49
-
50
-
51
-
52
-
53
-
54
-
 55
55 -
 56
56 -
 57
57 -
 58
58 -
 59
59 -
 60
60 -
 61
61 -
 62
62 -
 63
63 -
 64
64 -
 65
65 -
66
-
67
-
68
-
69
-
70
-
71
-
72
-
73
-
74
-
75
-
76
-
77
-
78
-
79
-
80
-
81
-
82
-
83
-
84
-
85
-
86
-
87
-
88
-
89
-
90
-
91
-
92
-
93
-
94
-
95
-
96
-
97
-
98
-
99
-
100
 |
 |