2005 Yamaha Motorsports SXVenom Owners Manual - Page 63
2005 Yamaha Motorsports SXVenom Manual

Page 63 highlights
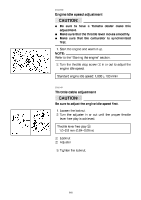
Main jet replacement Replace the main jet according to the setting chart which is available at a Yamaha dealer. WARNING @ G G G @ Never remove the drain plug or the float chamber while the engine is hot. Fuel will flow out from the float chamber which could ignite and cause injury. Place a rag under the carburetor before removing the drain plug or float chamber to catch any spilled fuel. Handle fuel with care: it is HIGHLY FLAMMABLE. Standard main jet: 1 No.1 Carburetor (P.T.O. side) # 138.8 2, 3 No.2 and No.3 Carburetors (center and magneto side) # 136.3 CD-04E Main jet 4 Mixture Lean Rich Condition Warm weather High altitude Cold weather Low altitude Small No. Large No. 1. Loosen the carburetor clamps and remove the carburetor. 2. Pinch the fuel hose to prevent fuel flowing. 3. Remove the drain plug and install the proper main jet. 4. Assemble by reversing the removal steps. WARNING @ Make sure that the throttle outer cable is firmly seated in the holder and throttle operates smoothly after assembling the carburetor. @ 8-9
-
 1
1 -
2
-
3
-
4
-
5
-
6
-
7
-
8
-
9
-
10
-
11
-
12
-
13
-
14
-
15
-
16
-
17
-
18
-
19
-
20
-
21
-
22
-
23
-
24
-
25
-
26
-
27
-
28
-
29
-
30
-
31
-
32
-
33
-
34
-
35
-
36
-
37
-
38
-
39
-
40
-
41
-
42
-
43
-
44
-
45
-
46
-
47
-
48
-
49
-
50
-
51
-
52
-
53
-
54
-
55
-
56
-
57
-
 58
58 -
 59
59 -
 60
60 -
 61
61 -
 62
62 -
 63
63 -
 64
64 -
 65
65 -
 66
66 -
 67
67 -
 68
68 -
69
-
70
-
71
-
72
-
73
-
74
-
75
-
76
-
77
-
78
-
79
-
80
-
81
-
82
-
83
-
84
-
85
-
86
-
87
-
88
-
89
-
90
-
91
-
92
-
93
-
94
 |
 |
