2003 Yamaha Motorsports V Star Custom Owners Manual - Page 90
2003 Yamaha Motorsports V Star Custom Manual

Page 90 highlights
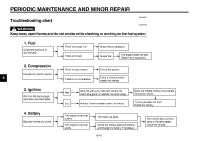
PERIODIC MAINTENANCE AND MINOR REPAIR 5. Tighten the wheel axle and front wheel axle pinch bolt to the specified torques, and then install the rubber cap. Tightening torques: Wheel axle: 59 Nm (5.9 m·kgf, 43 ft·lbf) Front wheel axle pinch bolt: 20 Nm (2.0 m·kgf, 14 ft·lbf) 6. While applying the front brake, push down hard on the handlebars several times to check if the front fork compresses and rebounds smoothly. 7. Connect the speedometer cable. 1. Axle nut EAU01350 Rear wheel To remove the rear wheel EW000122 1. 2. 3. 4. 5. 6. Brake pedal free play adjusting nut Brake camshaft lever Brake rod Bolt (shoe plate) Brake torque rod Bolt (swingarm) @ WARNING G It is advisable to have a Yamaha dealer service the wheel. G Securely support the motorcycle so that there is no danger of it falling over. 1. Loosen the axle nut. @ 2. Disconnect the brake torque rod from the brake shoe plate by removing the bolt. 3. Loosen the brake torque rod bolt at the swingarm. 4. Remove the brake pedal free play adjusting nut, and then disconnect the brake rod from the brake camshaft lever. 5. Remove panel A. (See page 6-8 for panel removal and installation procedures.) 6 6-38
-
 1
1 -
2
-
3
-
4
-
5
-
6
-
7
-
8
-
9
-
10
-
11
-
12
-
13
-
14
-
15
-
16
-
17
-
18
-
19
-
20
-
21
-
22
-
23
-
24
-
25
-
26
-
27
-
28
-
29
-
30
-
31
-
32
-
33
-
34
-
35
-
36
-
37
-
38
-
39
-
40
-
41
-
42
-
43
-
44
-
45
-
46
-
47
-
48
-
49
-
50
-
51
-
52
-
53
-
54
-
55
-
56
-
57
-
58
-
59
-
60
-
61
-
62
-
63
-
64
-
65
-
66
-
67
-
68
-
69
-
70
-
71
-
72
-
73
-
74
-
75
-
76
-
77
-
78
-
79
-
80
-
81
-
82
-
83
-
84
-
 85
85 -
 86
86 -
 87
87 -
 88
88 -
 89
89 -
 90
90 -
 91
91 -
 92
92 -
 93
93 -
 94
94 -
 95
95 -
96
-
97
-
98
-
99
-
100
-
101
-
102
-
103
-
104
-
105
-
106
-
107
-
108
-
109
-
110
-
111
-
112
-
113
-
114
-
115
-
116
-
117
-
118
-
119
 |
 |
