Marantz ST-17 ST-17 User Manual - Page 7
Equipment Front Panel, Connections And Controls, Operation On The Main Unit - reference am fm stereo tuner
 |
View all Marantz ST-17 manuals
Add to My Manuals
Save this manual to your list of manuals |
Page 7 highlights
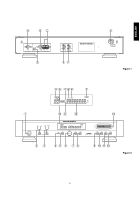
FRANÇAIS ENGLISH EQUIPMENT FRONT PANEL CONNECTIONS AND CONTROLS (Figure 2) q POWER SWITCH Press to switch the power ON. Press again to switch to power OFF. The mains switch is secondary connected and does not disconnect the entire set from the mains. w ANTENNA BUTTON This button is only operable when the FM band is selected. This button selects FM ANTENNA A and FM ANTENNA B. The selected side's LED will light. e IF BAND BUTTON This button is only operable when the FM band is selected. This button selects the IF band's WIDE or NARROW setting. The selected side's LED will light. WIDE: High quality audio can be listened to. NARROW: Ability to select neighboring stations is improved. r IR SENSOR Receives the infrared remote control signal. t MONO BUTTON Press to switch the receiving mode between the auto stereo mode and more mode. When the button is pressed into the in position, the receiving mode becomes the mono mode. When the button is pressed again, the receiving mode becomes the auto stereo mode. y BAND BUTTON Use this button to select FM or AM wave bands. u MEMO BUTTON Press to preset a receiving frequency in the memory. The MEMORY indicator lights up for about 5 seconds when this button is pressed. It is only during this period that a frequency can be preset in the memory. i DISPLAY BUTTON When this button is pressed while a station name is being displayed, the display is switched to the frequency display. Pressing the button again returns to the station name display; if no station name has been stored for the station being received. "NO NAME" is displayed when the button is pressed. o ST-NAME BUTTON Press before manual input of station name. For details, refer to "NANUAL INPUT OF STATION NAMES". !0 PRESET BUTTON For switching the GYRO CONTROL ring to the preset mode. !1 TUNING BUTTON For switching the GYRO CONTROL ring to the tuning mode. !2 AUTO BUTTON For switching the GYRO CONTROL ring to the auto tuning mode. !3 GYRO CONTROL RING Used for dialing control of tuning up/down, preset up/down, station name character display and PTY selection. !4 DISPLAY å MEMORY - This indicator lights up for about 5 seconds after the MEMO button has been pressed. ∫ PRESET - This indicator lights up when the PRESET button is pressed. ç STEREO - This indicator lights up when an FM stereo broadcast is being received. ∂ AUTO TUNING - This indicator lights up when the AUTO TUNING mode. é TUNING - This indicator lights up when the MANUAL TUNING mode. ƒ TUNED - This indicator lights up when a station is tuned. © FREQUENCY/STATION NAME - This indicator shows frequencies in MHz (FM) or kHz (AM), (RDS) station name, radio text or names you have assigned. ˙ MONO - This indicator lights up in the MONO mode, which is initiated when the MONO button is pressed. OPERATION ON THE MAIN UNIT SWITCHING ON AND OFF ¼ When you want to switch you tuner on, press the POWER button. ¼ When you wish to switch the unit off, simply press the POWER button again. SELECTING THE WAVE BAND ¼ Select the desired wave band (FM, AM) by pressing the BAND button. Pressing this button switches to the next wave band in the following order: FM - AM - FM. The display shows the selected band. AUTO TUNING This method can be used in areas where the signal strengths of the broadcast atations are normal. 1. Confirm that the "AUTO" and "TUNING" indicators are lit on the display. If not lit, turn the indicators on by pressing the TUNING button and AUTO button. 2. Gently move the GYRO CONTROL ring. The received frequency will automatically change and tuning will stop when a station is received. 3. Repeat moving the GYRO CONTROL ring gently until the desired station is received. NOTE: While the GYRO CONTROL ring is being turned, even if a station is tuned in, it will not be stopped at. MANUAL TUNING This method can be used in areas where the signal strengths of the broadcast atations are normal. 1. Confirm that the "TUNING" indicator is lit on the display. If not lit, turn the indicator on by pressing the TUNING button. 2. If "AUTO" is lit on the display, press the AUTO button to turn it off. 3. Turn the GYRO CONTROL ring until the frequency you want is received. The speed of received frequency display corresponds to the speed that you turn the ring. Also, received frequencies will change at 100kHz steps for FM and 9kHz steps for AM. PRESET TUNING Use the following procedure to recall a preset station directory from the preset memory. 1. Ensure that the PRESET indicator is lit in the display. If nor, press the PRESET button to light it.. 2. Rotate the GYRO CONTROL ring to select the desired preset station. PRESET MEMORY ON THE MAIN UNIT This unit is equipped with the one-touch preset tuning system which is particularly convenient when there is a large number of receivable stations. The preset tuning system allows up to 60 stations on FM and AM to be preset in a random order. 5
-
 1
1 -
 2
2 -
 3
3 -
 4
4 -
 5
5 -
 6
6 -
 7
7 -
 8
8 -
 9
9 -
 10
10 -
 11
11 -
 12
12 -
13
-
14
-
15
 |
 |
