Bose Acoustimass SE-5 Owner's guide - Page 4
Checking, System, Using
 |
View all Bose Acoustimass SE-5 manuals
Add to My Manuals
Save this manual to your list of manuals |
Page 4 highlights
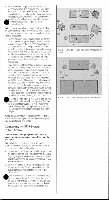
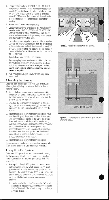
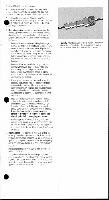
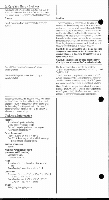
D. Locate the terminals marked "OUTPUTS TO STEREO TARGETING',' ARRAYS' on the rear of the Acoustimass module(Figure 4). Connect the other end of wires from the left Stereo Targeting array to the pair of terminals marked "L" Make sure that the lead with the red marker is connected to the "+", and the other lead to the " -" terminal. E. Repeat steps C and D for the right array F. Locate the 1St channel terminals on the Aceustimass4 module marked "INPUTS FROM AMP OR RECEIVER!' Depress the red ("+1tab, insert the lead with the red marker, and release the tab. Repeal the process for the black terminal and the other lead. G Locate the speaker outputs on your amplifier or receive( Connect the other ends of the wire from the left channel of the Acoustimass module to the terminals marked "L" or "LEFT' Make sure that the lead with the red marker is connected to the "+" and the other lead is connected to the " -" terminal. H. Repeat steps F and G for the right channel. I. Before you plug in your receiver or amplifier, make sure That no strands of wire from any terminal are brushing against any other terminal. Such "bridged" wires create short circuits which can damage your receiver or amplifer. J. Plug in your receiver, turn on your system, and enjoy your music! Checking the System Once you have begun listening to your SE•5 system, the following test will help you make sure that the system is working properly: A. Turn the balance control on your receiver or amplifier completely to the left. II you have connected the Stereo Targeting arrays properly, you will hear music from the left array, but not the right one. B. Next, turn the balance control completely to the right. If your system is connected properly, you will now hear music from the right Stereo Targeting array, but not the left one. C. Return the balance control to the center position. Playa selection with good, deep bass, and listen to the music. Nov% turn the balance control all the way to the left and listen, and then turn the balance all the way to the right and listen. If the system is connected properly, the center position should exhibit the same or greater bass response than either the left•only or right-only position. If it exhibits less, then your speakers are wired out 01 phase. Check to make sure that your receiver Of amp is properly connected to the module. D. Return the balance control to the center position. If your system does not appear to be working properly, refer to the Section entitled "In Case ThuHave a Problem!' Using the SE-5 System Once your SE-S system is set up and connected properly, it will require very Mlle attention. However, observing the following guidelines will help you get the most from your investment. A. Fusing-Vbur Bose SE-5 system incorporates automatic protection circuitry, which guards against most typesof electrical stress.Hoe/ever,any speaker can be damaged if the amphlier driving it should fail. Fusing will provide additional protection from amplifier failure, and is not required but is recommended for maximum protection. 1. Insert a fuse holder "intine" between the "+" terminal of the left input on the Acoustimasse module and the ' + " terminal of the left output on your receiver or amplifier (Figure 5). 'T L Figure 3. Properly connecting wires to a terminal. STEREO TARGETING,' ARRAYS L L I •I I I 'CCUST V AMPLIFIER OR RECEIVER Figure 4. Connecting lho comxnents at the system to your ampidies a reCeisier
-
 1
1 -
 2
2 -
 3
3 -
 4
4 -
 5
5 -
 6
6 -
 7
7 -
 8
8
 |
 |
