Yamaha PSR-8000 Owner's Manual - Page 90
Sampling & File Import, Sampling New Material
 |
View all Yamaha PSR-8000 manuals
Add to My Manuals
Save this manual to your list of manuals |
Page 90 highlights
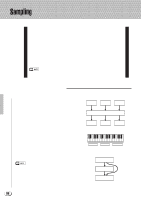
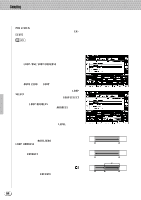
,,QQ,,QQ,,QQSampli,,QQng ,,QQ,,QQ,,QQ,,QQ,,QQ,,QQ,,QQ,,QQ,,QQ,,QQ,,QQ,,QQ,,QQ,,QQ Sampling & File Import To sample new material or import waves from disk, go to the SAMPLING/FILE IMPORT display by first pressing the panel [SAMPLING] button, and then the SAMPLING/FILE IMPORT LCD button which appears in the SAMPLING MENU. OVERALL/UTILITY VOICE STYLE CREATOR CREATOR FUNCTION SONG/M.PAD RECORDING SAMPLING DISK s Sampling New Material After making sure that your source is properly connected and the input level is set (see "Setting Up for Sampling", above), set the AUTO TRIGGER LEVEL if necessary (below), set up any PRE EFFECTs you want to use (below), and press the START LCD button. "WAITING" will appear above the AUTO TRIGGER LEVEL parameter, and the START LCD button will change to "STOP". Play your source and sampling will begin automatically as soon as a signal which exceeds the AUTO TRIGGER LEVEL is detected. Press the STOP LCD button to stop sample recording (sampling will continue, using up sample memory as it goes, until the STOP LCD button is pressed). Sampling will stop automatically when the available wave memory is full, so be sure to press STOP as soon as the sound you want to sample is recorded, otherwise you'll end up sampling unwanted silence (which can be edited out later). The amount of remaining sampling time will appear in the upper right corner of the display (this will depend on the total size of the samples currently in the wave memory, and the amount of wave memory available). • Prior to actually starting sample recording, the AUTO TRIGGER LEVEL display can be used as a "level meter" to check that the source level is higher than the set trigger level. • The PSR-8000 records at a sample rate of 44.1 kHz. • Although the wave memory of the PSR-8000 can be expanded to 33 megabytes (page 152), the maximum size of a single sample recording is 32 megabytes. 90
-
 1
1 -
2
-
3
-
4
-
5
-
6
-
7
-
8
-
9
-
10
-
11
-
12
-
13
-
14
-
15
-
16
-
17
-
18
-
19
-
20
-
21
-
22
-
23
-
24
-
25
-
26
-
27
-
28
-
29
-
30
-
31
-
32
-
33
-
34
-
35
-
36
-
37
-
38
-
39
-
40
-
41
-
42
-
43
-
44
-
45
-
46
-
47
-
48
-
49
-
50
-
51
-
52
-
53
-
54
-
55
-
56
-
57
-
58
-
59
-
60
-
61
-
62
-
63
-
64
-
65
-
66
-
67
-
68
-
69
-
70
-
71
-
72
-
73
-
74
-
75
-
76
-
77
-
78
-
79
-
80
-
81
-
82
-
83
-
84
-
 85
85 -
 86
86 -
 87
87 -
 88
88 -
 89
89 -
 90
90 -
 91
91 -
 92
92 -
 93
93 -
 94
94 -
 95
95 -
96
-
97
-
98
-
99
-
100
-
101
-
102
-
103
-
104
-
105
-
106
-
107
-
108
-
109
-
110
-
111
-
112
-
113
-
114
-
115
-
116
-
117
-
118
-
119
-
120
-
121
-
122
-
123
-
124
-
125
-
126
-
127
-
128
-
129
-
130
-
131
-
132
-
133
-
134
-
135
-
136
-
137
-
138
-
139
-
140
-
141
-
142
-
143
-
144
-
145
-
146
-
147
-
148
-
149
-
150
-
151
-
152
-
153
-
154
-
155
-
156
-
157
-
158
-
159
-
160
-
161
-
162
-
163
-
164
-
165
-
166
-
167
-
168
-
169
-
170
-
171
-
172
-
173
-
174
-
175
-
176
-
177
-
178
-
179
-
180
-
181
-
182
-
183
-
184
-
185
-
186
-
187
-
188
-
189
-
190
-
191
-
192
-
193
-
194
-
195
-
196
-
197
-
198
-
199
-
200
-
201
-
202
-
203
-
204
-
205
-
206
 |
 |
