Xerox 6110N User Guide - Page 11
Setting Up Your Printer, Unpacking - toner pack
 |
UPC - 095205427981
View all Xerox 6110N manuals
Add to My Manuals
Save this manual to your list of manuals |
Page 11 highlights
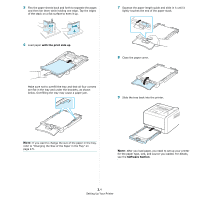
2 Setting Up Your Printer This chapter gives you step-by-step instructions for setting up your printer. This chapter includes: • Unpacking • Installing the Toner Cartridges • Loading Paper • Connecting a Printer Cable • Turning the Printer On • Printing a Demo Page • Installing the Printer Software Unpacking 1 Remove the printer and all of the accessories from the packing carton. Make sure that the printer has been packed with the following items: Toner Cartridges Power Cord CAUTION: Because your printer weighs 13.6 kg including the toner cartridges and the tray, it may move when you use it; for example, when opening/closing the tray or installing/removing the toner cartridge. Be careful not to move the printer. 2 Remove the packing tape in front of the tray and pull the tray out. Remove the packing tape and paper cushion from the tray. 3 Select a location for the printer: • Leave enough room to open the tray and covers, and to allow for proper ventilation. • Provide the proper environment: - A firm, level surface - Away from the direct airflow of air conditioners, heaters, or ventilators - Free of temperature, sunlight, and humidity extremes or fluctuations - Clean, dry, and free of dust Printer software CD Quick Install Guide NOTES: • If any items are missing or damaged, notify your dealer immediately. • Components may differ from one country to another. • The Printer Driver CD contains the printer driver, the SetIP, the User's Guide, and the Adobe Acrobat Reader program. • The appearance of the power cord may differ depending on your country's specifications. The power cord must be plugged into a grounded power socket. CAUTION: You must place your printer on a level surface. If you do not, print quality problems can occur. 2.1 Setting Up Your Printer
-
 1
1 -
2
-
3
-
4
-
5
-
 6
6 -
 7
7 -
 8
8 -
 9
9 -
 10
10 -
 11
11 -
 12
12 -
 13
13 -
 14
14 -
 15
15 -
 16
16 -
17
-
18
-
19
-
20
-
21
-
22
-
23
-
24
-
25
-
26
-
27
-
28
-
29
-
30
-
31
-
32
-
33
-
34
-
35
-
36
-
37
-
38
-
39
-
40
-
41
-
42
-
43
-
44
-
45
-
46
-
47
-
48
-
49
-
50
-
51
-
52
-
53
-
54
-
55
-
56
-
57
-
58
-
59
-
60
-
61
-
62
-
63
-
64
-
65
-
66
-
67
-
68
-
69
-
70
-
71
-
72
-
73
-
74
-
75
-
76
 |
 |
