Whirlpool WRF535SMHZ Use & Care Guide - Page 4
Warning
 |
View all Whirlpool WRF535SMHZ manuals
Add to My Manuals
Save this manual to your list of manuals |
Page 4 highlights
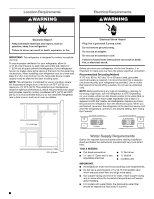
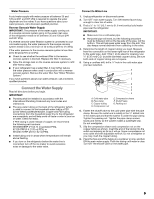
Location Requirements WARNING Electrical Requirements WARNING Explosion Hazard Keep flammable materials and vapors, such as gasoline, away from refrigerator. Failure to do so can result in death, explosion, or fire. IMPORTANT: This refrigerator is designed for indoor, household use only. To ensure proper ventilation for your refrigerator, allow for ¹⁄₂" (1.25 cm) of space on each side and at the top. Allow for 1" (2.54 cm) of space behind the refrigerator. If your refrigerator has an ice maker, allow extra space at the back for the water line connections. When installing your refrigerator next to a fixed wall, leave 2¹⁄₂" (6.3 cm) minimum on the hinge side (some models require more) to allow for the door to swing open. NOTE: This refrigerator is intended for use in a location where the temperature ranges from a minimum of 55°F (13°C) to a maximum of 110°F (43°C). The preferred room temperature range for optimum performance, which reduces electricity usage and provides superior cooling, is between 60°F (15°C) and 90°F (32°C). It is recommended that you do not install the refrigerator near a heat source, such as an oven or radiator. Electrical Shock Hazard Plug into a grounded 3 prong outlet. Do not remove ground prong. Do not use an adapter. Do not use an extension cord. Failure to follow these instructions can result in death, fire, or electrical shock. Before you move your refrigerator into its final location, it is important to make sure you have the proper electrical connection. Recommended Grounding Method A 115 volt, 60 Hz, AC only 15- or 20-amp fused, grounded electrical supply is required. It is recommended that a separate circuit serving only your refrigerator be provided. Use an outlet that cannot be turned off by a switch. Do not use an extension cord. NOTE: Before performing any type of installation, cleaning, or removing a light bulb, turn the refrigerator to OFF. Depending on your model, either turn the freezer control to the word OFF, or press the Minus sign touch pads repeatedly until a dash (-) appears in both the Freezer and Refrigerator displays as shown. Disconnect the refrigerator from the electrical source. When you are finished, reconnect the refrigerator to the electrical source and reset the temperature controls to the desired setting. See "Using the Controls." ¹⁄₂" (1.25 cm) 2¹⁄₂" (6.3 cm) 4 Water Supply Requirements Gather the required tools and parts before starting installation. Read and follow the instructions provided with any tools listed here. TOOLS NEEDED: ■ Flat-blade screwdriver and ¹⁄₂" Open-end or two adjustable wrenches Nut driver Drill bit ■ Cordless drill IMPORTANT: ■ All installations must meet local plumbing code requirements. ■ Do not use a piercing-type or 4.76 mm) saddle valve which reduces water flow and clogs more easily. ■ Use copper tubing and check for leaks. Install copper tubing only in areas where the household temperatures will remain above freezing. ■ For models with water filters, the disposable water filter should be replaced at least every 6 months.
-
 1
1 -
 2
2 -
 3
3 -
 4
4 -
 5
5 -
 6
6 -
 7
7 -
 8
8 -
 9
9 -
 10
10 -
11
-
12
-
13
-
14
-
15
-
16
-
17
-
18
-
19
-
20
-
21
-
22
-
23
-
24
-
25
-
26
-
27
-
28
-
29
-
30
-
31
-
32
-
33
-
34
-
35
-
36
-
37
-
38
-
39
-
40
-
41
-
42
-
43
-
44
-
45
-
46
-
47
-
48
 |
 |
