Western Digital My Net AC1300 User Manual - Page 28
To connect a device that is not WPS enabled, Click here
 |
View all Western Digital My Net AC1300 manuals
Add to My Manuals
Save this manual to your list of manuals |
Page 28 highlights
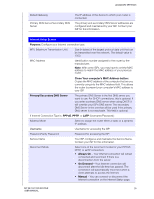
BASIC SETTINGS AND TASKS Note: The label on the bottom of the router also displays the default PIN. You can change the PIN on the Wi-Fi Protected Setup screen. (See "Advanced WAN (Internet) Category" on page 27.) Once you change the PIN, the default value is invalid unless you reset the router or the PIN to default values. 3. Click Next. The first Add a Device screen displays. To connect a device that is not WPS enabled: 1. On the first Add a Device screen (see "Adding a Device" on page 23), click Click here to connect by entering network name and password. 2. Using the values shown on the screen, enter the following into your wireless device's Wi-Fi connection screen as prompted: „ The Wi-Fi network name (SSID) for each wireless network you want to use „ The password for the wireless network you selected 3. Click Close. MY NET AC1300 ROUTER 24 USER MANUAL
-
 1
1 -
2
-
3
-
4
-
5
-
6
-
7
-
8
-
9
-
10
-
11
-
12
-
13
-
14
-
15
-
16
-
17
-
18
-
19
-
20
-
21
-
22
-
 23
23 -
 24
24 -
 25
25 -
 26
26 -
 27
27 -
 28
28 -
 29
29 -
 30
30 -
 31
31 -
 32
32 -
 33
33 -
34
-
35
-
36
-
37
-
38
-
39
-
40
-
41
-
42
-
43
-
44
-
45
-
46
-
47
-
48
-
49
-
50
-
51
-
52
-
53
-
54
-
55
-
56
-
57
-
58
-
59
-
60
-
61
-
62
-
63
-
64
-
65
-
66
-
67
-
68
-
69
-
70
-
71
-
72
-
73
-
74
-
75
-
76
-
77
 |
 |
