URC MRF-260 Owners Manual - Page 6
Installation, adapter into a live AC outlet. Place the MRF-260 in a location - base
 |
View all URC MRF-260 manuals
Add to My Manuals
Save this manual to your list of manuals |
Page 6 highlights
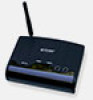
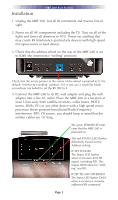
Installation MRF-260 BASE STATION 1. Unplug the MRF-260. Test all IR commands and macros line of sight. 2. Power on all AV components including the TV. Turn on all of the lights and lower all dimmers to 50%. Power on anything that may create RF Interference (particularly devices with high speed microprocessors or hard drives). 3. Check that the address wheel on the rear of the MRF-260 is set to ID#0 (the interference "sniffing" position). Check that the arrow pointer in the center of the wheel is pointed to 0, the default "interference sniffing" position. If it is not, use a small flat blade screwdriver (included) to set the RF ID# to 0. 4. Connect the MRF-260 to its DC wall adapter and plug the wall adapter into a live AC outlet. Place the MRF-260 in a location at least 3 feet away from satellite receivers, cable boxes, HDTV tuners, DVRs, PCs or any other device with a high speed microprocessor (these generate broad band Radio Frequency Interference -RFI). Of course, you should keep in mind that the emitter cables are 10' long. The green POWER LED indicates that the MRF-260 is powered on. The red STATUS LED flashes differently, based on the Address setting: IF SET TO ID#0 The Status LED flashes when it receives ANY RF signal, including RFI. This makes ID#0 ideal for "sniffing" out RFI. IF SET TO ANY OTHER ID# The Status LED flashes ONLY when it receives a correctly addressed RF command. Page 3
-
 1
1 -
 2
2 -
 3
3 -
 4
4 -
 5
5 -
 6
6 -
 7
7 -
 8
8 -
 9
9 -
 10
10 -
 11
11 -
 12
12 -
13
-
14
-
15
-
16
 |
 |
