URC KP-4000C Owners Manual - Page 7
Option 2: PoE Injector, Option 3: No PoE: 12 Volt Power Supply
 |
View all URC KP-4000C manuals
Add to My Manuals
Save this manual to your list of manuals |
Page 7 highlights
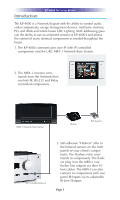
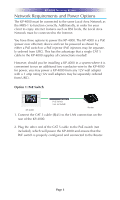
KP-4000 NETWORK KEYPAD Option 2: PoE Injector KP-4000 PoE Injector (not included) Router 1. Connect the CAT 5 cable (RJ45) to the LAN connection on the rear of the KP-4000. 2. Plug the other end of the CAT 5 cable to the PoE Injector which will power the KP-4000. 3. Connect the PoE injector (not included) to the Router. Option 3: No PoE: 12 Volt Power Supply Router KP-4000 Power Supply (not included) 1. Splice a 12V 1Amp Power Adapter (not included) and connect to the rear Power input. 2. For network connections to IP devices, MRX-1 and the internet, connect a CAT 5 cable (RJ-45) to the LAN connection on the rear of the KP-4000 and plug the other end into the Router. Page 4
-
 1
1 -
 2
2 -
 3
3 -
 4
4 -
 5
5 -
 6
6 -
 7
7 -
 8
8 -
 9
9 -
 10
10 -
 11
11 -
 12
12 -
13
-
14
-
15
-
16
-
17
-
18
-
19
-
20
-
21
-
22
-
23
-
24
 |
 |

KP-4000 N
ETWORK
K
EYPAD
Page 4
Option 2: PoE Injector
KP-4000
KP-4000
Router
PoE Injector
(not included)
Power Supply
(not included)
1. Splice a 12V 1Amp Power Adapter (not included) and connect to
the rear Power input.
2. For network connections to IP devices, MRX-1 and the internet,
connect a CAT 5 cable (RJ-45) to the LAN connection on the rear
of the KP-4000 and plug the other end into the Router.
Option 3: No PoE: 12 Volt Power Supply
1. Connect the CAT 5 cable (RJ45) to the LAN connection on the
rear of the KP-4000.
2. Plug the other end of the CAT 5 cable to the PoE Injector which
will power the KP-4000.
3. Connect the PoE injector (not included) to the Router.
Router