Sub-Zero IT-30RID Integrated Installation Guide - Page 9
Water Line, Alignment
 |
View all Sub-Zero IT-30RID manuals
Add to My Manuals
Save this manual to your list of manuals |
Page 9 highlights
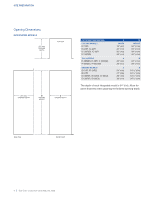
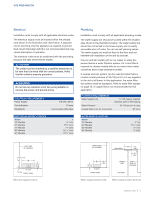
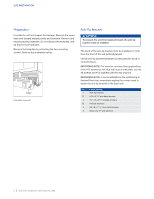
INSTALLATION Alignment DEPTH ADJUSTMENT Adjust the depth of the unit to fit flush with surrounding cabinetry. Follow these steps for a precision fit: 1 Place decorative panel on a protected work surface. Place the panel thickness gauge next to the panel to determine which notch corresponds with the panel thickness. Once the proper notch has been determined, mark that notch with a marker. 2 With the door closed, position the top of the unit using the panel thickness gauge. Insert a #8 x 1/2" stainless steel screw above the hinge, then insert a #8 x 1/2" pan head screw on the handle side of the unit. For narrower units, the door may need to be opened to access the handle side screw location. Repeat the process to align the bottom. Water Line Purge the water line prior to final connection to the unit. This will remove any debris that may be present in the tubing from installing the new water line. Connect the plastic tubing from the unit to the house water supply line with the fitting connection kit provided. Check all water line fittings for leaks. Locate the water line in the notch as shown in the illustration below. IMPORTANT NOTE: If a reverse osmosis system used, it is recommended that the water filtration system be bypassed by removing the filter. IMPORTANT NOTE: Water lines can not be exposed to freezing temperatures. ANCHORING Once the top and bottom are aligned, verify doors and drawers open properly, then install remaining screws in each side trim. SCREW SIDE TRIM CABINETRY FACE FRAME PANEL THICKNESS GAUGE Panel thickness. Unit depth. FRONT OF UNIT NOTCH WATER LINE CONNECTION Water line. subzero.com | 9
-
 1
1 -
2
-
3
-
 4
4 -
 5
5 -
 6
6 -
 7
7 -
 8
8 -
 9
9 -
 10
10 -
 11
11 -
 12
12 -
 13
13 -
 14
14 -
15
-
16
-
17
-
18
-
19
-
20
-
21
-
22
-
23
-
24
-
25
-
26
-
27
-
28
-
29
-
30
-
31
-
32
-
33
-
34
-
35
-
36
-
37
-
38
-
39
-
40
-
41
-
42
-
43
-
44
 |
 |
