Stihl MS 171 User Guide - Page 87
Adjusting the Carburetor, 14.5.1 Basic Setting, against its seat, unscrew
 |
View all Stihl MS 171 manuals
Add to My Manuals
Save this manual to your list of manuals |
Page 87 highlights
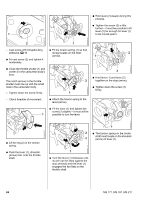
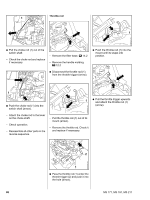
12 a 1 533RA370 TG 533RA371 TG 533RA220 TG : Inspect the tip (arrow) for damage or wear and replace the screw if necessary. - Screw home high speed screw H as far as stop. - Carry out basic setting, b 14.5.1 14.5 Adjusting the Carburetor 14.5.1 Basic Setting The basic setting is necessary only if the high speed screw H or low speed screw L has to be replaced or after cleaning and adjusting the carburetor from scratch. : Screw down the high speed screw H (1) clockwise onto its seat. : With the high speed screw H (1) against its seat, unscrew it one full turn counterclockwise - this is the basic setting. : Screw down the low speed screw L (2) clockwise onto its seat. : With the low speed screw L (2) against its seat, unscrew it one full turn counterclockwise - this is the basic setting. : Do not push on the limiter cap (1) as far as stop against the carburetor body (2) because it will be damaged. Maintain a minimum clearance of "a" = 1 mm (arrow). The high speed screw H now has a limited range. The standard setting is obtained by turning the high speed screw H counterclockwise until it engages in position. - Remove the limiter cap from the high speed screw, b 14.4.9 1 It is necessary to carry out the basic setting after removing the limiter cap. 533RA372 TG Always install a new limiter cap. First position it so that its lug is below the stop (arrow) and then press it onto the high speed screw. : Press the limiter cap (1) onto the high speed screw H. 86 MS 171, MS 181, MS 211
-
 1
1 -
2
-
3
-
4
-
5
-
6
-
7
-
8
-
9
-
10
-
11
-
12
-
13
-
14
-
15
-
16
-
17
-
18
-
19
-
20
-
21
-
22
-
23
-
24
-
25
-
26
-
27
-
28
-
29
-
30
-
31
-
32
-
33
-
34
-
35
-
36
-
37
-
38
-
39
-
40
-
41
-
42
-
43
-
44
-
45
-
46
-
47
-
48
-
49
-
50
-
51
-
52
-
53
-
54
-
55
-
56
-
57
-
58
-
59
-
60
-
61
-
62
-
63
-
64
-
65
-
66
-
67
-
68
-
69
-
70
-
71
-
72
-
73
-
74
-
75
-
76
-
77
-
78
-
79
-
80
-
81
-
 82
82 -
 83
83 -
 84
84 -
 85
85 -
 86
86 -
 87
87 -
 88
88 -
 89
89 -
 90
90 -
 91
91 -
 92
92 -
93
-
94
-
95
-
96
-
97
-
98
-
99
-
100
-
101
-
102
 |
 |
