Sharp XG-P610X XG-P610X Setup Manual - Page 47
Assigning the Projected Image on the Video Wall Setup, Adjusting the Position, Horizontally
 |
View all Sharp XG-P610X manuals
Add to My Manuals
Save this manual to your list of manuals |
Page 47 highlights
Video Wall Projection Adjusting the Position Horizontally and Vertically Click "UP", "DOWN", "LEFT" or "RIGHT" to the position of the projected image. Returning to the Default Video Wall Setup 1 Select "1 X 1" on "Division". 2 Click the assigning button 1. • The video wall setup will return to the default settings. Assigning the Projected Image on the Video Wall Setup Followings are examples for assigning the projected images for the front and rear projections. Front Projection Rear Projection 1 2 3 4 5 6 1 2 7 8 9 3 4 5 6 7 8 9 The numbers of the projector refer to the numbers of the projected positions. 1 2 3 4 5 6 7 8 9 The numbers of the projector refer to the numbers of the projected positions. 1 2 3 4 5 6 7 8 9 -47
-
 1
1 -
2
-
3
-
4
-
5
-
6
-
7
-
8
-
9
-
10
-
11
-
12
-
13
-
14
-
15
-
16
-
17
-
18
-
19
-
20
-
21
-
22
-
23
-
24
-
25
-
26
-
27
-
28
-
29
-
30
-
31
-
32
-
33
-
34
-
35
-
36
-
37
-
38
-
39
-
40
-
41
-
 42
42 -
 43
43 -
 44
44 -
 45
45 -
 46
46 -
 47
47 -
 48
48 -
 49
49 -
 50
50 -
 51
51 -
 52
52 -
53
-
54
-
55
-
56
-
57
-
58
-
59
 |
 |

-47
Video Wall Projection
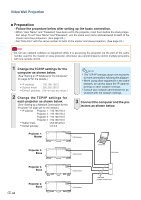
The numbers of the projector refer to the numbers
of the projected positions.
1
2
3
4
5
6
7
8
9
1
2
3
4
5
6
7
8
9
2
The numbers of the projector refer to the numbers
of the projected positions.
1
2
3
4
5
6
7
8
9
1
2
3
4
5
6
7
8
9
Assigning the Projected Image on the Video Wall Setup
Followings are examples for assigning the projected images for the front and rear projections.
Front Projection
Rear Projection
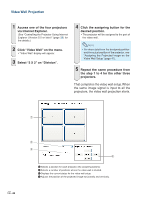
Adjusting the Position
Horizontally and Vertically
Click “UP”,
“DOWN”,
“LEFT” or “RIGHT” to the po-
sition of the projected image.
Returning to the Default
Video Wall Setup
1
Select “1 X 1” on “Division”.
2
Click the assigning button 1.
•
The video wall setup will return to the de-
fault settings.