Sharp XG-MB70XA XG-MB70X Operation Manual - Page 48
Picture Adjustment Picture menu
 |
View all Sharp XG-MB70XA manuals
Add to My Manuals
Save this manual to your list of manuals |
Page 48 highlights
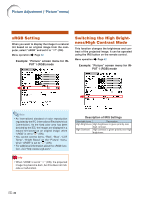
Picture Adjustment ("Picture" menu) You can adjust the projector's picture to your preferences using the "Picture" menu. Selecting the Picture Mode This function allows you to select the picture mode in accordance with brightness of the room or content of the image to be projected. In all picture modes, items on the "Picture" menu can be adjusted and saved. Menu operation Page 42 Example: "Picture" screen menu for INPUT 1 (RGB) mode Adjusting the Image Select a picture mode before adjusting the image. Menu operation Page 40 Example: "Picture" screen menu for INPUT 1 (RGB) mode Description of Picture Modes Selectable items Description Standard For standard image Presentation Brightens darker portions of image for more enhanced presentations. Cinema Gives greater depth to darker portions of image for a more exciting theater experience. Game For natural color gradation for playing a game, etc. Note • You can also press on the remote control to select the picture mode. (See page 35.) -44 Description of Adjustment Items Selectable items Press \ Press | Contrast For less contrast For more contrast Bright For less brightness For more brightness Color*1 For less color intensity For more color intensity Tint*1 For making skin tones purplish For making skin tones greenish Sharp*1 For less sharpness For more sharpness Red*2 For weaker red For stronger red Blue*2 For weaker blue For stronger blue *1 "Color", "Tint" and "Sharp" are not displayed when selecting INPUT 1/INPUT 2 and setting the "Signal Type" to "RGB" or setting the "Signal Type" to "Auto" and the input signal is recognized as an RGB signal. *2 "Red" and "Blue" cannot be adjusted when "sRGB" is set to " " (ON). Note • "Sharp" can be adjusted when 480I, 480P, 540P, 576I, 576P, 720P, 1035I or 1080I signals are detected while "Signal Type" for INPUT 1 or INPUT 2 is set to "Component" or set to "Auto" and the input signal is recognized as a component signal. • To reset all adjustment items, select "Reset" and press .
-
 1
1 -
2
-
3
-
4
-
5
-
6
-
7
-
8
-
9
-
10
-
11
-
12
-
13
-
14
-
15
-
16
-
17
-
18
-
19
-
20
-
21
-
22
-
23
-
24
-
25
-
26
-
27
-
28
-
29
-
30
-
31
-
32
-
33
-
34
-
35
-
36
-
37
-
38
-
39
-
40
-
41
-
42
-
 43
43 -
 44
44 -
 45
45 -
 46
46 -
 47
47 -
 48
48 -
 49
49 -
 50
50 -
 51
51 -
 52
52 -
 53
53 -
54
-
55
-
56
-
57
-
58
-
59
-
60
-
61
-
62
-
63
-
64
-
65
-
66
-
67
-
68
-
69
-
70
-
71
-
72
-
73
-
74
-
75
-
76
-
77
-
78
-
79
-
80
 |
 |
