Sharp PN-U553 Operation Manual - Page 43
■ Lan Setup / Security / General, ■ Snmp, Trap Setting Of Authentication Error
 |
View all Sharp PN-U553 manuals
Add to My Manuals
Save this manual to your list of manuals |
Page 43 highlights
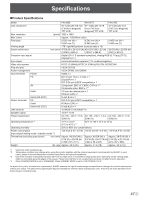
Controlling the Monitor with a PC (LAN) ■ LAN SETUP / SECURITY / GENERAL This screen allows you to set the settings necessary when the monitor is connected to a LAN. ■ SNMP You can configure settings related to SNMP. DHCP CLIENT If your LAN has a DHCP server and you wish to obtain an address automatically, change this setting to ON. To set the address manually, set this to OFF. IP ADDRESS If the DHCP CLIENT is set to OFF, specify an IP address. SUBNET MASK If the DHCP CLIENT is set to OFF, specify the subnet mask. DEFAULT GATEWAY If the DHCP CLIENT is set to OFF, specify the default gateway. If you are not using a default gateway, specify "0.0.0.0". USER NAME / PASSWORD / Confirm PASSWORD Sets up a user name and password to restrict access to this monitor. For confirmation, reenter the password you entered in PASSWORD in Confirm PASSWORD. AUTO LOGOUT TIME Specify the time (in minutes) to elapse before automatically disconnecting this monitor from the network. Specify in minutes from 1 to 65535. A value of '0' will disable this function. DATA PORT Specify the TCP port number to use for exchanging data with the monitor. Specify a value from 1025 to 65535. SEARCH PORT Specify the port number to use when searching for this monitor. Specify a value from 1025 to 65535. SNMP SETTING Set whether to enable or disable SNMP. COMMUNITY NAME 1 to 3 Set the name of the community required for the access. TRAP SETTING Set whether to enable or disable the trap function. When this function is enabled, a trap will be sent when the monitor is turned on. TRAP SETTING OF AUTHENTICATION ERROR Set whether the trap function sends a notification when authentication fails. TRAP ADDRESS & PORT Set the destination address and port number of the notification sent by the trap function. TIPS • After you have changed the settings, click [Apply]. TIPS • After you have changed the settings, click [Apply]. • After you have changed the settings in DATA PORT and SEARCH PORT, click [Reboot]. 43 E
-
 1
1 -
2
-
3
-
4
-
5
-
6
-
7
-
8
-
9
-
10
-
11
-
12
-
13
-
14
-
15
-
16
-
17
-
18
-
19
-
20
-
21
-
22
-
23
-
24
-
25
-
26
-
27
-
28
-
29
-
30
-
31
-
32
-
33
-
34
-
35
-
36
-
37
-
 38
38 -
 39
39 -
 40
40 -
 41
41 -
 42
42 -
 43
43 -
 44
44 -
 45
45 -
 46
46 -
 47
47 -
 48
48 -
49
-
50
-
51
-
52
-
53
-
54
 |
 |
