Sharp PG-M10X PG-M10SU , PG-M10XU Operation Manual - Page 22
Using the Remote Control Input Selection
 |
View all Sharp PG-M10X manuals
Add to My Manuals
Save this manual to your list of manuals |
Page 22 highlights
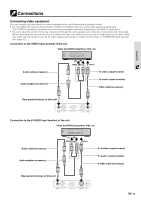
Using the Remote Control (Input Selection) Using the unit (continued) After using the unit 1 Press the POWER ON/OFF button of the remote control or the POWER ON/OFF button of the main unit for a few seconds. The power will turn off and the POWER indicator will blink orange for 1 min., then the standby status will be activated. (The cooling fan will continue to run for a while for cooling purposes.) Do not unplug the power cord while the indicator is blinking. MOUSE ON/OFF VIDEO MENU R-CLICK/EXIT COMPUTER POWER STA ON/OFF Blinks orange (1 min.) ↓ Illuminates orange • The POWER ON/OFF button of the remote control and main unit will not operate until the blinking stops. • After the standby status is activated, wait 1 min. or more before turning the power on again. The power will not turn on until the 1 min. interval has elapsed. • The cooling fan will continue to run even in standby status. 2 Disconnect the power cord. The POWER indicator will turn off. Using the Remote Control (Input Selection) VIDEO button MOUSE ON/OFF VIDEO MENU R-CLICK/EXIT COMPUTER COMPUTER button Operating from the main unit Inputs can be selected not only by operating the remote control but also by using the projector's INPUT SELECT button. POWER STATUS ON/OFF INPUT SELECT AUTO SYNC INPUT SELECT button 1 Press the VIDEO button. The video signal (VIDEO, S-VIDEO) connected to the input terminal of this unit will be detected and projected automatically. If a video signal is not detected, the message NO SIGNAL will be displayed. VIDEO 2 Press the COMPUTER button. The analog RGB signal connected to the input terminal of this unit will be detected and projected automatically. (Component video will be detected if the COMPUTER input terminal is set to "YPBPR" (page 31).) If a video signal is not detected, the message NO SIGNAL will be displayed. COMPUTER Basic Operation All video signals input to this device will be detected if "AUTO SOURCE" is set to "ON" (page 33). 3 Press the INPUT SELECT button. The video signal (RGB or YPBPR, VIDEO, S-VIDEO) connected to the input terminal of this unit will automatically be detected and projected. If a video signal is not detected, the message NO SIGNAL will be displayed. INPUT SELECT The signals are detected repeatedly in the sequence shown below. → RGB/YPBPR S-VIDEO ← VIDEO← When "AUTO SOURCE" is set to "ON" (see page 33), all signals input to this unit will be detected. 20
-
 1
1 -
2
-
3
-
4
-
5
-
6
-
7
-
8
-
9
-
10
-
11
-
12
-
13
-
14
-
15
-
16
-
 17
17 -
 18
18 -
 19
19 -
 20
20 -
 21
21 -
 22
22 -
 23
23 -
 24
24 -
 25
25 -
 26
26 -
 27
27 -
28
-
29
-
30
-
31
-
32
-
33
-
34
-
35
-
36
-
37
-
38
-
39
-
40
-
41
-
42
-
43
-
44
-
45
-
46
-
47
-
48
-
49
 |
 |
