Sharp LC46D65E Operation Manual - Page 36
Connecting a USB device, USB Photo Viewer/Music Player
 |
View all Sharp LC46D65E manuals
Add to My Manuals
Save this manual to your list of manuals |
Page 36 highlights
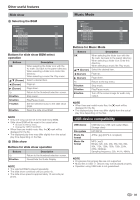
Other useful features Connecting a USB device Connect an USB device to the TV as shown below. Photo Mode Viewing thumbnails Sample • Depending on the USB device, the TV may not be able to recognise the contained data. • Use only alphanumeric characters for naming files. • File names over 80 characters (may vary depending on character set) may not be displayed. • Do not disconnect a USB device or memory card from the TV while transferring files, using the slide show function, when a screen is switching to another or before you exit "USB" from the "INPUT SOURCE" menu. • Do not connect and disconnect a USB device from the TV repeatedly. USB Photo Viewer/Music Player In this mode, you can enjoy viewing photos and listening to music from external USB devices. Select "USB" from the "INPUT SOURCE" menu to enter this mode. INPUT SOURCE TV EXT1 EXT2 EXT3 NOTE • You cannot enter this mode when there EXT4 HDMI1 is no USB device connected to the TV. HDMI2 • This mode is not available during DTV HDMI3 timer recording. EXT8 • "WIDE MODE" is fixed during this USB mode. • "USER (USB)" is the default value for the "AV MODE" setting. Each time you press AV MODE, the mode changes between "USER (USB)", "DYNAMIC (Fixed)", "DYNAMIC" and "STANDARD". Selecting modes and devices Select Mode Photo Mode Music Mode Select USB drive Drive 1 Drive 5 Drive 9 Drive 13 Drive 2 Drive 6 Drive 10 Drive 14 Drive 3 Drive 7 Drive 11 Drive 15 Drive 4 Drive 8 Drive 12 Drive 16 1 Press c/d to select between "Photo Mode" and "Music Mode", and then press OK. 2 Press a/b/c/d to select the drive where you want to find your files, and then press OK. NOTE • You do not need to select the drive in step 2 when there is only one drive in the connected USB device. • 16 is the maximum number of drives that can be displayed. 34 Demo/Demo 01 Demo.jpg 2007:10:18 13:30:00 600KB 1600X1200 Buttons for thumbnail operations Buttons OK a/b/c/d (Cursor) 6 R button G button Y button B button Description When selecting the folder icon with the 6 mark: Go back to the parent directory. When selecting a folder icon: Enter this directory. When selecting a photo thumbnail: Display the photo in full screen. Select a desired item. Return to the top menu. Go back to the previous page. Go to the next page. Select BGM for the slide show. Start the slide show. NOTE • When there are invalid photo files, the g mark will be displayed for the file. • You can see the file name, shooting date, file size and pixel size of the selected photo in the lower-left corner of the screen (shooting date is only available in the EXIF file format). Viewing photos in full screen Buttons for full screen display operation Buttons c/d (Cursor) 6 R button G button B button Description Go to the previous/next photo in the same directory. Return to the thumbnail selection screen. Rotate the photo by 90 degrees to the left. Rotate the photo by 90 degrees to the right. Reveal/hide the Guide Display. NOTE • Rotating photos only applies to the temporarily selected item and this setting is not saved.
-
 1
1 -
2
-
3
-
4
-
5
-
6
-
7
-
8
-
9
-
10
-
11
-
12
-
13
-
14
-
15
-
16
-
17
-
18
-
19
-
20
-
21
-
22
-
23
-
24
-
25
-
26
-
27
-
28
-
29
-
30
-
 31
31 -
 32
32 -
 33
33 -
 34
34 -
 35
35 -
 36
36 -
 37
37 -
 38
38 -
 39
39 -
 40
40 -
 41
41 -
42
-
43
-
44
-
45
-
46
-
47
-
48
 |
 |
