Pyle SLSPT438 Instruction Manual - Page 5
Step 2, Step 3, Step 4, Step 5
 |
View all Pyle SLSPT438 manuals
Add to My Manuals
Save this manual to your list of manuals |
Page 5 highlights
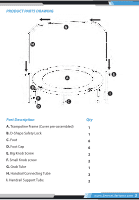
STEP 2: Screw the 6 Foot(C) to the 6 threaded connectors. STEP 3: Place the trampoline in the normal use position. Remove the two Foot Cap (D) from two Foot (C) and these two feet are randomly chosen but there is one foot between these two feet. Slide the Handrail Support Tube (I) onto the two Foot (C), and then press the Foot Cap (D) back on these two Foot (C). Do not tighten the Small Knob Screw (F) until STEP 5. C I F A D STEP 4: Slide both ends of the Grab Tube (G) into the 2 Handrail Connecting Tube (H). Slide the two Handrail Connecting Tube (H) into the Handrail Support Tube (I) and lock in position with the Big Knob Screw (E). STEP 5: Tighten all Big Knob Screw (E) and Small Knob Screw (F). G H E H I E I F www.SereneLifeHome.com 5
-
 1
1 -
 2
2 -
 3
3 -
 4
4 -
 5
5 -
 6
6 -
 7
7 -
 8
8 -
 9
9 -
 10
10 -
 11
11 -
12
-
13
-
14
-
15
-
16
 |
 |

A
I
D
F
C
STEP 2:
Screw the 6 Foot(C) to the 6 threaded connectors.
STEP 3:
Place the trampoline in the normal use position. Remove the two Foot Cap (D) from
two Foot (C) and these two feet are randomly chosen but there is one foot between
these two feet. Slide the Handrail Support Tube (I) onto the two Foot (C), and then
press the Foot Cap (D) back on these two Foot (C). Do not tighten the Small Knob
Screw (F) until STEP 5.
STEP 4:
Slide both ends of the Grab Tube (G) into
the 2 Handrail Connecting Tube (H).
Slide the two Handrail Connecting Tube (H)
into the Handrail Support Tube (I) and
lock in position with the Big Knob Screw (E).
STEP 5:
Tighten all Big Knob Screw (E) and Small
Knob Screw (F).
www.SereneLifeHome.com
5
E
E
I
F
H
I
H
G